Let agents edit Webflow CMS items and pages, read form submissions, upload assets, and publish sites. Connect your own Webflow app in a few minutes.
Overview
Buckle connects AI agents to Webflow. Agents can read and edit CMS content, update pages and components, work with forms and assets, and publish sites. The gateway injects the token into requests to api.webflow.com, so your agent never sees it.To connect, you create a Webflow app in your workspace and paste its Client ID and Client Secret into Buckle. This takes a few minutes, and you need to be an admin of the Webflow workspace. One-click Connect is coming once Webflow approves Buckle’s app.
What you will set up
A Webflow app in your workspace with the required scopes
A Webflow connection that injects the token on requests to api.webflow.com
Per-agent, per-tool access, with approval before publishing
Connect Webflow
1
Create a Webflow app
In Webflow, open your workspace and go to Apps & Integrations > Develop > Create an App. Name it Buckle and add a homepage URL. Leave Restrict App installation to a specific site off, then click Continue.Under building blocks, leave Designer Extension off and turn Data Client on.
2
Add the redirect URI and scopes
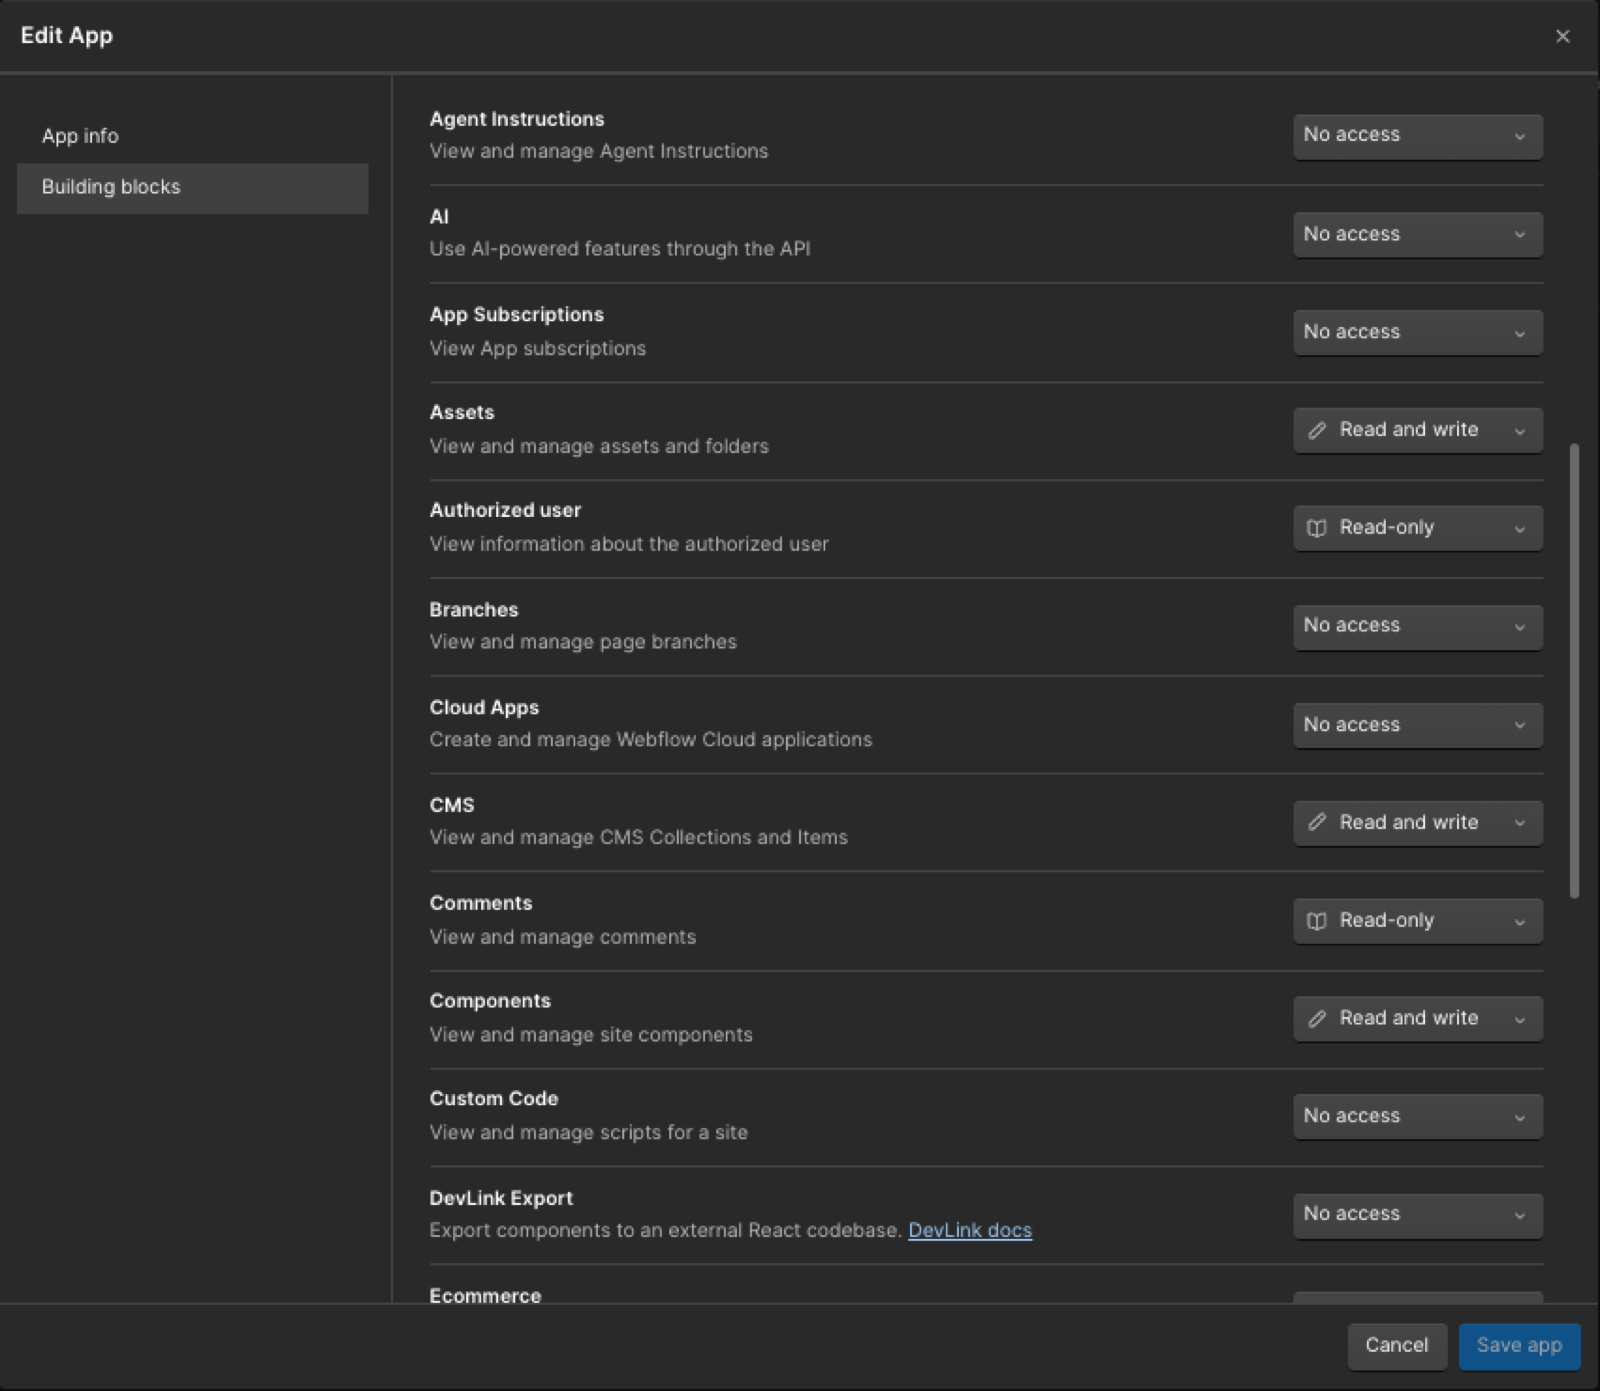
In Buckle, open Settings > Apps > Webflow and click Connect Webflow. The setup dialog shows a Redirect URI. Copy it and paste it into the Redirect URI field in Webflow. On Buckle Cloud it’s https://api.buckle.dev/v1/apps/webflow/callback. Self-hosted Buckle shows its own.Then set these scopes. Buckle requests all of them, and Webflow rejects the connection if the app is missing any one. Leave everything else on No access.
Set each area to Read and write or Read-only as in the table. Leave the rest on No access.
Click Create App.
3
Copy the Client ID and Client Secret
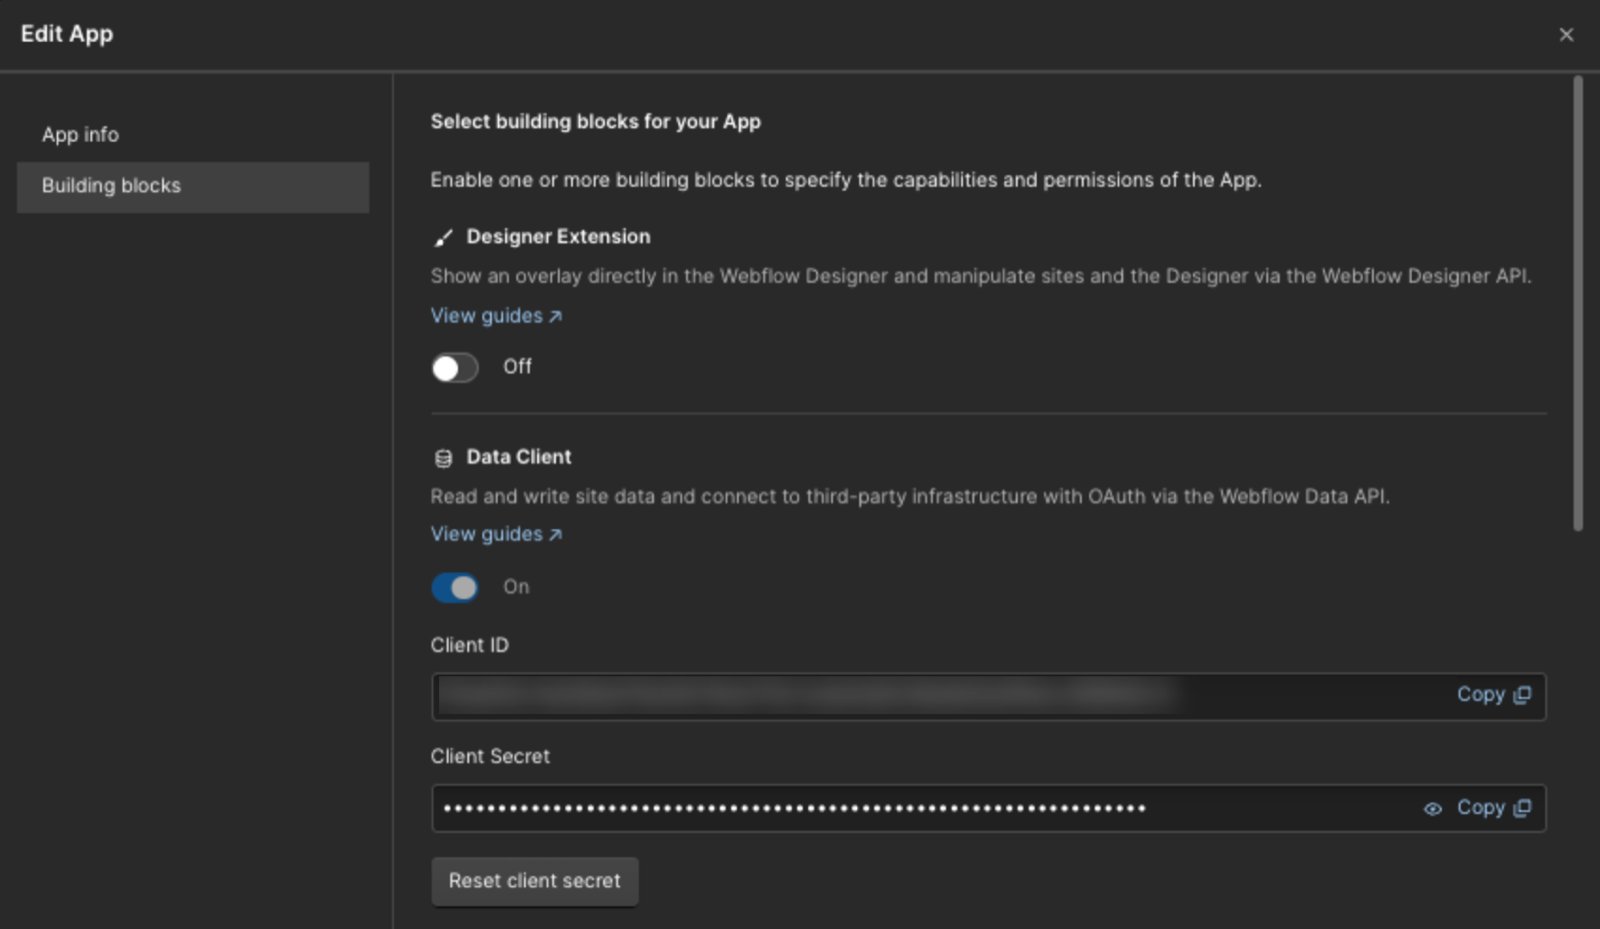
On the app card, click ⋯ > Edit App. The card itself isn’t clickable. Copy the Client ID and Client Secret. Only workspace admins can see the secret.
The Client ID and Client Secret are under Data Client on the Building blocks tab.
4
Connect in Buckle
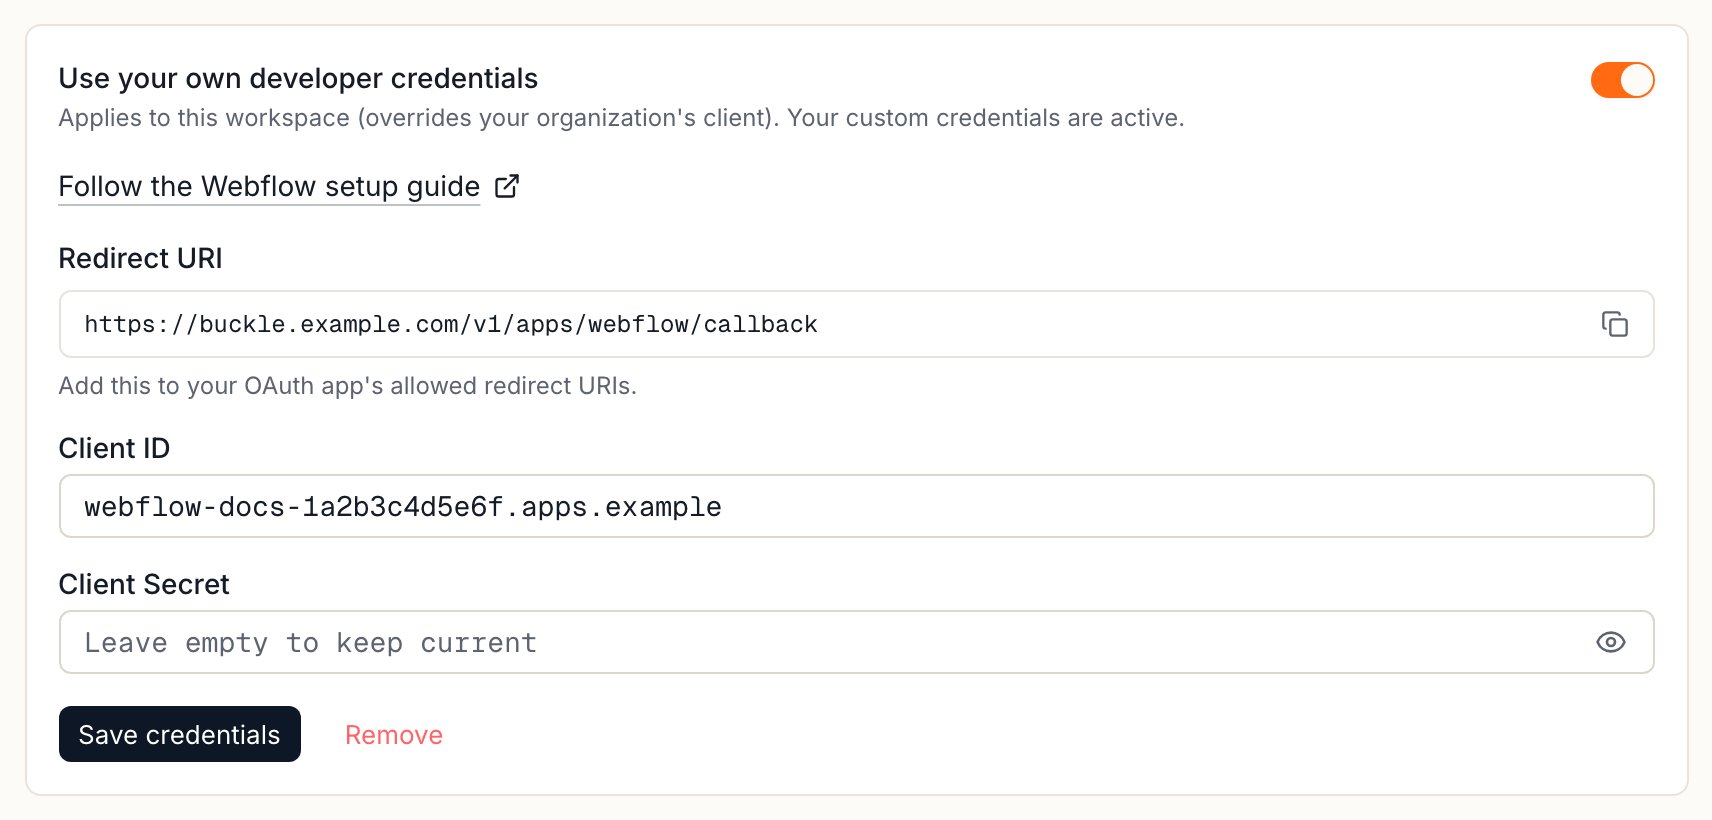
Back in the Buckle setup dialog, paste the Client ID and Client Secret, then click Save & Connect.
The Webflow setup dialog in Buckle. Copy the Redirect URI from here, then paste your Client ID and Client Secret.
5
Authorize in Webflow
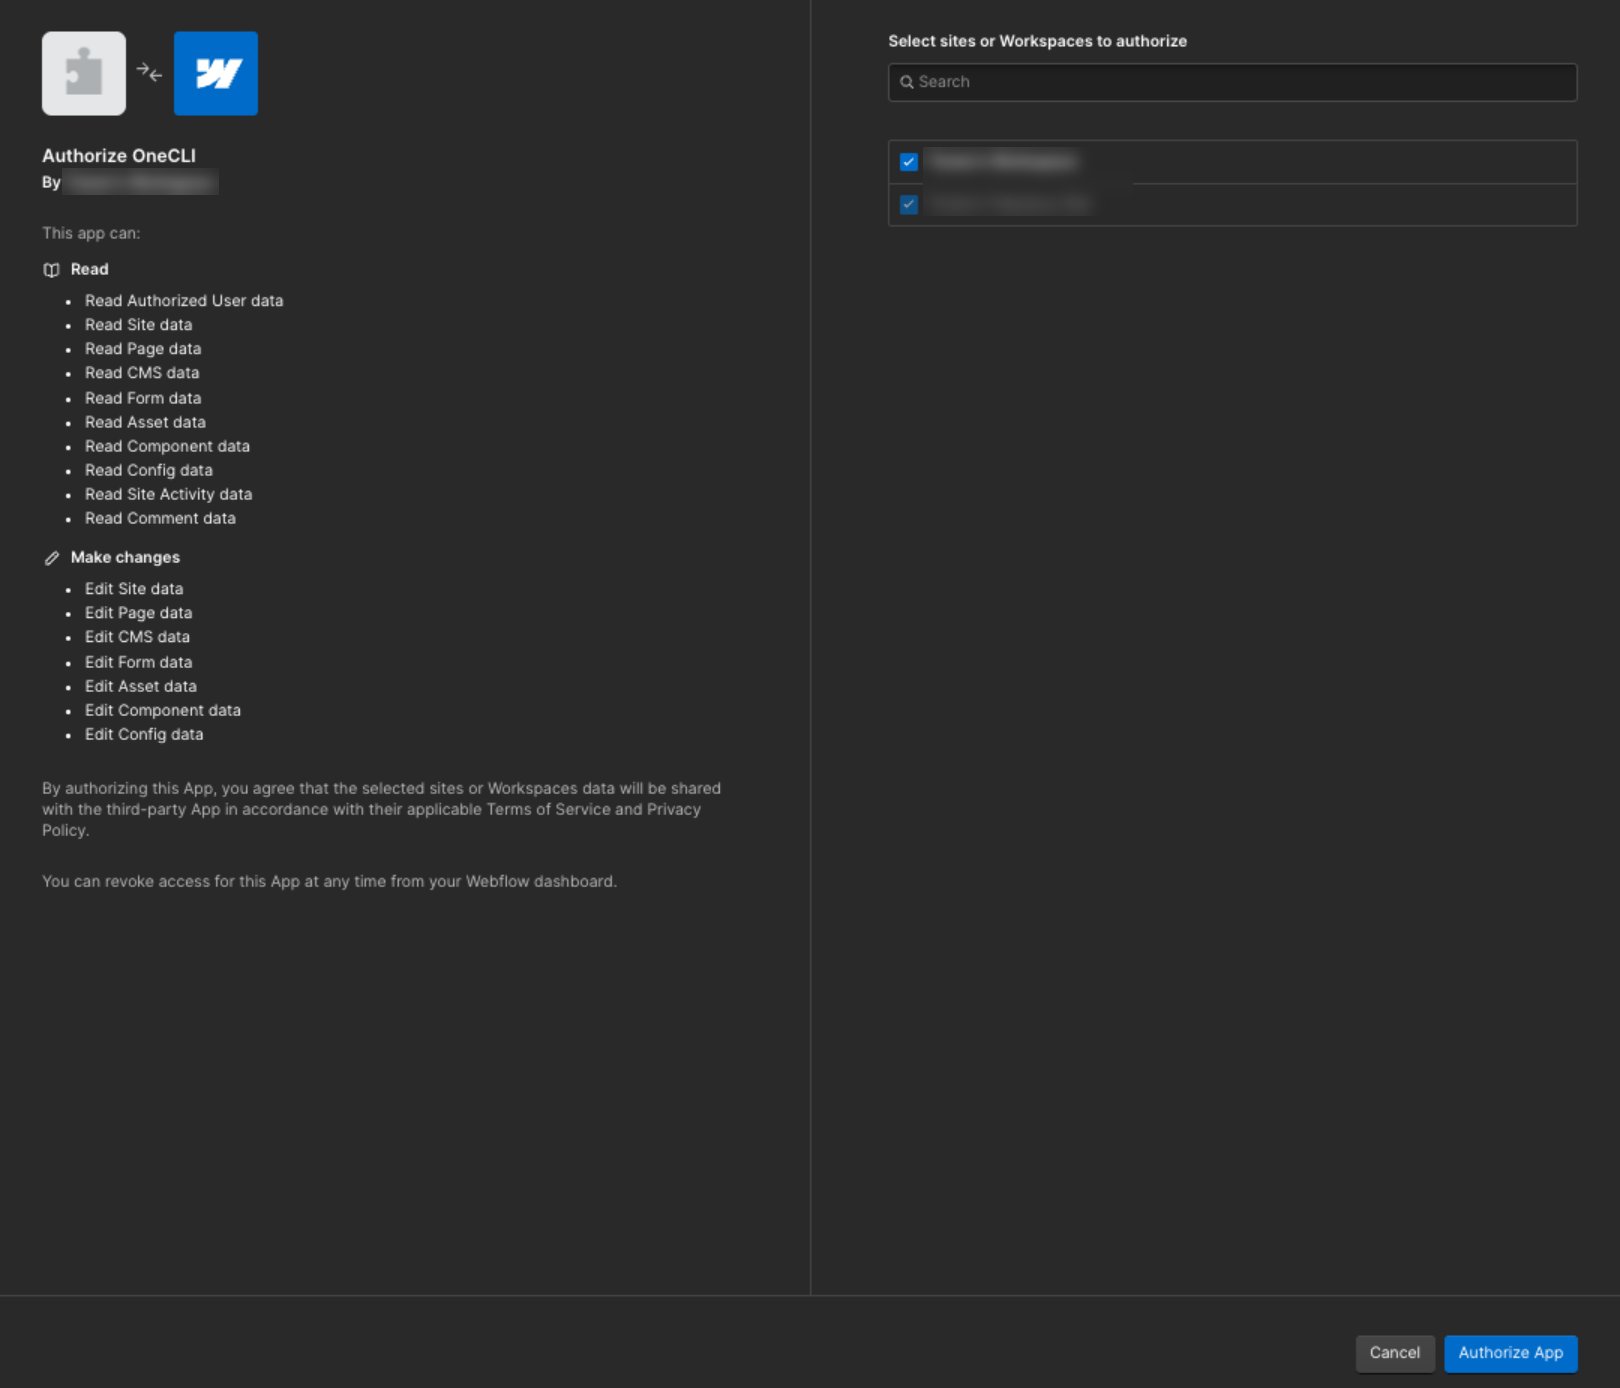
Webflow asks which sites or workspace Buckle can access. Pick them and click Authorize App. The connection shows as Connected with your Webflow email.
Webflow lists the permissions Buckle requests. Pick the sites or workspace your agents need.
Buckle can only reach the sites you pick on the Webflow screen. To add a site later, connect again and select it. Treat the Client Secret like a password.
What agents can do
Area
What agents can do
Sites
List sites, read a site and its domains, publish a site
Pages
List pages, read page settings and content, update SEO settings and static text
Components
List components, read and edit their content and properties
CMS
List and read collections and items, create and edit collections, fields, and items, publish or delete items
Forms
List forms, read submissions, edit or delete a submission
Assets
List and read assets and folders, upload, rename, move, or delete assets
Controlling access
Grant the connection to each agent that needs it, and choose per tool what runs freely, what needs approval, and what’s blocked. For example, let an agent read and draft CMS items freely, but put Publish site, Publish items, and every delete behind approval, since they change your live site. Organization rules add guardrails on top. A blocked request never reaches Webflow.To disconnect, remove the connection in Settings > Apps > Webflow, then revoke Buckle in Webflow under Workspace settings > Apps & Integrations.
FAQ
Do I need to be a Webflow admin?
Yes. Creating the app and seeing its Client Secret requires workspace admin access.
Does the agent see my Webflow token?
No. The token stays in Buckle, and the gateway adds it at the proxy. See How it works.
Why does Webflow reject the connection?
Buckle requests every scope listed in the setup steps. Webflow rejects the connection if the app is missing any one of them.
Can I approve before an agent publishes?
Yes. Put publishing behind approval when you grant the connection.
{"docsConfig":{"theme":"mint","$schema":"https://mintlify.com/docs.json","name":"Buckle","colors":{"primary":"#ff6a13","light":"#ff8236","dark":"#e55e0f"},"logo":{"light":"https://mintcdn.com/onecli-17d3f772/5_AFCR2UNaqNo0AT/logo/logo-full-light.svg?fit=max\u0026auto=format\u0026n=5_AFCR2UNaqNo0AT\u0026q=85\u0026s=30ceea1dd3505e0e9dea50b544521ced","dark":"https://mintcdn.com/onecli-17d3f772/5_AFCR2UNaqNo0AT/logo/logo-full-dark.svg?fit=max\u0026auto=format\u0026n=5_AFCR2UNaqNo0AT\u0026q=85\u0026s=120ef96cf376422549781454d97dd810","href":"https://buckle.dev"},"favicon":"https://mintcdn.com/onecli-17d3f772/hJP3XqgFsBDnXHKy/favicon.svg?fit=max\u0026auto=format\u0026n=hJP3XqgFsBDnXHKy\u0026q=85\u0026s=ddda982106e5fd52c3815a54c183f4b1","appearance":{"default":"light"},"background":{"color":{"light":"#FAFAF9","dark":"#1A1918"}},"navbar":{"links":[{"href":"https://github.com/trybuckle/buckle","label":"GitHub"},{"href":"https://buckle.dev","label":"Install"}]},"footer":{"socials":{"github":"https://github.com/trybuckle"}},"fonts":{"heading":{"family":"Chakra Petch","weight":700,"source":"fonts/ChakraPetch-700.woff2","format":"woff2"}},"contextual":{"options":["copy","view","chatgpt","claude","perplexity","mcp","cursor","vscode"],"display":"header"},"styling":{"latex":false},"navigation":{"global":{"anchors":[{"anchor":"GitHub","icon":"https://mintlify.s3.us-west-1.amazonaws.com/onecli-17d3f772/images/github.svg","href":"https://github.com/buckle"}]},"pages":[]}},"deployment":{"deploymentMetadataValue":{"subdomain":"onecli-17d3f772","hasAudioNarration":false,"actualSubdomain":"onecli-17d3f772","customDomains":[],"gitSource":{"type":"github","owner":"trybuckle","repo":"buckle-docs","deployBranch":"main","contentDirectory":"","isPrivate":true,"mountPath":"","label":"","_id":"6af9ac749033d7e87e8c505a"},"entitlements":{"AI_CHAT":{"status":"DISABLED"}},"buildId":"6af9b4b9e79e0e5d703531fb","clientVersion":"0.0.4143","searchFilterCounts":[{"language":"default","tag":"API Reference","count":240},{"language":"default","tag":"Workspace","count":105},{"language":"default","tag":"Integrations","count":88},{"language":"default","tag":"All app connections","count":64},{"language":"default","tag":"Enterprise","count":57},{"language":"default","tag":"Organization","count":52},{"language":"default","tag":"Apps","count":29},{"language":"default","tag":"Channels","count":28},{"language":"default","tag":"Platform","count":21},{"language":"default","tag":"Guides","count":17}]},"assistantConfig":{"enableAskAiButton":false,"enableStarterQuestions":false,"enableContextualStarterQuestions":false,"enableAskAiSearchBar":true},"basePath":"/docs","hasChatPermissions":false,"hasWebMcpPermissions":false,"toggles":[{"name":"kill-isr","enabled":true,"variant":{"name":"disabled","enabled":false,"feature_enabled":true},"impressionData":false},{"name":"custom-rbac-roles","enabled":true,"variant":{"name":"disabled","enabled":false,"feature_enabled":true},"impressionData":false},{"name":"agent-mintlify-slack","enabled":true,"variant":{"name":"disabled","enabled":false,"feature_enabled":true},"impressionData":false},{"name":"agent-integrations-settings","enabled":true,"variant":{"name":"disabled","enabled":false,"feature_enabled":true},"impressionData":false},{"name":"rbac-expansion","enabled":true,"variant":{"name":"disabled","enabled":false,"feature_enabled":true},"impressionData":false},{"name":"automations-pr-grouping","enabled":true,"variant":{"name":"disabled","enabled":false,"feature_enabled":true},"impressionData":false},{"name":"custom-prefix","enabled":true,"variant":{"name":"disabled","enabled":false,"feature_enabled":true},"impressionData":false},{"name":"analytics-v7","enabled":true,"variant":{"name":"disabled","enabled":false,"feature_enabled":true},"impressionData":false},{"name":"user-flows-analytics","enabled":true,"variant":{"name":"disabled","enabled":false,"feature_enabled":true},"impressionData":false},{"name":"no-publish-flow","enabled":true,"variant":{"name":"disabled","enabled":false,"feature_enabled":true},"impressionData":false},{"name":"workos-onboarding","enabled":true,"variant":{"name":"disabled","enabled":false,"feature_enabled":true},"impressionData":false},{"name":"snapshot-serving-live","enabled":true,"variant":{"name":"disabled","enabled":false,"feature_enabled":true},"impressionData":false},{"name":"stripTemperatureMiddleware","enabled":true,"variant":{"name":"disabled","enabled":false,"feature_enabled":true},"impressionData":false},{"name":"support-platform-pylon-zendesk","enabled":true,"variant":{"name":"disabled","enabled":false,"feature_enabled":true},"impressionData":false},{"name":"snapshot-serving","enabled":true,"variant":{"name":"disabled","enabled":false,"feature_enabled":true},"impressionData":false},{"name":"instant-rollback","enabled":true,"variant":{"name":"disabled","enabled":false,"feature_enabled":true},"impressionData":false},{"name":"granular-notifications-server","enabled":true,"variant":{"name":"disabled","enabled":false,"feature_enabled":true},"impressionData":false},{"name":"granular-notifications","enabled":true,"variant":{"name":"disabled","enabled":false,"feature_enabled":true},"impressionData":false},{"name":"automations-fable","enabled":true,"variant":{"name":"disabled","enabled":false,"feature_enabled":true},"impressionData":false},{"name":"fixed-ai-action-pricing","enabled":true,"variant":{"name":"disabled","enabled":false,"feature_enabled":true},"impressionData":false},{"name":"automation-resolve-merge-conflict","enabled":true,"variant":{"name":"disabled","enabled":false,"feature_enabled":true},"impressionData":false},{"name":"scoped-publishing","enabled":true,"variant":{"name":"disabled","enabled":false,"feature_enabled":true},"impressionData":false},{"name":"mintql","enabled":true,"variant":{"name":"disabled","enabled":false,"feature_enabled":true},"impressionData":false},{"name":"page-level-analytics","enabled":true,"variant":{"name":"disabled","enabled":false,"feature_enabled":true},"impressionData":false},{"name":"editor-version-history-v2","enabled":true,"variant":{"name":"disabled","enabled":false,"feature_enabled":true},"impressionData":false},{"name":"billing-page-v2","enabled":true,"variant":{"name":"disabled","enabled":false,"feature_enabled":true},"impressionData":false},{"name":"full-page-search","enabled":true,"variant":{"name":"disabled","enabled":false,"feature_enabled":true},"impressionData":false},{"name":"workspace-projects","enabled":true,"variant":{"name":"disabled","enabled":false,"feature_enabled":true},"impressionData":false},{"name":"assistant-v5","enabled":true,"variant":{"name":"disabled","enabled":false,"feature_enabled":true},"impressionData":false},{"name":"fork-pr-previews","enabled":true,"variant":{"name":"disabled","enabled":false,"feature_enabled":true},"impressionData":false},{"name":"revalidation-jwt","enabled":true,"variant":{"name":"disabled","enabled":false,"feature_enabled":true},"impressionData":false},{"name":"workos-sso-scim","enabled":true,"variant":{"name":"disabled","enabled":false,"feature_enabled":true},"impressionData":false},{"name":"hobby-abuse-scan","enabled":true,"variant":{"name":"disabled","enabled":false,"feature_enabled":true},"impressionData":false},{"name":"dashboard-inbox","enabled":true,"variant":{"name":"disabled","enabled":false,"feature_enabled":true},"impressionData":false},{"name":"workos-signup","enabled":true,"variant":{"name":"disabled","enabled":false,"feature_enabled":true},"impressionData":false},{"name":"turbopuffer-dual-write","enabled":true,"variant":{"name":"disabled","enabled":false,"feature_enabled":true},"impressionData":false},{"name":"workos-enabled","enabled":true,"variant":{"name":"disabled","enabled":false,"feature_enabled":true},"impressionData":false},{"name":"approve-review-flow","enabled":true,"variant":{"name":"disabled","enabled":false,"feature_enabled":true},"impressionData":false},{"name":"editor-metadata","enabled":true,"variant":{"name":"disabled","enabled":false,"feature_enabled":true},"impressionData":false},{"name":"sso-setup-deadline-banner","enabled":true,"variant":{"name":"disabled","enabled":false,"feature_enabled":true},"impressionData":false},{"name":"turbopuffer-serve","enabled":true,"variant":{"name":"disabled","enabled":false,"feature_enabled":true},"impressionData":false},{"name":"live-agents","enabled":true,"variant":{"name":"disabled","enabled":false,"feature_enabled":true},"impressionData":false},{"name":"llms-txt-v2","enabled":true,"variant":{"name":"disabled","enabled":false,"feature_enabled":true},"impressionData":false}],"googleFontsInlined":false},"customCss":[{"filePath":"style.css","content":"a.nav-anchor div.mr-4.rounded-md{--tw-ring-color: transparent !important;--tw-ring-shadow: 0 0 0 0 transparent !important;--tw-ring-offset-shadow: 0 0 0 0 transparent !important;box-shadow:none!important;background:transparent!important;filter:none!important;transition:opacity 0.15s ease!important}a.nav-anchor:hover div.mr-4.rounded-md{--tw-ring-color: transparent !important;--tw-ring-shadow: 0 0 0 0 transparent !important;--tw-ring-offset-shadow: 0 0 0 0 transparent !important;box-shadow:none!important;background:transparent!important;filter:none!important;opacity:0.7!important}a.nav-anchor div.mr-4.rounded-md img{opacity:1!important;filter:none!important;background:transparent!important}a.nav-anchor:hover div.mr-4.rounded-md img{opacity:1!important;filter:none!important;background:transparent!important}.dark a.nav-anchor div.mr-4.rounded-md img,[data-theme=\"dark\"] a.nav-anchor div.mr-4.rounded-md img{filter:invert(1)!important}"}],"page":{"pagePath":"integrations/webflow","slug":"/integrations/webflow","pageMetadata":{"title":"Let AI Agents Edit Webflow CMS and Publish Sites","sidebarTitle":"Webflow","description":"Let agents edit Webflow CMS items and pages, read form submissions, upload assets, and publish sites. Connect your own Webflow app in a few minutes.","canonical":"https://buckle.dev/docs/integrations/webflow","href":"/integrations/webflow"},"description":{"compiledSource":"\"use strict\";\nconst {jsx: _jsx} = arguments[0];\nconst {useMDXComponents: _provideComponents} = arguments[0];\nfunction _createMdxContent(props) {\n const _components = {\n p: \"p\",\n ..._provideComponents(),\n ...props.components\n };\n return _jsx(_components.p, {\n children: \"Let agents edit Webflow CMS items and pages, read form submissions, upload assets, and publish sites. Connect your own Webflow app in a few minutes.\"\n });\n}\nfunction MDXContent(props = {}) {\n const {wrapper: MDXLayout} = {\n ..._provideComponents(),\n ...props.components\n };\n return MDXLayout ? _jsx(MDXLayout, {\n ...props,\n children: _jsx(_createMdxContent, {\n ...props\n })\n }) : _createMdxContent(props);\n}\nreturn {\n default: MDXContent\n};\n","frontmatter":{},"scope":{}},"pageType":"default","mdx":{"mdxSource":{"compiledSource":"\"use strict\";const{Fragment:_Fragment,jsx:_jsx,jsxs:_jsxs}=arguments[0];const{useMDXComponents:_provideComponents}=arguments[0];function _createMdxContent(props){const _components={a:`a`,code:`code`,li:`li`,p:`p`,strong:`strong`,tbody:`tbody`,td:`td`,th:`th`,thead:`thead`,tr:`tr`,ul:`ul`,..._provideComponents(),...props.components},{Accordion,AccordionGroup,Frame,Heading,Note,OptimizedImage,Step,Steps,Table}=_components;if(!Accordion)_missingMdxReference(`Accordion`,true);if(!AccordionGroup)_missingMdxReference(`AccordionGroup`,true);if(!Frame)_missingMdxReference(`Frame`,true);if(!Heading)_missingMdxReference(`Heading`,true);if(!Note)_missingMdxReference(`Note`,true);if(!OptimizedImage)_missingMdxReference(`OptimizedImage`,true);if(!Step)_missingMdxReference(`Step`,true);if(!Steps)_missingMdxReference(`Steps`,true);if(!Table)_missingMdxReference(`Table`,true);return _jsxs(_Fragment,{children:[_jsx(Heading,{level:`2`,id:`overview`,children:`Overview`}),`\n`,_jsxs(_components.p,{children:[`Buckle connects AI agents to Webflow. Agents can read and edit CMS content, update pages and components, work with forms and assets, and publish sites. The gateway injects the token into requests to `,_jsx(_components.code,{children:`api.webflow.com`}),`, so your agent never sees it.`]}),`\n`,_jsx(_components.p,{children:`To connect, you create a Webflow app in your workspace and paste its Client ID and Client Secret into Buckle. This takes a few minutes, and you need to be an admin of the Webflow workspace. One-click Connect is coming once Webflow approves Buckle’s app.`}),`\n`,_jsx(Heading,{level:`2`,id:`what-you-will-set-up`,children:`What you will set up`}),`\n`,_jsxs(_components.ul,{children:[`\n`,_jsx(_components.li,{children:`A Webflow app in your workspace with the required scopes`}),`\n`,_jsxs(_components.li,{children:[`A Webflow connection that injects the token on requests to `,_jsx(_components.code,{children:`api.webflow.com`})]}),`\n`,_jsx(_components.li,{children:`Per-agent, per-tool access, with approval before publishing`}),`\n`]}),`\n`,_jsx(`a`,{id:`self-hosted`,style:{scrollMarginTop:`8rem`}}),`\n`,_jsx(Heading,{level:`2`,id:`connect-webflow`,children:`Connect Webflow`}),`\n`,_jsxs(Steps,{children:[_jsxs(Step,{title:`Create a Webflow app`,children:[_jsxs(_components.p,{children:[`In Webflow, open your workspace and go to `,_jsx(_components.strong,{children:`Apps \u0026 Integrations`}),` > `,_jsx(_components.strong,{children:`Develop`}),` > `,_jsx(_components.strong,{children:`Create an App`}),`. Name it `,_jsx(_components.code,{children:`Buckle`}),` and add a homepage URL. Leave `,_jsx(_components.strong,{children:`Restrict App installation to a specific site`}),` off, then click `,_jsx(_components.strong,{children:`Continue`}),`.`]}),_jsxs(_components.p,{children:[`Under building blocks, leave `,_jsx(_components.strong,{children:`Designer Extension`}),` off and turn `,_jsx(_components.strong,{children:`Data Client`}),` on.`]})]}),_jsxs(Step,{title:`Add the redirect URI and scopes`,children:[_jsxs(_components.p,{children:[`In Buckle, open `,_jsx(_components.strong,{children:`Settings`}),` > `,_jsx(_components.strong,{children:`Apps`}),` > `,_jsx(_components.strong,{children:`Webflow`}),` and click `,_jsx(_components.strong,{children:`Connect Webflow`}),`. The setup dialog shows a `,_jsx(_components.strong,{children:`Redirect URI`}),`. Copy it and paste it into the `,_jsx(_components.strong,{children:`Redirect URI`}),` field in Webflow. On Buckle Cloud it’s `,_jsx(_components.code,{children:`https://api.buckle.dev/v1/apps/webflow/callback`}),`. Self-hosted Buckle shows its own.`]}),_jsxs(_components.p,{children:[`Then set these scopes. Buckle requests all of them, and Webflow rejects the connection if the app is missing any one. Leave everything else on `,_jsx(_components.strong,{children:`No access`}),`.`]}),_jsxs(Table,{children:[_jsx(_components.thead,{children:_jsxs(_components.tr,{children:[_jsx(_components.th,{children:`Area`}),_jsx(_components.th,{children:`Scopes`})]})}),_jsxs(_components.tbody,{children:[_jsxs(_components.tr,{children:[_jsx(_components.td,{children:_jsx(_components.strong,{children:`User`})}),_jsx(_components.td,{children:_jsx(_components.code,{children:`authorized_user:read`})})]}),_jsxs(_components.tr,{children:[_jsx(_components.td,{children:_jsx(_components.strong,{children:`Sites, pages, components`})}),_jsxs(_components.td,{children:[_jsx(_components.code,{children:`sites:read`}),`, `,_jsx(_components.code,{children:`sites:write`}),`, `,_jsx(_components.code,{children:`pages:read`}),`, `,_jsx(_components.code,{children:`pages:write`}),`, `,_jsx(_components.code,{children:`components:read`}),`, `,_jsx(_components.code,{children:`components:write`})]})]}),_jsxs(_components.tr,{children:[_jsx(_components.td,{children:_jsx(_components.strong,{children:`CMS, forms, assets`})}),_jsxs(_components.td,{children:[_jsx(_components.code,{children:`cms:read`}),`, `,_jsx(_components.code,{children:`cms:write`}),`, `,_jsx(_components.code,{children:`forms:read`}),`, `,_jsx(_components.code,{children:`forms:write`}),`, `,_jsx(_components.code,{children:`assets:read`}),`, `,_jsx(_components.code,{children:`assets:write`})]})]}),_jsxs(_components.tr,{children:[_jsx(_components.td,{children:_jsx(_components.strong,{children:`Site settings`})}),_jsxs(_components.td,{children:[_jsx(_components.code,{children:`site_config:read`}),`, `,_jsx(_components.code,{children:`site_config:write`}),`, `,_jsx(_components.code,{children:`site_activity:read`}),`, `,_jsx(_components.code,{children:`comments:read`})]})]})]})]}),_jsx(Frame,{caption:`Set each area to Read and write or Read-only as in the table. Leave the rest on No access.`,children:_jsx(OptimizedImage,{src:`https://mintcdn.com/onecli-17d3f772/h1DTAVlDkLshz4JZ/images/integrations/webflow/webflow-app-scopes.png?fit=max\u0026auto=format\u0026n=h1DTAVlDkLshz4JZ\u0026q=85\u0026s=c4d9c31c577b63223f3bf864ffca7c40`,alt:`Webflow Edit App dialog on the Building blocks tab, with Assets, CMS, and Components set to Read and write, Authorized user and Comments set to Read-only, and other areas such as AI, Branches, and Custom Code set to No access.`,\"data-og-width\":`1600`,width:`1600`,\"data-og-height\":`1391`,height:`1391`,\"data-path\":`images/integrations/webflow/webflow-app-scopes.png`,\"data-optimize\":`true`,\"data-opv\":`3`,srcset:`https://mintcdn.com/onecli-17d3f772/h1DTAVlDkLshz4JZ/images/integrations/webflow/webflow-app-scopes.png?w=280\u0026fit=max\u0026auto=format\u0026n=h1DTAVlDkLshz4JZ\u0026q=85\u0026s=e9ae02305acb6f56a50b521a60a7a825 280w, https://mintcdn.com/onecli-17d3f772/h1DTAVlDkLshz4JZ/images/integrations/webflow/webflow-app-scopes.png?w=560\u0026fit=max\u0026auto=format\u0026n=h1DTAVlDkLshz4JZ\u0026q=85\u0026s=2186f0a148ca4d5f04f1e06b6ecd87d8 560w, https://mintcdn.com/onecli-17d3f772/h1DTAVlDkLshz4JZ/images/integrations/webflow/webflow-app-scopes.png?w=840\u0026fit=max\u0026auto=format\u0026n=h1DTAVlDkLshz4JZ\u0026q=85\u0026s=625c767e0da936919db114cafc57890d 840w, https://mintcdn.com/onecli-17d3f772/h1DTAVlDkLshz4JZ/images/integrations/webflow/webflow-app-scopes.png?w=1100\u0026fit=max\u0026auto=format\u0026n=h1DTAVlDkLshz4JZ\u0026q=85\u0026s=364c4900d6e6d4cd074a91a5b9309f6e 1100w, https://mintcdn.com/onecli-17d3f772/h1DTAVlDkLshz4JZ/images/integrations/webflow/webflow-app-scopes.png?w=1650\u0026fit=max\u0026auto=format\u0026n=h1DTAVlDkLshz4JZ\u0026q=85\u0026s=5db041b6344964ee254e84d13eb31be0 1650w, https://mintcdn.com/onecli-17d3f772/h1DTAVlDkLshz4JZ/images/integrations/webflow/webflow-app-scopes.png?w=2500\u0026fit=max\u0026auto=format\u0026n=h1DTAVlDkLshz4JZ\u0026q=85\u0026s=4939a112d8691afa226431fba19c06c0 2500w`})}),_jsxs(_components.p,{children:[`Click `,_jsx(_components.strong,{children:`Create App`}),`.`]})]}),_jsxs(Step,{title:`Copy the Client ID and Client Secret`,children:[_jsxs(_components.p,{children:[`On the app card, click `,_jsx(_components.strong,{children:`⋯`}),` > `,_jsx(_components.strong,{children:`Edit App`}),`. The card itself isn’t clickable. Copy the `,_jsx(_components.strong,{children:`Client ID`}),` and `,_jsx(_components.strong,{children:`Client Secret`}),`. Only workspace admins can see the secret.`]}),_jsx(Frame,{caption:`The Client ID and Client Secret are under Data Client on the Building blocks tab.`,children:_jsx(OptimizedImage,{src:`https://mintcdn.com/onecli-17d3f772/h1DTAVlDkLshz4JZ/images/integrations/webflow/webflow-client-credentials.png?fit=max\u0026auto=format\u0026n=h1DTAVlDkLshz4JZ\u0026q=85\u0026s=976cbe4439eec74d6068b9f45599a6e7`,alt:`Webflow Edit App dialog on the Building blocks tab, with Designer Extension off, Data Client on, and the Client ID and masked Client Secret fields, each with a Copy button.`,\"data-og-width\":`1600`,width:`1600`,\"data-og-height\":`929`,height:`929`,\"data-path\":`images/integrations/webflow/webflow-client-credentials.png`,\"data-optimize\":`true`,\"data-opv\":`3`,srcset:`https://mintcdn.com/onecli-17d3f772/h1DTAVlDkLshz4JZ/images/integrations/webflow/webflow-client-credentials.png?w=280\u0026fit=max\u0026auto=format\u0026n=h1DTAVlDkLshz4JZ\u0026q=85\u0026s=7ff3def5848ec4848440a456e6d17edc 280w, https://mintcdn.com/onecli-17d3f772/h1DTAVlDkLshz4JZ/images/integrations/webflow/webflow-client-credentials.png?w=560\u0026fit=max\u0026auto=format\u0026n=h1DTAVlDkLshz4JZ\u0026q=85\u0026s=21e83bb8d0e7340160548373527c3215 560w, https://mintcdn.com/onecli-17d3f772/h1DTAVlDkLshz4JZ/images/integrations/webflow/webflow-client-credentials.png?w=840\u0026fit=max\u0026auto=format\u0026n=h1DTAVlDkLshz4JZ\u0026q=85\u0026s=a379151c47559c84f401ff83b17a902a 840w, https://mintcdn.com/onecli-17d3f772/h1DTAVlDkLshz4JZ/images/integrations/webflow/webflow-client-credentials.png?w=1100\u0026fit=max\u0026auto=format\u0026n=h1DTAVlDkLshz4JZ\u0026q=85\u0026s=bea246717bff2f6d91ffd1c0408c332a 1100w, https://mintcdn.com/onecli-17d3f772/h1DTAVlDkLshz4JZ/images/integrations/webflow/webflow-client-credentials.png?w=1650\u0026fit=max\u0026auto=format\u0026n=h1DTAVlDkLshz4JZ\u0026q=85\u0026s=80d20dfa6cb591a60d4d9cb9a6bc6649 1650w, https://mintcdn.com/onecli-17d3f772/h1DTAVlDkLshz4JZ/images/integrations/webflow/webflow-client-credentials.png?w=2500\u0026fit=max\u0026auto=format\u0026n=h1DTAVlDkLshz4JZ\u0026q=85\u0026s=7782e9230210a1e909f9e5c4adb73480 2500w`})})]}),_jsxs(Step,{title:`Connect in Buckle`,children:[_jsxs(_components.p,{children:[`Back in the Buckle setup dialog, paste the `,_jsx(_components.strong,{children:`Client ID`}),` and `,_jsx(_components.strong,{children:`Client Secret`}),`, then click `,_jsx(_components.strong,{children:`Save \u0026 Connect`}),`.`]}),_jsx(Frame,{caption:`The Webflow setup dialog in Buckle. Copy the Redirect URI from here, then paste your Client ID and Client Secret.`,children:_jsx(OptimizedImage,{src:`https://mintcdn.com/onecli-17d3f772/h1DTAVlDkLshz4JZ/images/integrations/webflow/buckle-webflow-setup.png?fit=max\u0026auto=format\u0026n=h1DTAVlDkLshz4JZ\u0026q=85\u0026s=308f727a5645df835b0c8a662acb4736`,alt:`Buckle Webflow setup dialog saying This connection requires setup, with a link to the Webflow setup guide, the Redirect URI and its copy button, Client ID and Client Secret fields, and the Save \u0026 Connect button.`,\"data-og-width\":`1712`,width:`1712`,\"data-og-height\":`820`,height:`820`,\"data-path\":`images/integrations/webflow/buckle-webflow-setup.png`,\"data-optimize\":`true`,\"data-opv\":`3`,srcset:`https://mintcdn.com/onecli-17d3f772/h1DTAVlDkLshz4JZ/images/integrations/webflow/buckle-webflow-setup.png?w=280\u0026fit=max\u0026auto=format\u0026n=h1DTAVlDkLshz4JZ\u0026q=85\u0026s=defd530e2c8339b1a2915db718cef191 280w, https://mintcdn.com/onecli-17d3f772/h1DTAVlDkLshz4JZ/images/integrations/webflow/buckle-webflow-setup.png?w=560\u0026fit=max\u0026auto=format\u0026n=h1DTAVlDkLshz4JZ\u0026q=85\u0026s=b10db8c86c97a3686a9fba2706783b63 560w, https://mintcdn.com/onecli-17d3f772/h1DTAVlDkLshz4JZ/images/integrations/webflow/buckle-webflow-setup.png?w=840\u0026fit=max\u0026auto=format\u0026n=h1DTAVlDkLshz4JZ\u0026q=85\u0026s=2661a8c935e1e7ab69619e21c7753491 840w, https://mintcdn.com/onecli-17d3f772/h1DTAVlDkLshz4JZ/images/integrations/webflow/buckle-webflow-setup.png?w=1100\u0026fit=max\u0026auto=format\u0026n=h1DTAVlDkLshz4JZ\u0026q=85\u0026s=e01b34e52e6c931449c2d0a84f6fad92 1100w, https://mintcdn.com/onecli-17d3f772/h1DTAVlDkLshz4JZ/images/integrations/webflow/buckle-webflow-setup.png?w=1650\u0026fit=max\u0026auto=format\u0026n=h1DTAVlDkLshz4JZ\u0026q=85\u0026s=76c077155c909df03dc42470af551cf9 1650w, https://mintcdn.com/onecli-17d3f772/h1DTAVlDkLshz4JZ/images/integrations/webflow/buckle-webflow-setup.png?w=2500\u0026fit=max\u0026auto=format\u0026n=h1DTAVlDkLshz4JZ\u0026q=85\u0026s=6e89ea5743927a27383504264001dd29 2500w`})})]}),_jsxs(Step,{title:`Authorize in Webflow`,children:[_jsxs(_components.p,{children:[`Webflow asks which sites or workspace Buckle can access. Pick them and click `,_jsx(_components.strong,{children:`Authorize App`}),`. The connection shows as `,_jsx(_components.strong,{children:`Connected`}),` with your Webflow email.`]}),_jsx(Frame,{caption:`Webflow lists the permissions Buckle requests. Pick the sites or workspace your agents need.`,children:_jsx(OptimizedImage,{src:`https://mintcdn.com/onecli-17d3f772/h1DTAVlDkLshz4JZ/images/integrations/webflow/webflow-authorize-buckle.png?fit=max\u0026auto=format\u0026n=h1DTAVlDkLshz4JZ\u0026q=85\u0026s=e87c49d4cedbd1c8d083d1808644fe80`,alt:`Webflow Authorize Buckle screen listing read and edit permissions for sites, pages, CMS, forms, assets, components, and config, with a workspace and a site selected and the Authorize App button.`,\"data-og-width\":`1620`,width:`1620`,\"data-og-height\":`1388`,height:`1388`,\"data-path\":`images/integrations/webflow/webflow-authorize-buckle.png`,\"data-optimize\":`true`,\"data-opv\":`3`,srcset:`https://mintcdn.com/onecli-17d3f772/h1DTAVlDkLshz4JZ/images/integrations/webflow/webflow-authorize-buckle.png?w=280\u0026fit=max\u0026auto=format\u0026n=h1DTAVlDkLshz4JZ\u0026q=85\u0026s=4a3ca074bbd6db0466a4bc83a51b3a73 280w, https://mintcdn.com/onecli-17d3f772/h1DTAVlDkLshz4JZ/images/integrations/webflow/webflow-authorize-buckle.png?w=560\u0026fit=max\u0026auto=format\u0026n=h1DTAVlDkLshz4JZ\u0026q=85\u0026s=5b7363dfdcfccba2c2d1830d2080a706 560w, https://mintcdn.com/onecli-17d3f772/h1DTAVlDkLshz4JZ/images/integrations/webflow/webflow-authorize-buckle.png?w=840\u0026fit=max\u0026auto=format\u0026n=h1DTAVlDkLshz4JZ\u0026q=85\u0026s=4f5c2affe9f8d50c90d5f913931960bf 840w, https://mintcdn.com/onecli-17d3f772/h1DTAVlDkLshz4JZ/images/integrations/webflow/webflow-authorize-buckle.png?w=1100\u0026fit=max\u0026auto=format\u0026n=h1DTAVlDkLshz4JZ\u0026q=85\u0026s=0fd74350bc788fbfcae4866fe0fc3497 1100w, https://mintcdn.com/onecli-17d3f772/h1DTAVlDkLshz4JZ/images/integrations/webflow/webflow-authorize-buckle.png?w=1650\u0026fit=max\u0026auto=format\u0026n=h1DTAVlDkLshz4JZ\u0026q=85\u0026s=b8d70236a47640889714c42a26a4114a 1650w, https://mintcdn.com/onecli-17d3f772/h1DTAVlDkLshz4JZ/images/integrations/webflow/webflow-authorize-buckle.png?w=2500\u0026fit=max\u0026auto=format\u0026n=h1DTAVlDkLshz4JZ\u0026q=85\u0026s=a3e5f4a4f27959095aae59fba3ee050f 2500w`})})]})]}),`\n`,_jsx(Note,{children:_jsx(_components.p,{children:`Buckle can only reach the sites you pick on the Webflow screen. To add a site later, connect again and select it. Treat the Client Secret like a password.`})}),`\n`,_jsx(Heading,{level:`2`,id:`what-agents-can-do`,children:`What agents can do`}),`\n`,_jsxs(Table,{children:[_jsx(_components.thead,{children:_jsxs(_components.tr,{children:[_jsx(_components.th,{children:`Area`}),_jsx(_components.th,{children:`What agents can do`})]})}),_jsxs(_components.tbody,{children:[_jsxs(_components.tr,{children:[_jsx(_components.td,{children:_jsx(_components.strong,{children:`Sites`})}),_jsx(_components.td,{children:`List sites, read a site and its domains, publish a site`})]}),_jsxs(_components.tr,{children:[_jsx(_components.td,{children:_jsx(_components.strong,{children:`Pages`})}),_jsx(_components.td,{children:`List pages, read page settings and content, update SEO settings and static text`})]}),_jsxs(_components.tr,{children:[_jsx(_components.td,{children:_jsx(_components.strong,{children:`Components`})}),_jsx(_components.td,{children:`List components, read and edit their content and properties`})]}),_jsxs(_components.tr,{children:[_jsx(_components.td,{children:_jsx(_components.strong,{children:`CMS`})}),_jsx(_components.td,{children:`List and read collections and items, create and edit collections, fields, and items, publish or delete items`})]}),_jsxs(_components.tr,{children:[_jsx(_components.td,{children:_jsx(_components.strong,{children:`Forms`})}),_jsx(_components.td,{children:`List forms, read submissions, edit or delete a submission`})]}),_jsxs(_components.tr,{children:[_jsx(_components.td,{children:_jsx(_components.strong,{children:`Assets`})}),_jsx(_components.td,{children:`List and read assets and folders, upload, rename, move, or delete assets`})]})]})]}),`\n`,_jsx(Heading,{level:`2`,id:`controlling-access`,children:`Controlling access`}),`\n`,_jsxs(_components.p,{children:[_jsx(_components.a,{href:`/guides/agent-access`,children:`Grant`}),` the connection to each agent that needs it, and choose per tool what runs freely, what needs approval, and what’s blocked. For example, let an agent read and draft CMS items freely, but put `,_jsx(_components.strong,{children:`Publish site`}),`, `,_jsx(_components.strong,{children:`Publish items`}),`, and every delete behind approval, since they change your live site. Organization `,_jsx(_components.a,{href:`/guides/rules`,children:`rules`}),` add guardrails on top. A blocked request never reaches Webflow.`]}),`\n`,_jsxs(_components.p,{children:[`To disconnect, remove the connection in `,_jsx(_components.strong,{children:`Settings`}),` > `,_jsx(_components.strong,{children:`Apps`}),` > `,_jsx(_components.strong,{children:`Webflow`}),`, then revoke Buckle in Webflow under `,_jsx(_components.strong,{children:`Workspace settings`}),` > `,_jsx(_components.strong,{children:`Apps \u0026 Integrations`}),`.`]}),`\n`,_jsx(Heading,{level:`2`,id:`faq`,children:`FAQ`}),`\n`,_jsxs(AccordionGroup,{children:[_jsx(Accordion,{title:`Do I need to be a Webflow admin?`,id:`do-i-need-to-be-a-webflow-admin`,children:_jsx(_components.p,{children:`Yes. Creating the app and seeing its Client Secret requires workspace admin access.`})}),_jsx(Accordion,{title:`Does the agent see my Webflow token?`,id:`does-the-agent-see-my-webflow-token`,children:_jsxs(_components.p,{children:[`No. The token stays in Buckle, and the gateway adds it at the proxy. See `,_jsx(_components.a,{href:`/how-it-works`,children:`How it works`}),`.`]})}),_jsx(Accordion,{title:`Why does Webflow reject the connection?`,id:`why-does-webflow-reject-the-connection`,children:_jsx(_components.p,{children:`Buckle requests every scope listed in the setup steps. Webflow rejects the connection if the app is missing any one of them.`})}),_jsx(Accordion,{title:`Can I approve before an agent publishes?`,id:`can-i-approve-before-an-agent-publishes`,children:_jsxs(_components.p,{children:[`Yes. Put publishing behind approval when you `,_jsx(_components.a,{href:`/guides/agent-access`,children:`grant`}),` the connection.`]})})]})]})}function MDXContent(props={}){const{wrapper:MDXLayout}={..._provideComponents(),...props.components};return MDXLayout?_jsx(MDXLayout,{...props,children:_jsx(_createMdxContent,{...props})}):_createMdxContent(props)}return{default:MDXContent};function _missingMdxReference(id,component){throw new Error(`Expected `+(component?`component`:`object`)+\" `\"+id+\"` to be defined: you likely forgot to import, pass, or provide it.\")}","frontmatter":{},"scope":{"config":{},"pageMetadata":{"title":"Let AI Agents Edit Webflow CMS and Publish Sites","sidebarTitle":"Webflow","description":"Let agents edit Webflow CMS items and pages, read form submissions, upload assets, and publish sites. Connect your own Webflow app in a few minutes.","canonical":"https://buckle.dev/docs/integrations/webflow","href":"/integrations/webflow"}}},"mdxSourceWithNoJs":null},"mdxExtracts":{"tableOfContents":[{"title":"Overview","slug":"overview","depth":2,"children":[]},{"title":"What you will set up","slug":"what-you-will-set-up","depth":2,"children":[]},{"title":"Connect Webflow","slug":"connect-webflow","depth":2,"children":[]},{"title":"What agents can do","slug":"what-agents-can-do","depth":2,"children":[]},{"title":"Controlling access","slug":"controlling-access","depth":2,"children":[]},{"title":"FAQ","slug":"faq","depth":2,"children":[]}],"codeExamples":{}},"jsLinks":["/docs/_mintlify/custom/onecli-17d3f772/e8c5fc0faf4d8de9/infra/cloudfront/docs-response-headers.js"],"subdomain":"onecli-17d3f772","siteName":"Buckle","title":"Let AI Agents Edit Webflow CMS and Publish Sites - Buckle","navMaps":{"firstHrefInVersion":{},"firstHrefInLanguage":{}},"lastModified":"2026-11-15T13:34:02.491Z","originalFileLocation":"integrations/webflow.mdx"},"headHtml":"\u003cscript data-mint-head>(function(){var d=document.documentElement,p=null;if(!p){try{p=localStorage.getItem(\"isDarkMode\")}catch(e){}if(p==='true')p='dark';else if(p==='false')p='light';if(p!=='light'\u0026\u0026p!=='dark'\u0026\u0026p!=='system')p=\"light\"}var r=p==='system'?(matchMedia(\"(prefers-color-scheme: dark)\").matches?'dark':'light'):p;d.classList.remove(r==='dark'?'light':'dark');d.classList.add(r);d.setAttribute(\"data-theme-preference\",p)})();\u003c/script>\u003cmeta data-mint-head name=\"description\" content=\"Let agents edit Webflow CMS items and pages, read form submissions, upload assets, and publish sites. Connect your own Webflow app in a few minutes.\">\u003cmeta data-mint-head name=\"application-name\" content=\"Buckle\">\u003cmeta data-mint-head name=\"generator\" content=\"Mintlify\">\u003clink data-mint-head rel=\"icon\" type=\"image/png\" sizes=\"192x192\" href=\"/docs/mintlify-assets/_mintlify/favicons/onecli-17d3f772/eFiEtTXh_9JK0wwc/_generated/favicon/android-chrome-192x192.png\" media=\"(prefers-color-scheme: light)\">\u003clink data-mint-head rel=\"apple-touch-icon\" type=\"image/png\" sizes=\"180x180\" href=\"/docs/mintlify-assets/_mintlify/favicons/onecli-17d3f772/eFiEtTXh_9JK0wwc/_generated/favicon/apple-touch-icon.png\">\u003clink data-mint-head rel=\"icon\" type=\"image/png\" sizes=\"16x16\" href=\"/docs/mintlify-assets/_mintlify/favicons/onecli-17d3f772/eFiEtTXh_9JK0wwc/_generated/favicon/favicon-16x16.png\" media=\"(prefers-color-scheme: light)\">\u003clink data-mint-head rel=\"icon\" type=\"image/png\" sizes=\"32x32\" href=\"/docs/mintlify-assets/_mintlify/favicons/onecli-17d3f772/eFiEtTXh_9JK0wwc/_generated/favicon/favicon-32x32.png\" media=\"(prefers-color-scheme: light)\">\u003clink data-mint-head rel=\"shortcut icon\" type=\"image/x-icon\" href=\"/docs/mintlify-assets/_mintlify/favicons/onecli-17d3f772/eFiEtTXh_9JK0wwc/_generated/favicon/favicon.ico\" media=\"(prefers-color-scheme: light)\">\u003clink data-mint-head rel=\"icon\" type=\"image/png\" sizes=\"192x192\" href=\"/docs/mintlify-assets/_mintlify/favicons/onecli-17d3f772/eFiEtTXh_9JK0wwc/_generated/favicon-dark/android-chrome-192x192.png\" media=\"(prefers-color-scheme: dark)\">\u003clink data-mint-head rel=\"icon\" type=\"image/png\" sizes=\"16x16\" href=\"/docs/mintlify-assets/_mintlify/favicons/onecli-17d3f772/eFiEtTXh_9JK0wwc/_generated/favicon-dark/favicon-16x16.png\" media=\"(prefers-color-scheme: dark)\">\u003clink data-mint-head rel=\"icon\" type=\"image/png\" sizes=\"32x32\" href=\"/docs/mintlify-assets/_mintlify/favicons/onecli-17d3f772/eFiEtTXh_9JK0wwc/_generated/favicon-dark/favicon-32x32.png\" media=\"(prefers-color-scheme: dark)\">\u003clink data-mint-head rel=\"shortcut icon\" type=\"image/x-icon\" href=\"/docs/mintlify-assets/_mintlify/favicons/onecli-17d3f772/eFiEtTXh_9JK0wwc/_generated/favicon-dark/favicon.ico\" media=\"(prefers-color-scheme: dark)\">\u003cmeta data-mint-head property=\"og:title\" content=\"Let AI Agents Edit Webflow CMS and Publish Sites - Buckle\">\u003cmeta data-mint-head property=\"og:description\" content=\"Let agents edit Webflow CMS items and pages, read form submissions, upload assets, and publish sites. Connect your own Webflow app in a few minutes.\">\u003cmeta data-mint-head property=\"og:site_name\" content=\"Buckle\">\u003cmeta data-mint-head property=\"og:url\" content=\"https://buckle.dev/docs/integrations/webflow\">\u003cmeta data-mint-head property=\"og:type\" content=\"website\">\u003cmeta data-mint-head property=\"og:image\" content=\"https://onecli-17d3f772.mintlify.site/docs/_mintlify/api/og/v2?division=All+app+connections\u0026amp;title=Let+AI+Agents+Edit+Webflow+CMS+and+Publish+Sites\u0026amp;description=Let+agents+edit+Webflow+CMS+items+and+pages%2C+read+form+submissions%2C+upload+assets%2C+and+publish+sites.+Connect+your+own+Webflow+app+in+a+few+minutes.\u0026amp;theme=14ca75cbbb2a0e9ba5cd5703\u0026amp;signature=89b1bb52752a997beb5245049bd6c0cde8d268f9cd974729b17d09222716664d\">\u003cmeta data-mint-head property=\"og:image:width\" content=\"1200\">\u003cmeta data-mint-head property=\"og:image:height\" content=\"630\">\u003cmeta data-mint-head name=\"twitter:card\" content=\"summary_large_image\">\u003cmeta data-mint-head name=\"twitter:title\" content=\"Let AI Agents Edit Webflow CMS and Publish Sites - Buckle\">\u003cmeta data-mint-head name=\"twitter:description\" content=\"Let agents edit Webflow CMS items and pages, read form submissions, upload assets, and publish sites. Connect your own Webflow app in a few minutes.\">\u003cmeta data-mint-head name=\"twitter:image\" content=\"https://onecli-17d3f772.mintlify.site/docs/_mintlify/api/og/v2?division=All+app+connections\u0026amp;title=Let+AI+Agents+Edit+Webflow+CMS+and+Publish+Sites\u0026amp;description=Let+agents+edit+Webflow+CMS+items+and+pages%2C+read+form+submissions%2C+upload+assets%2C+and+publish+sites.+Connect+your+own+Webflow+app+in+a+few+minutes.\u0026amp;theme=14ca75cbbb2a0e9ba5cd5703\u0026amp;signature=89b1bb52752a997beb5245049bd6c0cde8d268f9cd974729b17d09222716664d\">\u003cmeta data-mint-head name=\"twitter:image:width\" content=\"1200\">\u003cmeta data-mint-head name=\"twitter:image:height\" content=\"630\">\u003cmeta data-mint-head name=\"msapplication-config\" content=\"/docs/mintlify-assets/_mintlify/favicons/onecli-17d3f772/eFiEtTXh_9JK0wwc/_generated/favicon/browserconfig.xml\">\u003cmeta data-mint-head name=\"apple-mobile-web-app-title\" content=\"Buckle\">\u003cmeta data-mint-head name=\"msapplication-TileColor\" content=\"#ff6a13\">\u003clink data-mint-head rel=\"canonical\" href=\"https://buckle.dev/docs/integrations/webflow\">\u003clink data-mint-head rel=\"alternate\" type=\"application/xml\" href=\"/docs/sitemap.xml\">\u003clink data-mint-head rel=\"alternate\" type=\"text/markdown\" href=\"/docs/integrations/webflow.md\">\u003cscript data-mint-head type=\"application/ld+json\">{\"@context\":\"https://schema.org\",\"@graph\":[{\"@type\":\"Organization\",\"@id\":\"https://onecli-17d3f772.mintlify.dev/#organization\",\"name\":\"Buckle\",\"url\":\"https://onecli-17d3f772.mintlify.dev\",\"logo\":{\"@type\":\"ImageObject\",\"url\":\"https://mintcdn.com/onecli-17d3f772/5_AFCR2UNaqNo0AT/logo/logo-full-light.svg?fit=max\u0026auto=format\u0026n=5_AFCR2UNaqNo0AT\u0026q=85\u0026s=30ceea1dd3505e0e9dea50b544521ced\"}},{\"@type\":\"WebSite\",\"@id\":\"https://onecli-17d3f772.mintlify.dev/docs#website\",\"name\":\"Buckle\",\"url\":\"https://onecli-17d3f772.mintlify.dev/docs\",\"publisher\":{\"@id\":\"https://onecli-17d3f772.mintlify.dev/#organization\"}},{\"@type\":\"WebPage\",\"@id\":\"https://buckle.dev/docs/integrations/webflow#webpage\",\"url\":\"https://buckle.dev/docs/integrations/webflow\",\"name\":\"Let AI Agents Edit Webflow CMS and Publish Sites\",\"description\":\"Let agents edit Webflow CMS items and pages, read form submissions, upload assets, and publish sites. Connect your own Webflow app in a few minutes.\",\"dateModified\":\"2026-11-15T13:34:02.491Z\",\"isPartOf\":{\"@id\":\"https://onecli-17d3f772.mintlify.dev/docs#website\"},\"breadcrumb\":{\"@id\":\"https://buckle.dev/docs/integrations/webflow#breadcrumb\"}},{\"@type\":\"BreadcrumbList\",\"@id\":\"https://buckle.dev/docs/integrations/webflow#breadcrumb\",\"itemListElement\":[{\"@type\":\"ListItem\",\"position\":1,\"name\":\"All app connections\",\"item\":\"https://onecli-17d3f772.mintlify.dev/docs/integrations/affinity\"},{\"@type\":\"ListItem\",\"position\":2,\"name\":\"Let AI Agents Edit Webflow CMS and Publish Sites\",\"item\":\"https://buckle.dev/docs/integrations/webflow\"}]},{\"@type\":[\"Article\",\"TechArticle\"],\"@id\":\"https://buckle.dev/docs/integrations/webflow#article\",\"headline\":\"Let AI Agents Edit Webflow CMS and Publish Sites\",\"name\":\"Let AI Agents Edit Webflow CMS and Publish Sites\",\"description\":\"Let agents edit Webflow CMS items and pages, read form submissions, upload assets, and publish sites. Connect your own Webflow app in a few minutes.\",\"url\":\"https://buckle.dev/docs/integrations/webflow\",\"mainEntityOfPage\":{\"@id\":\"https://buckle.dev/docs/integrations/webflow#webpage\"},\"dateModified\":\"2026-11-15T13:34:02.491Z\",\"publisher\":{\"@id\":\"https://onecli-17d3f772.mintlify.dev/#organization\"},\"isPartOf\":{\"@id\":\"https://onecli-17d3f772.mintlify.dev/docs#website\"}}]}\u003c/script>\u003cscript data-mint-head type=\"application/ld+json\">{\"@context\":\"https://schema.org\",\"@type\":\"WebSite\",\"name\":\"Buckle\",\"publisher\":{\"@type\":\"Organization\",\"name\":\"Buckle\"},\"provider\":{\"@type\":\"Organization\",\"name\":\"Mintlify\",\"url\":\"https://mintlify.com\"}}\u003c/script>","agentPointerHref":"/docs/integrations/webflow.md","siteName":"Buckle","nav":{"global":{"anchors":[{"anchor":"GitHub","icon":"https://mintlify.s3.us-west-1.amazonaws.com/onecli-17d3f772/images/github.svg","href":"https://github.com/buckle"}]},"tabs":[{"tab":"Documentation","pages":[{"title":"Documentation","href":""}]},{"tab":"Integrations","groups":[{"group":"Integrations","root":{"title":"Integrations: Connect Agents to External Services","sidebarTitle":"Overview","href":"/integrations"},"pages":[{"title":"App Connections: How OAuth \u0026 API Keys Work","sidebarTitle":"App Connections","href":"/integrations/app-connections"},{"title":"Custom Connections: Connect Any API With a Key","sidebarTitle":"Custom connections","href":"/integrations/custom-connections"},{"title":"Chat With AI Agents and Approve Actions in Slack","sidebarTitle":"Slack","href":"/integrations/slack"},{"title":"Keep LLM API Keys Out of Your AI Agents","sidebarTitle":"LLMs","href":"/integrations/llms"},{"title":"External Vaults: Connect Password Managers","sidebarTitle":"External Vaults","href":"/vaults/overview"}]},{"group":"Cloud integrations","pages":[{"title":"Prospect and Enrich Leads in Apollo.io With Agents","sidebarTitle":"Apollo.io","href":"/integrations/apollo-io"},{"title":"Use AWS From AI Agents Without Exposing Keys","sidebarTitle":"AWS","href":"/integrations/aws"},{"title":"Let AI Agents Open PRs and Issues on GitHub","sidebarTitle":"GitHub","href":"/integrations/github"},{"title":"Org-Approved GitHub Repo Access for AI Agents","sidebarTitle":"GitHub App","href":"/integrations/github-app"},{"title":"Let AI Agents Query Datadog Metrics and Monitors","sidebarTitle":"Datadog","href":"/integrations/datadog"},{"title":"Let AI Agents Update HubSpot CRM Records","sidebarTitle":"HubSpot","href":"/integrations/hubspot"},{"title":"Let AI Agents Triage Sentry Errors","sidebarTitle":"Sentry","href":"/integrations/sentry"},{"title":"Let AI Agents Read and Write OneNote Notebooks","sidebarTitle":"Microsoft OneNote","href":"/integrations/microsoft-onenote"},{"title":"Connect AI Agents to Outlook Mail in Microsoft 365","sidebarTitle":"Outlook Mail","href":"/integrations/outlook-mail"},{"title":"Let AI Agents Book Meetings in Outlook Calendar","sidebarTitle":"Outlook Calendar","href":"/integrations/outlook-calendar"}]},{"group":"All app connections","pages":[{"title":"Connect AI Agents to Affinity CRM With an API Key","sidebarTitle":"Affinity","href":"/integrations/affinity"},{"title":"Let AI Agents Manage Attio CRM Records","sidebarTitle":"Attio","href":"/integrations/attio"},{"title":"Run Clay Enrichment From AI Agents","sidebarTitle":"Clay","href":"/integrations/clay"},{"title":"Query PostHog Analytics and Flags From Agents","sidebarTitle":"PostHog","href":"/integrations/posthog"},{"title":"Connect AI Agents to Salesforce With an External App","sidebarTitle":"Salesforce","href":"/integrations/salesforce"},{"title":"Turn Timeless Meetings Into Agent Follow-Ups","sidebarTitle":"Timeless","href":"/integrations/timeless"},{"title":"Let Agents Search Circleback Meeting Notes","sidebarTitle":"Circleback","href":"/integrations/circleback"},{"title":"Run HeyReach LinkedIn Campaigns From AI Agents","sidebarTitle":"HeyReach","href":"/integrations/heyreach"},{"title":"Automate Dripify LinkedIn Outreach With Agents","sidebarTitle":"Dripify","href":"/integrations/dripify"},{"title":"Let On-Call Agents Triage PagerDuty Incidents","sidebarTitle":"PagerDuty","href":"/integrations/pagerduty"},{"title":"Query Coralogix Logs and Metrics From Agents","sidebarTitle":"Coralogix","href":"/integrations/coralogix"},{"title":"Search Company Knowledge in Onyx From Agents","sidebarTitle":"Onyx","href":"/integrations/onyx"},{"title":"Scoped Cloudflare API Tokens for AI Agents","sidebarTitle":"Cloudflare","href":"/integrations/cloudflare"},{"title":"Set Up One Google OAuth Client for All Google Apps","sidebarTitle":"Google (setup)","href":"/integrations/google"},{"title":"Let AI Agents Search, Draft, and Send Gmail","sidebarTitle":"Gmail","href":"/integrations/gmail"},{"title":"Let AI Agents Schedule Meetings in Google Calendar","sidebarTitle":"Google Calendar","href":"/integrations/google-calendar"},{"title":"Give AI Agents Access to Google Drive Files","sidebarTitle":"Google Drive","href":"/integrations/google-drive"},{"title":"Let AI Agents Draft and Edit Google Docs","sidebarTitle":"Google Docs","href":"/integrations/google-docs"},{"title":"Let AI Agents Read and Update Google Sheets","sidebarTitle":"Google Sheets","href":"/integrations/google-sheets"},{"title":"Generate Google Slides Decks With AI Agents","sidebarTitle":"Google Slides","href":"/integrations/google-slides"},{"title":"Build Google Forms and Read Responses With Agents","sidebarTitle":"Google Forms","href":"/integrations/google-forms"},{"title":"Create Google Meet Links From AI Agents","sidebarTitle":"Google Meet","href":"/integrations/google-meet"},{"title":"Search and Organize Google Photos With AI Agents","sidebarTitle":"Google Photos","href":"/integrations/google-photos"},{"title":"Track To-Dos in Google Tasks From AI Agents","sidebarTitle":"Google Tasks","href":"/integrations/google-tasks"},{"title":"Automate Google Workspace User Admin With Agents","sidebarTitle":"Google Admin","href":"/integrations/google-admin"},{"title":"Pull GA4 Reports Into AI Agents","sidebarTitle":"Google Analytics","href":"/integrations/google-analytics"},{"title":"Let AI Agents Check Indexing in Search Console","sidebarTitle":"Google Search Console","href":"/integrations/google-search-console"},{"title":"Automate Google Classroom Coursework With Agents","sidebarTitle":"Google Classroom","href":"/integrations/google-classroom"},{"title":"Manage YouTube Playlists and Analytics With Agents","sidebarTitle":"YouTube","href":"/integrations/youtube"},{"title":"Let AI Agents Search and Update Notion Pages","sidebarTitle":"Notion","href":"/integrations/notion"},{"title":"Let AI Agents Create and Triage Jira Issues","sidebarTitle":"Jira","href":"/integrations/jira"},{"title":"Give AI Agents Search and Edit Access to Confluence","sidebarTitle":"Confluence","href":"/integrations/confluence"},{"title":"Let AI Agents Manage Your Todoist Tasks","sidebarTitle":"Todoist","href":"/integrations/todoist"},{"title":"Give AI Agents Safe Access to Your Dropbox Files","sidebarTitle":"Dropbox","href":"/integrations/dropbox"},{"title":"Deploy to Fly.io From an Agent Without Exposing Tokens","sidebarTitle":"Fly.io","href":"/integrations/flyio"},{"title":"Let AI Agents Post to LinkedIn on Your Behalf","sidebarTitle":"LinkedIn","href":"/integrations/linkedin"},{"title":"Connect AI Agents to Monday.com Boards","sidebarTitle":"Monday.com","href":"/integrations/monday"},{"title":"Administer MongoDB Atlas Clusters With Agents","sidebarTitle":"MongoDB Atlas","href":"/integrations/mongodb-atlas"},{"title":"Sync Navan Bookings and Expenses With AI Agents","sidebarTitle":"Navan","href":"/integrations/navan"},{"title":"Let AI Agents Send Email With Resend","sidebarTitle":"Resend","href":"/integrations/resend"},{"title":"Send SMS and WhatsApp From AI Agents With Twilio","sidebarTitle":"Twilio","href":"/integrations/twilio"},{"title":"Zendesk Integration: Tickets and Help Center","sidebarTitle":"Zendesk","href":"/integrations/zendesk"},{"title":"Manage Supabase Projects With AI Agents","sidebarTitle":"Supabase","href":"/integrations/supabase"},{"title":"Call Claude and Gemini on Vertex AI From Agents","sidebarTitle":"Vertex AI","description":"Let agents call Claude and Gemini on Vertex AI with your Google Cloud project's billing. Service account or ADC credentials stay hidden at the gateway.","href":"/integrations/vertex-ai"},{"title":"Let AI Agents Edit Webflow CMS and Publish Sites","sidebarTitle":"Webflow","href":"/integrations/webflow"},{"title":"Let AI Agents Schedule Zoom Meetings and Get Recordings","sidebarTitle":"Zoom","description":"Let agents list and schedule Zoom meetings and access cloud recordings. Connect with Zoom OAuth, and the gateway injects tokens so agents never see them.","href":"/integrations/zoom"},{"title":"Give Agents AWS Access With an IAM Role, Not Keys","sidebarTitle":"AWS Role","href":"/integrations/aws-role"},{"title":"Bitbucket Repos, Pull Requests, and Pipelines","sidebarTitle":"Bitbucket","href":"/integrations/bitbucket"},{"title":"Manage Docker Hub Repositories From AI Agents","sidebarTitle":"Docker Hub","href":"/integrations/docker"},{"title":"Read Fathom Meeting Summaries From AI Agents","sidebarTitle":"Fathom","href":"/integrations/fathom"},{"title":"Give AI Agents Access to Fireflies Transcripts","sidebarTitle":"Fireflies","href":"/integrations/fireflies"},{"title":"Let AI Agents Work With GitLab Merge Requests","sidebarTitle":"GitLab","href":"/integrations/gitlab"},{"title":"Send Google Chat Messages From AI Agents","sidebarTitle":"Google Chat","href":"/integrations/google-chat"},{"title":"Let AI Agents Look Up and Update Google Contacts","sidebarTitle":"Google Contacts","href":"/integrations/google-contacts"},{"title":"Let AI Agents Read Your Granola Meeting Notes","sidebarTitle":"Granola","href":"/integrations/granola"},{"title":"Route Agent Package Installs Through JFrog","sidebarTitle":"JFrog Artifactory","href":"/integrations/jfrog-artifactory"},{"title":"Let AI Agents File and Update Linear Issues","sidebarTitle":"Linear","href":"/integrations/linear"},{"title":"Run Snowflake SQL From an Agent, Token Hidden","sidebarTitle":"Snowflake","href":"/integrations/snowflake"},{"title":"Use a Restricted Stripe Key With AI Agents","sidebarTitle":"Stripe","href":"/integrations/stripe"},{"title":"Let AI Agents Manage Trello Boards and Cards","sidebarTitle":"Trello","href":"/integrations/trello"},{"title":"Let AI Agents Deploy and Manage Vercel Projects","sidebarTitle":"Vercel","href":"/integrations/vercel"},{"title":"Let AI Agents Post and Read on X (Twitter)","sidebarTitle":"X","href":"/integrations/x"},{"title":"Let AI Agents Work Zoho CRM Leads and Deals","sidebarTitle":"Zoho CRM","href":"/integrations/zoho-crm"},{"title":"Let AI Agents Draft Word Docs in OneDrive","sidebarTitle":"Microsoft Word","href":"/integrations/microsoft-word"}]},{"group":"LLMs","pages":[{"title":"Connect Claude to Agents With a Token or API Key","sidebarTitle":"Anthropic","href":"/integrations/anthropic"},{"title":"Use OpenAI API Keys and Codex OAuth With AI Agents","sidebarTitle":"OpenAI","href":"/integrations/openai"}]},{"group":"External Vaults","pages":[{"title":"Bitwarden Vault: Sync Secrets to the Gateway","sidebarTitle":"Bitwarden","href":"/vaults/bitwarden"},{"title":"1Password Vault: Service Account Integration","sidebarTitle":"1Password","href":"/vaults/1password"}]}]},{"tab":"Guides","pages":[{"title":"Guides","href":"/guides"}]},{"tab":"API Reference","pages":[{"title":"API Reference","href":"/api-reference"}]},{"tab":"SDKs","pages":[{"title":"SDKs","href":"/sdks"}]}]},"basePath":"","title":"Let AI Agents Edit Webflow CMS and Publish Sites - Buckle","buildId":"dpl_Aw98ji4XvBsgtZwL1VrkUF9ehFqz","deploymentId":"dpl_Aw98ji4XvBsgtZwL1VrkUF9ehFqz","dynamics":["07c022d89b","a74be98ba7"],"chunks":["Frame-0domioUa.js","DynamicMarkdown-BcGRTrw6.js","zoom-image-lightbox-DsiWwPWR.js","lightbox-handle-r17bVUz3.js"]}