Let agents search Notion, read pages, create notes, and query databases. Connect with OAuth, pick which pages to share, and keep tokens out of the agent.
Overview
Buckle connects AI agents to Notion through Notion’s OAuth flow. Agents can search your workspace, read page content, create and update pages, and query databases. The gateway injects OAuth credentials into requests to the Notion API automatically.This is useful for agents that need to look up internal documentation, create tasks or notes, or sync data with Notion databases.
What you will set up
A Notion connection through OAuth, limited to the pages and databases you select
Automatic token injection on Notion API requests
Per-agent, per-tool access to your workspace
Setup
1
Open the app
Open the Buckle dashboard and navigate to Settings > Apps > Notion.
2
Authorize
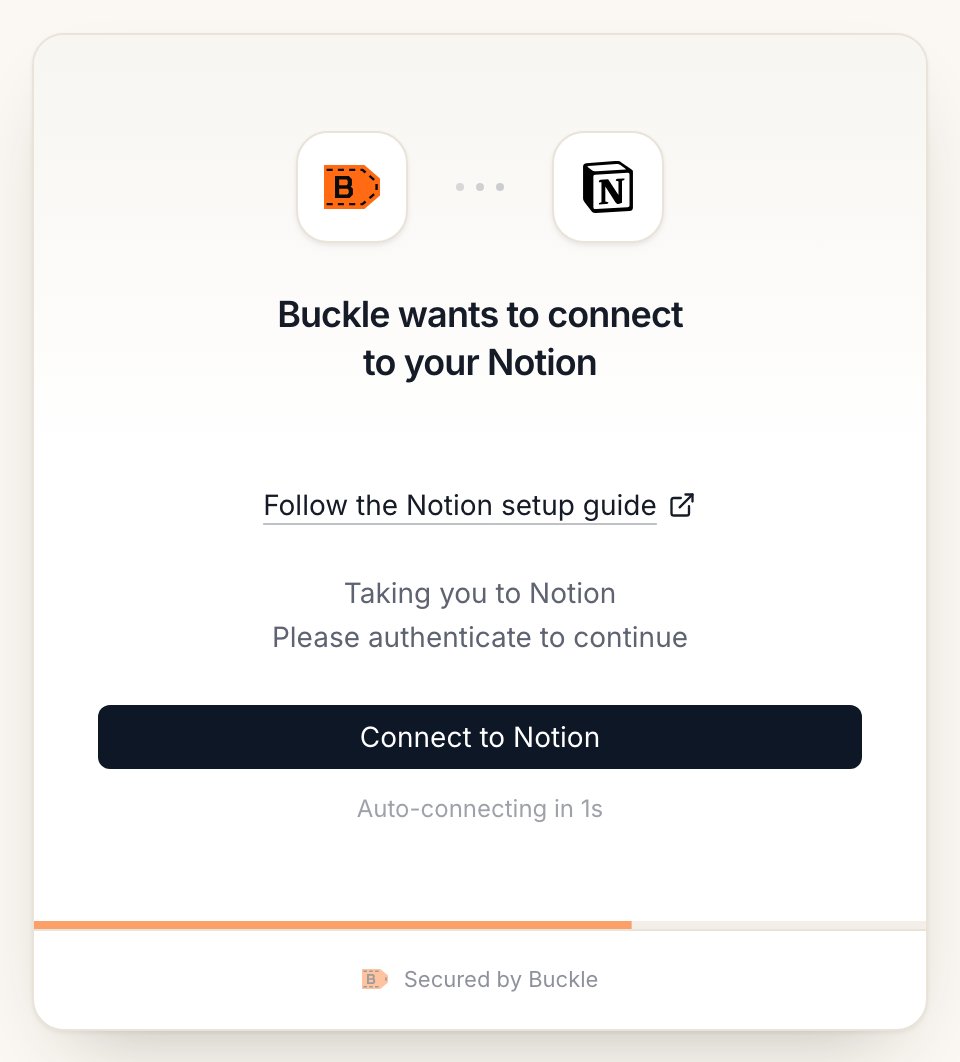
Click Connect Notion. You’ll be redirected to Notion to authorize Buckle. Select which pages and databases the integration can access, then click Allow access.
The Notion connect window on Buckle Cloud.
Self-hosted: use your own Notion integration
Skip this section on Buckle Cloud. It’s only for self-hosted Buckle without NOTION_CLIENT_ID and NOTION_CLIENT_SECRET set, or if you want your own company name on Notion’s consent screen.
1. Create the Notion integration
Go to notion.so/profile/integrations and select New integration. Name it Buckle, pick your workspace, set Type to Public, and save.
2. Set the capabilities
Open Capabilities and turn on the ones your agents need:
Capability
Why
Read content
Search and read pages and databases
Update content and Insert content
Create and edit pages
Read comments
Read page comments
Read user information without email addresses
Show who wrote what
3. Add the redirect URI
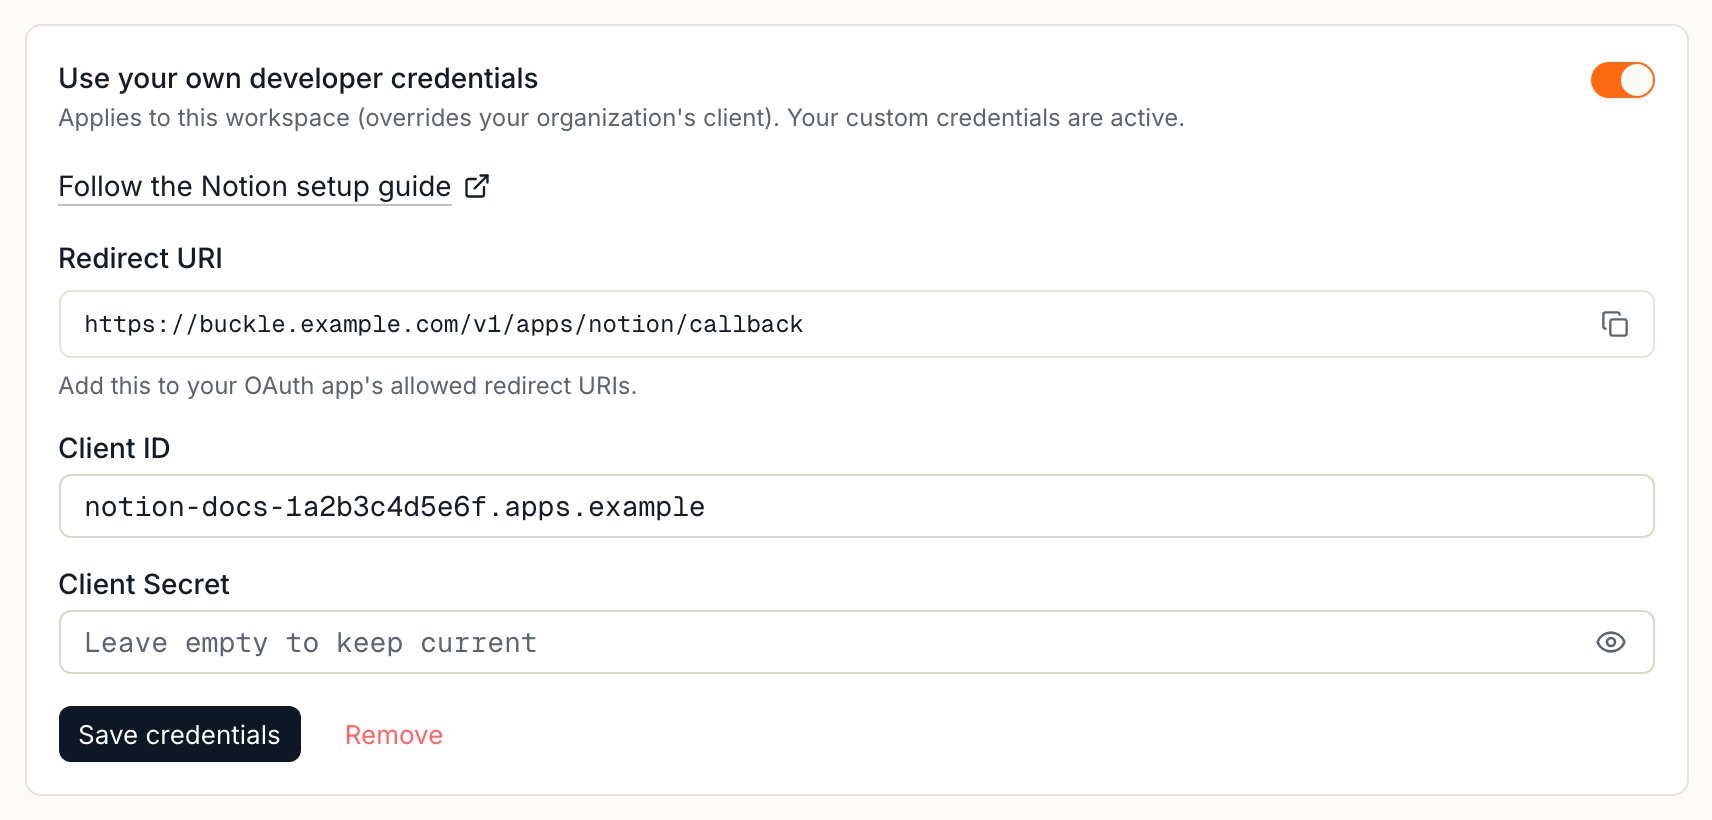
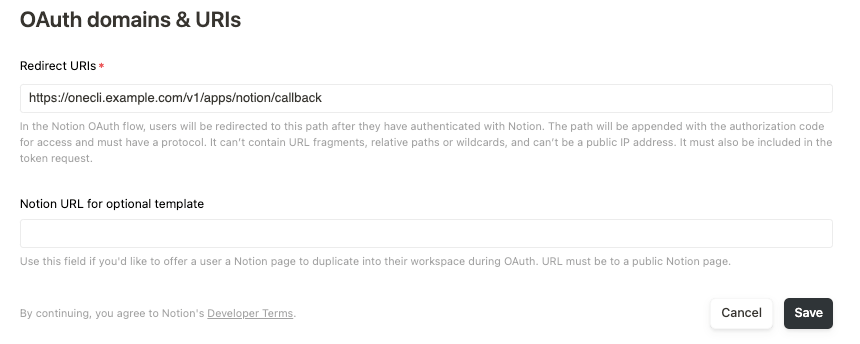
In Buckle, open Settings > Apps > Notion > Custom credentials and copy the Redirect URI. In Notion, open Configuration > OAuth Domain & URIs, paste it into Redirect URIs, and save.
Copy the Redirect URI from Custom credentials in Buckle.
Notion's OAuth domains & URIs section with the Buckle Redirect URI.
4. Connect with your integration
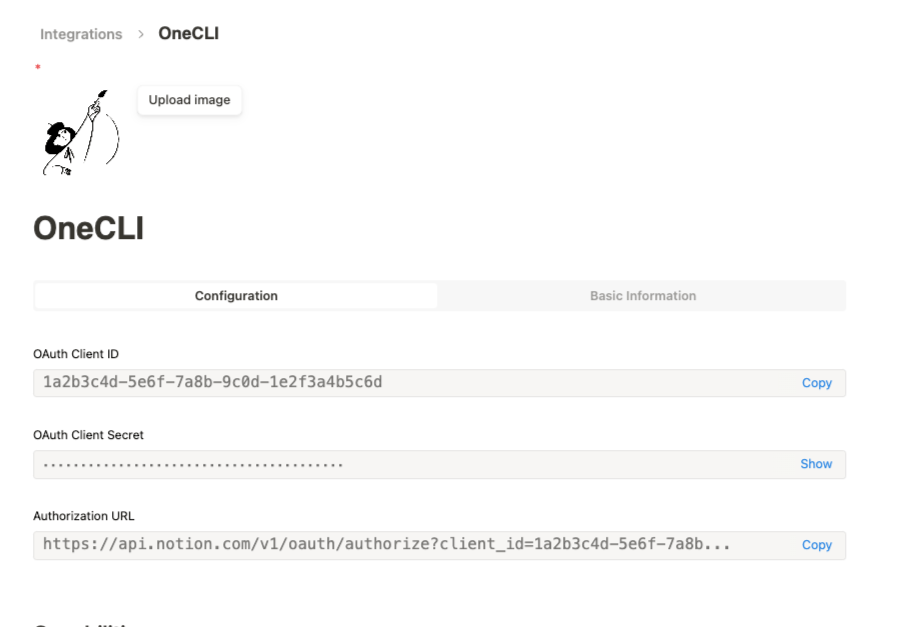
In Notion, open Configuration and copy the OAuth Client ID and OAuth Client Secret. Paste both into Settings > Apps > Notion > Custom credentials, select Save credentials, then Connect and allow access in Notion.
Your integration's Configuration tab in Notion: the OAuth Client ID and Client Secret.
What agents can do
Search across all accessible pages and databases by keyword
Read the full content of a page (text, headings, lists, tables, callouts)
Create new pages in a specified parent page or database
Access is per agent: grant the connection to each agent that needs it, choosing per tool what runs freely, what needs human approval, and what stays blocked — a read-only agent is a single grant. Organization rules add guardrails on top, like rate limits and blanket blocks. Everything is checked before credential injection, so a blocked request never reaches Notion.
FAQ
Which Notion pages can the agent see?
Only the pages and databases you select when you authorize Buckle in Notion.
Does the agent see my Notion token?
No. The token stays in Buckle, and the gateway adds it at the proxy. See How it works.
{"docsConfig":{"theme":"mint","$schema":"https://mintlify.com/docs.json","name":"Buckle","colors":{"primary":"#ff6a13","light":"#ff8236","dark":"#e55e0f"},"logo":{"light":"https://mintcdn.com/onecli-17d3f772/5_AFCR2UNaqNo0AT/logo/logo-full-light.svg?fit=max\u0026auto=format\u0026n=5_AFCR2UNaqNo0AT\u0026q=85\u0026s=30ceea1dd3505e0e9dea50b544521ced","dark":"https://mintcdn.com/onecli-17d3f772/5_AFCR2UNaqNo0AT/logo/logo-full-dark.svg?fit=max\u0026auto=format\u0026n=5_AFCR2UNaqNo0AT\u0026q=85\u0026s=120ef96cf376422549781454d97dd810","href":"https://buckle.dev"},"favicon":"https://mintcdn.com/onecli-17d3f772/hJP3XqgFsBDnXHKy/favicon.svg?fit=max\u0026auto=format\u0026n=hJP3XqgFsBDnXHKy\u0026q=85\u0026s=ddda982106e5fd52c3815a54c183f4b1","appearance":{"default":"light"},"background":{"color":{"light":"#FAFAF9","dark":"#1A1918"}},"navbar":{"links":[{"href":"https://github.com/trybuckle/buckle","label":"GitHub"},{"href":"https://buckle.dev","label":"Install"}]},"footer":{"socials":{"github":"https://github.com/trybuckle"}},"fonts":{"heading":{"family":"Chakra Petch","weight":700,"source":"fonts/ChakraPetch-700.woff2","format":"woff2"}},"contextual":{"options":["copy","view","chatgpt","claude","perplexity","mcp","cursor","vscode"],"display":"header"},"styling":{"latex":false},"navigation":{"global":{"anchors":[{"anchor":"GitHub","icon":"https://mintlify.s3.us-west-1.amazonaws.com/onecli-17d3f772/images/github.svg","href":"https://github.com/buckle"}]},"pages":[]}},"deployment":{"deploymentMetadataValue":{"subdomain":"onecli-17d3f772","hasAudioNarration":false,"actualSubdomain":"onecli-17d3f772","customDomains":[],"gitSource":{"type":"github","owner":"trybuckle","repo":"buckle-docs","deployBranch":"main","contentDirectory":"","isPrivate":true,"mountPath":"","label":"","_id":"6af9ac749033d7e87e8c505a"},"entitlements":{"AI_CHAT":{"status":"DISABLED"}},"buildId":"6af9b4b9e79e0e5d703531fb","clientVersion":"0.0.4143","searchFilterCounts":[{"language":"default","tag":"API Reference","count":240},{"language":"default","tag":"Workspace","count":105},{"language":"default","tag":"Integrations","count":88},{"language":"default","tag":"All app connections","count":64},{"language":"default","tag":"Enterprise","count":57},{"language":"default","tag":"Organization","count":52},{"language":"default","tag":"Apps","count":29},{"language":"default","tag":"Channels","count":28},{"language":"default","tag":"Platform","count":21},{"language":"default","tag":"Guides","count":17}]},"assistantConfig":{"enableAskAiButton":false,"enableStarterQuestions":false,"enableContextualStarterQuestions":false,"enableAskAiSearchBar":true},"basePath":"/docs","hasChatPermissions":false,"hasWebMcpPermissions":false,"toggles":[{"name":"kill-isr","enabled":true,"variant":{"name":"disabled","enabled":false,"feature_enabled":true},"impressionData":false},{"name":"custom-rbac-roles","enabled":true,"variant":{"name":"disabled","enabled":false,"feature_enabled":true},"impressionData":false},{"name":"agent-mintlify-slack","enabled":true,"variant":{"name":"disabled","enabled":false,"feature_enabled":true},"impressionData":false},{"name":"agent-integrations-settings","enabled":true,"variant":{"name":"disabled","enabled":false,"feature_enabled":true},"impressionData":false},{"name":"rbac-expansion","enabled":true,"variant":{"name":"disabled","enabled":false,"feature_enabled":true},"impressionData":false},{"name":"automations-pr-grouping","enabled":true,"variant":{"name":"disabled","enabled":false,"feature_enabled":true},"impressionData":false},{"name":"custom-prefix","enabled":true,"variant":{"name":"disabled","enabled":false,"feature_enabled":true},"impressionData":false},{"name":"analytics-v7","enabled":true,"variant":{"name":"disabled","enabled":false,"feature_enabled":true},"impressionData":false},{"name":"user-flows-analytics","enabled":true,"variant":{"name":"disabled","enabled":false,"feature_enabled":true},"impressionData":false},{"name":"no-publish-flow","enabled":true,"variant":{"name":"disabled","enabled":false,"feature_enabled":true},"impressionData":false},{"name":"workos-onboarding","enabled":true,"variant":{"name":"disabled","enabled":false,"feature_enabled":true},"impressionData":false},{"name":"snapshot-serving-live","enabled":true,"variant":{"name":"disabled","enabled":false,"feature_enabled":true},"impressionData":false},{"name":"stripTemperatureMiddleware","enabled":true,"variant":{"name":"disabled","enabled":false,"feature_enabled":true},"impressionData":false},{"name":"support-platform-pylon-zendesk","enabled":true,"variant":{"name":"disabled","enabled":false,"feature_enabled":true},"impressionData":false},{"name":"snapshot-serving","enabled":true,"variant":{"name":"disabled","enabled":false,"feature_enabled":true},"impressionData":false},{"name":"instant-rollback","enabled":true,"variant":{"name":"disabled","enabled":false,"feature_enabled":true},"impressionData":false},{"name":"granular-notifications-server","enabled":true,"variant":{"name":"disabled","enabled":false,"feature_enabled":true},"impressionData":false},{"name":"granular-notifications","enabled":true,"variant":{"name":"disabled","enabled":false,"feature_enabled":true},"impressionData":false},{"name":"automations-fable","enabled":true,"variant":{"name":"disabled","enabled":false,"feature_enabled":true},"impressionData":false},{"name":"fixed-ai-action-pricing","enabled":true,"variant":{"name":"disabled","enabled":false,"feature_enabled":true},"impressionData":false},{"name":"automation-resolve-merge-conflict","enabled":true,"variant":{"name":"disabled","enabled":false,"feature_enabled":true},"impressionData":false},{"name":"scoped-publishing","enabled":true,"variant":{"name":"disabled","enabled":false,"feature_enabled":true},"impressionData":false},{"name":"mintql","enabled":true,"variant":{"name":"disabled","enabled":false,"feature_enabled":true},"impressionData":false},{"name":"page-level-analytics","enabled":true,"variant":{"name":"disabled","enabled":false,"feature_enabled":true},"impressionData":false},{"name":"editor-version-history-v2","enabled":true,"variant":{"name":"disabled","enabled":false,"feature_enabled":true},"impressionData":false},{"name":"billing-page-v2","enabled":true,"variant":{"name":"disabled","enabled":false,"feature_enabled":true},"impressionData":false},{"name":"full-page-search","enabled":true,"variant":{"name":"disabled","enabled":false,"feature_enabled":true},"impressionData":false},{"name":"workspace-projects","enabled":true,"variant":{"name":"disabled","enabled":false,"feature_enabled":true},"impressionData":false},{"name":"assistant-v5","enabled":true,"variant":{"name":"disabled","enabled":false,"feature_enabled":true},"impressionData":false},{"name":"fork-pr-previews","enabled":true,"variant":{"name":"disabled","enabled":false,"feature_enabled":true},"impressionData":false},{"name":"revalidation-jwt","enabled":true,"variant":{"name":"disabled","enabled":false,"feature_enabled":true},"impressionData":false},{"name":"workos-sso-scim","enabled":true,"variant":{"name":"disabled","enabled":false,"feature_enabled":true},"impressionData":false},{"name":"hobby-abuse-scan","enabled":true,"variant":{"name":"disabled","enabled":false,"feature_enabled":true},"impressionData":false},{"name":"dashboard-inbox","enabled":true,"variant":{"name":"disabled","enabled":false,"feature_enabled":true},"impressionData":false},{"name":"workos-signup","enabled":true,"variant":{"name":"disabled","enabled":false,"feature_enabled":true},"impressionData":false},{"name":"turbopuffer-dual-write","enabled":true,"variant":{"name":"disabled","enabled":false,"feature_enabled":true},"impressionData":false},{"name":"workos-enabled","enabled":true,"variant":{"name":"disabled","enabled":false,"feature_enabled":true},"impressionData":false},{"name":"approve-review-flow","enabled":true,"variant":{"name":"disabled","enabled":false,"feature_enabled":true},"impressionData":false},{"name":"editor-metadata","enabled":true,"variant":{"name":"disabled","enabled":false,"feature_enabled":true},"impressionData":false},{"name":"sso-setup-deadline-banner","enabled":true,"variant":{"name":"disabled","enabled":false,"feature_enabled":true},"impressionData":false},{"name":"turbopuffer-serve","enabled":true,"variant":{"name":"disabled","enabled":false,"feature_enabled":true},"impressionData":false},{"name":"live-agents","enabled":true,"variant":{"name":"disabled","enabled":false,"feature_enabled":true},"impressionData":false},{"name":"llms-txt-v2","enabled":true,"variant":{"name":"disabled","enabled":false,"feature_enabled":true},"impressionData":false}],"googleFontsInlined":false},"customCss":[{"filePath":"style.css","content":"a.nav-anchor div.mr-4.rounded-md{--tw-ring-color: transparent !important;--tw-ring-shadow: 0 0 0 0 transparent !important;--tw-ring-offset-shadow: 0 0 0 0 transparent !important;box-shadow:none!important;background:transparent!important;filter:none!important;transition:opacity 0.15s ease!important}a.nav-anchor:hover div.mr-4.rounded-md{--tw-ring-color: transparent !important;--tw-ring-shadow: 0 0 0 0 transparent !important;--tw-ring-offset-shadow: 0 0 0 0 transparent !important;box-shadow:none!important;background:transparent!important;filter:none!important;opacity:0.7!important}a.nav-anchor div.mr-4.rounded-md img{opacity:1!important;filter:none!important;background:transparent!important}a.nav-anchor:hover div.mr-4.rounded-md img{opacity:1!important;filter:none!important;background:transparent!important}.dark a.nav-anchor div.mr-4.rounded-md img,[data-theme=\"dark\"] a.nav-anchor div.mr-4.rounded-md img{filter:invert(1)!important}"}],"page":{"pagePath":"integrations/notion","slug":"/integrations/notion","pageMetadata":{"title":"Let AI Agents Search and Update Notion Pages","sidebarTitle":"Notion","description":"Let agents search Notion, read pages, create notes, and query databases. Connect with OAuth, pick which pages to share, and keep tokens out of the agent.","canonical":"https://buckle.dev/docs/integrations/notion","href":"/integrations/notion"},"description":{"compiledSource":"\"use strict\";\nconst {jsx: _jsx} = arguments[0];\nconst {useMDXComponents: _provideComponents} = arguments[0];\nfunction _createMdxContent(props) {\n const _components = {\n p: \"p\",\n ..._provideComponents(),\n ...props.components\n };\n return _jsx(_components.p, {\n children: \"Let agents search Notion, read pages, create notes, and query databases. Connect with OAuth, pick which pages to share, and keep tokens out of the agent.\"\n });\n}\nfunction MDXContent(props = {}) {\n const {wrapper: MDXLayout} = {\n ..._provideComponents(),\n ...props.components\n };\n return MDXLayout ? _jsx(MDXLayout, {\n ...props,\n children: _jsx(_createMdxContent, {\n ...props\n })\n }) : _createMdxContent(props);\n}\nreturn {\n default: MDXContent\n};\n","frontmatter":{},"scope":{}},"pageType":"default","mdx":{"mdxSource":{"compiledSource":"\"use strict\";const{Fragment:_Fragment,jsx:_jsx,jsxs:_jsxs}=arguments[0];const{useMDXComponents:_provideComponents}=arguments[0];function _createMdxContent(props){const _components={a:`a`,code:`code`,li:`li`,p:`p`,strong:`strong`,tbody:`tbody`,td:`td`,th:`th`,thead:`thead`,tr:`tr`,ul:`ul`,..._provideComponents(),...props.components},{Accordion,AccordionGroup,Frame,Heading,Info,OptimizedImage,Step,Steps,Table}=_components;if(!Accordion)_missingMdxReference(`Accordion`,true);if(!AccordionGroup)_missingMdxReference(`AccordionGroup`,true);if(!Frame)_missingMdxReference(`Frame`,true);if(!Heading)_missingMdxReference(`Heading`,true);if(!Info)_missingMdxReference(`Info`,true);if(!OptimizedImage)_missingMdxReference(`OptimizedImage`,true);if(!Step)_missingMdxReference(`Step`,true);if(!Steps)_missingMdxReference(`Steps`,true);if(!Table)_missingMdxReference(`Table`,true);return _jsxs(_Fragment,{children:[_jsx(Heading,{level:`2`,id:`overview`,children:`Overview`}),`\n`,_jsx(_components.p,{children:`Buckle connects AI agents to Notion through Notion’s OAuth flow. Agents can search your workspace, read page content, create and update pages, and query databases. The gateway injects OAuth credentials into requests to the Notion API automatically.`}),`\n`,_jsx(_components.p,{children:`This is useful for agents that need to look up internal documentation, create tasks or notes, or sync data with Notion databases.`}),`\n`,_jsx(Heading,{level:`2`,id:`what-you-will-set-up`,children:`What you will set up`}),`\n`,_jsxs(_components.ul,{children:[`\n`,_jsx(_components.li,{children:`A Notion connection through OAuth, limited to the pages and databases you select`}),`\n`,_jsx(_components.li,{children:`Automatic token injection on Notion API requests`}),`\n`,_jsx(_components.li,{children:`Per-agent, per-tool access to your workspace`}),`\n`]}),`\n`,_jsx(Heading,{level:`2`,id:`setup`,children:`Setup`}),`\n`,_jsxs(Steps,{children:[_jsx(Step,{title:`Open the app`,children:_jsxs(_components.p,{children:[`Open the Buckle dashboard and navigate to `,_jsx(_components.strong,{children:`Settings`}),` > `,_jsx(_components.strong,{children:`Apps`}),` > `,_jsx(_components.strong,{children:`Notion`}),`.`]})}),_jsxs(Step,{title:`Authorize`,children:[_jsxs(_components.p,{children:[`Click `,_jsx(_components.strong,{children:`Connect Notion`}),`. You’ll be redirected to Notion to authorize Buckle. Select which pages and databases the integration can access, then click `,_jsx(_components.strong,{children:`Allow access`}),`.`]}),_jsx(Frame,{caption:`The Notion connect window on Buckle Cloud.`,children:_jsx(OptimizedImage,{src:`https://mintcdn.com/onecli-17d3f772/h1DTAVlDkLshz4JZ/images/integrations/notion/buckle-connect-notion.png?fit=max\u0026auto=format\u0026n=h1DTAVlDkLshz4JZ\u0026q=85\u0026s=d47db98d20637adb84ef6069fb87fd7c`,alt:`Buckle connect window for Notion on Cloud, showing the Connect to Notion button.`,\"data-og-width\":`960`,width:`960`,\"data-og-height\":`1062`,height:`1062`,\"data-path\":`images/integrations/notion/buckle-connect-notion.png`,\"data-optimize\":`true`,\"data-opv\":`3`,srcset:`https://mintcdn.com/onecli-17d3f772/h1DTAVlDkLshz4JZ/images/integrations/notion/buckle-connect-notion.png?w=280\u0026fit=max\u0026auto=format\u0026n=h1DTAVlDkLshz4JZ\u0026q=85\u0026s=f1f51fc084ad93e481551c3a7c32ca4c 280w, https://mintcdn.com/onecli-17d3f772/h1DTAVlDkLshz4JZ/images/integrations/notion/buckle-connect-notion.png?w=560\u0026fit=max\u0026auto=format\u0026n=h1DTAVlDkLshz4JZ\u0026q=85\u0026s=f7c2159405016cb0e69bd3bc21035c40 560w, https://mintcdn.com/onecli-17d3f772/h1DTAVlDkLshz4JZ/images/integrations/notion/buckle-connect-notion.png?w=840\u0026fit=max\u0026auto=format\u0026n=h1DTAVlDkLshz4JZ\u0026q=85\u0026s=67e876b1d804536148957a604cde089b 840w, https://mintcdn.com/onecli-17d3f772/h1DTAVlDkLshz4JZ/images/integrations/notion/buckle-connect-notion.png?w=1100\u0026fit=max\u0026auto=format\u0026n=h1DTAVlDkLshz4JZ\u0026q=85\u0026s=d63fc0c11d3302c8d355cc74a03f741e 1100w, https://mintcdn.com/onecli-17d3f772/h1DTAVlDkLshz4JZ/images/integrations/notion/buckle-connect-notion.png?w=1650\u0026fit=max\u0026auto=format\u0026n=h1DTAVlDkLshz4JZ\u0026q=85\u0026s=b261ae97a56d09d859008b95e3480112 1650w, https://mintcdn.com/onecli-17d3f772/h1DTAVlDkLshz4JZ/images/integrations/notion/buckle-connect-notion.png?w=2500\u0026fit=max\u0026auto=format\u0026n=h1DTAVlDkLshz4JZ\u0026q=85\u0026s=7394e181d89e2f7bf45ae52623547915 2500w`})})]})]}),`\n`,_jsx(`a`,{id:`self-hosted`,style:{scrollMarginTop:`8rem`}}),`\n`,_jsx(Heading,{level:`2`,id:`self-hosted-use-your-own-notion-integration`,children:`Self-hosted: use your own Notion integration`}),`\n`,_jsx(Info,{children:_jsxs(_components.p,{children:[_jsx(_components.strong,{children:`Skip this section on Buckle Cloud.`}),` It’s only for self-hosted Buckle without `,_jsx(_components.code,{children:`NOTION_CLIENT_ID`}),` and `,_jsx(_components.code,{children:`NOTION_CLIENT_SECRET`}),` set, or if you want your own company name on Notion’s consent screen.`]})}),`\n`,_jsxs(AccordionGroup,{children:[_jsx(Accordion,{title:`1. Create the Notion integration`,defaultOpen:true,id:`1-create-the-notion-integration`,children:_jsxs(_components.p,{children:[`Go to `,_jsx(_components.a,{href:`https://www.notion.so/profile/integrations`,children:`notion.so/profile/integrations`}),` and select `,_jsx(_components.strong,{children:`New integration`}),`. Name it `,_jsx(_components.code,{children:`Buckle`}),`, pick your workspace, set `,_jsx(_components.strong,{children:`Type`}),` to `,_jsx(_components.strong,{children:`Public`}),`, and save.`]})}),_jsxs(Accordion,{title:`2. Set the capabilities`,id:`2-set-the-capabilities`,children:[_jsxs(_components.p,{children:[`Open `,_jsx(_components.strong,{children:`Capabilities`}),` and turn on the ones your agents need:`]}),_jsxs(Table,{children:[_jsx(_components.thead,{children:_jsxs(_components.tr,{children:[_jsx(_components.th,{children:`Capability`}),_jsx(_components.th,{children:`Why`})]})}),_jsxs(_components.tbody,{children:[_jsxs(_components.tr,{children:[_jsx(_components.td,{children:_jsx(_components.strong,{children:`Read content`})}),_jsx(_components.td,{children:`Search and read pages and databases`})]}),_jsxs(_components.tr,{children:[_jsxs(_components.td,{children:[_jsx(_components.strong,{children:`Update content`}),` and `,_jsx(_components.strong,{children:`Insert content`})]}),_jsx(_components.td,{children:`Create and edit pages`})]}),_jsxs(_components.tr,{children:[_jsx(_components.td,{children:_jsx(_components.strong,{children:`Read comments`})}),_jsx(_components.td,{children:`Read page comments`})]}),_jsxs(_components.tr,{children:[_jsx(_components.td,{children:_jsx(_components.strong,{children:`Read user information without email addresses`})}),_jsx(_components.td,{children:`Show who wrote what`})]})]})]})]}),_jsxs(Accordion,{title:`3. Add the redirect URI`,id:`3-add-the-redirect-uri`,children:[_jsxs(_components.p,{children:[`In Buckle, open `,_jsx(_components.strong,{children:`Settings`}),` > `,_jsx(_components.strong,{children:`Apps`}),` > `,_jsx(_components.strong,{children:`Notion`}),` > `,_jsx(_components.strong,{children:`Custom credentials`}),` and copy the `,_jsx(_components.strong,{children:`Redirect URI`}),`. In Notion, open `,_jsx(_components.strong,{children:`Configuration`}),` > `,_jsx(_components.strong,{children:`OAuth Domain \u0026 URIs`}),`, paste it into `,_jsx(_components.strong,{children:`Redirect URIs`}),`, and save.`]}),_jsx(Frame,{caption:`Copy the Redirect URI from Custom credentials in Buckle.`,children:_jsx(OptimizedImage,{src:`https://mintcdn.com/onecli-17d3f772/h1DTAVlDkLshz4JZ/images/integrations/notion/buckle-custom-credentials-notion.png?fit=max\u0026auto=format\u0026n=h1DTAVlDkLshz4JZ\u0026q=85\u0026s=10e35d8d9a6c30dcbedf258fc312683a`,alt:`Buckle Custom credentials card for Notion with the setup guide link, the Redirect URI and its copy button, and the client ID and secret fields.`,\"data-og-width\":`1712`,width:`1712`,\"data-og-height\":`820`,height:`820`,\"data-path\":`images/integrations/notion/buckle-custom-credentials-notion.png`,\"data-optimize\":`true`,\"data-opv\":`3`,srcset:`https://mintcdn.com/onecli-17d3f772/h1DTAVlDkLshz4JZ/images/integrations/notion/buckle-custom-credentials-notion.png?w=280\u0026fit=max\u0026auto=format\u0026n=h1DTAVlDkLshz4JZ\u0026q=85\u0026s=60d149d4ea59cfaba34c865212fc8db2 280w, https://mintcdn.com/onecli-17d3f772/h1DTAVlDkLshz4JZ/images/integrations/notion/buckle-custom-credentials-notion.png?w=560\u0026fit=max\u0026auto=format\u0026n=h1DTAVlDkLshz4JZ\u0026q=85\u0026s=f7a2fd9469077eb05df46988881749ca 560w, https://mintcdn.com/onecli-17d3f772/h1DTAVlDkLshz4JZ/images/integrations/notion/buckle-custom-credentials-notion.png?w=840\u0026fit=max\u0026auto=format\u0026n=h1DTAVlDkLshz4JZ\u0026q=85\u0026s=e0230b8149ccad88729d77324b67a2fa 840w, https://mintcdn.com/onecli-17d3f772/h1DTAVlDkLshz4JZ/images/integrations/notion/buckle-custom-credentials-notion.png?w=1100\u0026fit=max\u0026auto=format\u0026n=h1DTAVlDkLshz4JZ\u0026q=85\u0026s=1c9a4a9965579dbb4a4267a4d42a24ea 1100w, https://mintcdn.com/onecli-17d3f772/h1DTAVlDkLshz4JZ/images/integrations/notion/buckle-custom-credentials-notion.png?w=1650\u0026fit=max\u0026auto=format\u0026n=h1DTAVlDkLshz4JZ\u0026q=85\u0026s=f53fe5eaea33a49695fc8ac5b774c16b 1650w, https://mintcdn.com/onecli-17d3f772/h1DTAVlDkLshz4JZ/images/integrations/notion/buckle-custom-credentials-notion.png?w=2500\u0026fit=max\u0026auto=format\u0026n=h1DTAVlDkLshz4JZ\u0026q=85\u0026s=2a22316be356517f8e5c34e53fb6026e 2500w`})}),_jsx(Frame,{caption:`Notion's OAuth domains \u0026 URIs section with the Buckle Redirect URI.`,children:_jsx(OptimizedImage,{src:`https://mintcdn.com/onecli-17d3f772/h1DTAVlDkLshz4JZ/images/integrations/notion/02-provider-redirect.png?fit=max\u0026auto=format\u0026n=h1DTAVlDkLshz4JZ\u0026q=85\u0026s=f4f187035881528167966ecb0b247703`,alt:`Notion integration settings, OAuth domains and URIs section, with https://buckle.example.com/v1/apps/notion/callback in Redirect URIs.`,\"data-og-width\":`860`,width:`860`,\"data-og-height\":`344`,height:`344`,\"data-path\":`images/integrations/notion/02-provider-redirect.png`,\"data-optimize\":`true`,\"data-opv\":`3`,srcset:`https://mintcdn.com/onecli-17d3f772/h1DTAVlDkLshz4JZ/images/integrations/notion/02-provider-redirect.png?w=280\u0026fit=max\u0026auto=format\u0026n=h1DTAVlDkLshz4JZ\u0026q=85\u0026s=01ced62ff818574851a9b547b04381d4 280w, https://mintcdn.com/onecli-17d3f772/h1DTAVlDkLshz4JZ/images/integrations/notion/02-provider-redirect.png?w=560\u0026fit=max\u0026auto=format\u0026n=h1DTAVlDkLshz4JZ\u0026q=85\u0026s=3c5f053bb817428f63e0a6c7be055f5c 560w, https://mintcdn.com/onecli-17d3f772/h1DTAVlDkLshz4JZ/images/integrations/notion/02-provider-redirect.png?w=840\u0026fit=max\u0026auto=format\u0026n=h1DTAVlDkLshz4JZ\u0026q=85\u0026s=7b44473a997452c48245e226ace239d8 840w, https://mintcdn.com/onecli-17d3f772/h1DTAVlDkLshz4JZ/images/integrations/notion/02-provider-redirect.png?w=1100\u0026fit=max\u0026auto=format\u0026n=h1DTAVlDkLshz4JZ\u0026q=85\u0026s=6a5377146274cd5534d46a6d8ffaa57b 1100w, https://mintcdn.com/onecli-17d3f772/h1DTAVlDkLshz4JZ/images/integrations/notion/02-provider-redirect.png?w=1650\u0026fit=max\u0026auto=format\u0026n=h1DTAVlDkLshz4JZ\u0026q=85\u0026s=996cf0475f5beedf05fbd6fb24c8de04 1650w, https://mintcdn.com/onecli-17d3f772/h1DTAVlDkLshz4JZ/images/integrations/notion/02-provider-redirect.png?w=2500\u0026fit=max\u0026auto=format\u0026n=h1DTAVlDkLshz4JZ\u0026q=85\u0026s=6ed208201072d7a032ca5858602d350c 2500w`})})]}),_jsxs(Accordion,{title:`4. Connect with your integration`,id:`4-connect-with-your-integration`,children:[_jsxs(_components.p,{children:[`In Notion, open `,_jsx(_components.strong,{children:`Configuration`}),` and copy the `,_jsx(_components.strong,{children:`OAuth Client ID`}),` and `,_jsx(_components.strong,{children:`OAuth Client Secret`}),`. Paste both into `,_jsx(_components.strong,{children:`Settings`}),` > `,_jsx(_components.strong,{children:`Apps`}),` > `,_jsx(_components.strong,{children:`Notion`}),` > `,_jsx(_components.strong,{children:`Custom credentials`}),`, select `,_jsx(_components.strong,{children:`Save credentials`}),`, then `,_jsx(_components.strong,{children:`Connect`}),` and allow access in Notion.`]}),_jsx(Frame,{caption:`Your integration's Configuration tab in Notion: the OAuth Client ID and Client Secret.`,children:_jsx(OptimizedImage,{src:`https://mintcdn.com/onecli-17d3f772/h1DTAVlDkLshz4JZ/images/integrations/notion/01-provider-setup.png?fit=max\u0026auto=format\u0026n=h1DTAVlDkLshz4JZ\u0026q=85\u0026s=ebb4a78075c445388e1bf66ee0ace2b8`,alt:`Notion integration named Buckle, Configuration tab showing the OAuth Client ID, a hidden OAuth Client Secret, and the Authorization URL.`,\"data-og-width\":`912`,width:`912`,\"data-og-height\":`627`,height:`627`,\"data-path\":`images/integrations/notion/01-provider-setup.png`,\"data-optimize\":`true`,\"data-opv\":`3`,srcset:`https://mintcdn.com/onecli-17d3f772/h1DTAVlDkLshz4JZ/images/integrations/notion/01-provider-setup.png?w=280\u0026fit=max\u0026auto=format\u0026n=h1DTAVlDkLshz4JZ\u0026q=85\u0026s=52314afdef7600ee1ddd081fa5e592a2 280w, https://mintcdn.com/onecli-17d3f772/h1DTAVlDkLshz4JZ/images/integrations/notion/01-provider-setup.png?w=560\u0026fit=max\u0026auto=format\u0026n=h1DTAVlDkLshz4JZ\u0026q=85\u0026s=b3400173e7e3d499e5411b8f9a18974c 560w, https://mintcdn.com/onecli-17d3f772/h1DTAVlDkLshz4JZ/images/integrations/notion/01-provider-setup.png?w=840\u0026fit=max\u0026auto=format\u0026n=h1DTAVlDkLshz4JZ\u0026q=85\u0026s=bfe4c95ce873aec0e64541e5a2f608ae 840w, https://mintcdn.com/onecli-17d3f772/h1DTAVlDkLshz4JZ/images/integrations/notion/01-provider-setup.png?w=1100\u0026fit=max\u0026auto=format\u0026n=h1DTAVlDkLshz4JZ\u0026q=85\u0026s=f54fb81b32aa60810b9547e674e288f8 1100w, https://mintcdn.com/onecli-17d3f772/h1DTAVlDkLshz4JZ/images/integrations/notion/01-provider-setup.png?w=1650\u0026fit=max\u0026auto=format\u0026n=h1DTAVlDkLshz4JZ\u0026q=85\u0026s=13e09b7dd96fba62ed180111fcb3aea0 1650w, https://mintcdn.com/onecli-17d3f772/h1DTAVlDkLshz4JZ/images/integrations/notion/01-provider-setup.png?w=2500\u0026fit=max\u0026auto=format\u0026n=h1DTAVlDkLshz4JZ\u0026q=85\u0026s=401f9a0b4877ddfffd5f5c16f2b275a8 2500w`})})]})]}),`\n`,_jsx(Heading,{level:`2`,id:`what-agents-can-do`,children:`What agents can do`}),`\n`,_jsxs(_components.ul,{children:[`\n`,_jsx(_components.li,{children:`Search across all accessible pages and databases by keyword`}),`\n`,_jsx(_components.li,{children:`Read the full content of a page (text, headings, lists, tables, callouts)`}),`\n`,_jsx(_components.li,{children:`Create new pages in a specified parent page or database`}),`\n`,_jsx(_components.li,{children:`Update existing page content (append blocks, modify properties)`}),`\n`,_jsx(_components.li,{children:`Query databases with filters and sorts (e.g., all tasks with status “In Progress”)`}),`\n`,_jsx(_components.li,{children:`Create new entries in a database with specified property values`}),`\n`,_jsx(_components.li,{children:`Update database entry properties (status, assignee, dates, tags)`}),`\n`,_jsx(_components.li,{children:`Read database schema (property names, types, select options)`}),`\n`,_jsx(_components.li,{children:`Archive and restore pages`}),`\n`,_jsx(_components.li,{children:`Read and add comments on a page`}),`\n`]}),`\n`,_jsx(Heading,{level:`2`,id:`controlling-access`,children:`Controlling access`}),`\n`,_jsxs(_components.p,{children:[`Access is per agent: `,_jsx(_components.a,{href:`/guides/agent-access`,children:`grant`}),` the connection to each agent that needs it, choosing per tool what runs freely, what needs human approval, and what stays blocked — a read-only agent is a single grant. Organization `,_jsx(_components.a,{href:`/guides/rules`,children:`rules`}),` add guardrails on top, like rate limits and blanket blocks. Everything is checked before credential injection, so a blocked request never reaches Notion.`]}),`\n`,_jsx(Heading,{level:`2`,id:`faq`,children:`FAQ`}),`\n`,_jsxs(AccordionGroup,{children:[_jsx(Accordion,{title:`Which Notion pages can the agent see?`,id:`which-notion-pages-can-the-agent-see`,children:_jsx(_components.p,{children:`Only the pages and databases you select when you authorize Buckle in Notion.`})}),_jsx(Accordion,{title:`Does the agent see my Notion token?`,id:`does-the-agent-see-my-notion-token`,children:_jsxs(_components.p,{children:[`No. The token stays in Buckle, and the gateway adds it at the proxy. See `,_jsx(_components.a,{href:`/how-it-works`,children:`How it works`}),`.`]})}),_jsx(Accordion,{title:`Can an agent read Notion without writing?`,id:`can-an-agent-read-notion-without-writing`,children:_jsxs(_components.p,{children:[`Yes. A read-only agent is a single `,_jsx(_components.a,{href:`/guides/agent-access`,children:`grant`}),`.`]})})]})]})}function MDXContent(props={}){const{wrapper:MDXLayout}={..._provideComponents(),...props.components};return MDXLayout?_jsx(MDXLayout,{...props,children:_jsx(_createMdxContent,{...props})}):_createMdxContent(props)}return{default:MDXContent};function _missingMdxReference(id,component){throw new Error(`Expected `+(component?`component`:`object`)+\" `\"+id+\"` to be defined: you likely forgot to import, pass, or provide it.\")}","frontmatter":{},"scope":{"config":{},"pageMetadata":{"title":"Let AI Agents Search and Update Notion Pages","sidebarTitle":"Notion","description":"Let agents search Notion, read pages, create notes, and query databases. Connect with OAuth, pick which pages to share, and keep tokens out of the agent.","canonical":"https://buckle.dev/docs/integrations/notion","href":"/integrations/notion"}}},"mdxSourceWithNoJs":null},"mdxExtracts":{"tableOfContents":[{"title":"Overview","slug":"overview","depth":2,"children":[]},{"title":"What you will set up","slug":"what-you-will-set-up","depth":2,"children":[]},{"title":"Setup","slug":"setup","depth":2,"children":[]},{"title":"Self-hosted: use your own Notion integration","slug":"self-hosted-use-your-own-notion-integration","depth":2,"children":[]},{"title":"What agents can do","slug":"what-agents-can-do","depth":2,"children":[]},{"title":"Controlling access","slug":"controlling-access","depth":2,"children":[]},{"title":"FAQ","slug":"faq","depth":2,"children":[]}],"codeExamples":{}},"jsLinks":["/docs/_mintlify/custom/onecli-17d3f772/e8c5fc0faf4d8de9/infra/cloudfront/docs-response-headers.js"],"subdomain":"onecli-17d3f772","siteName":"Buckle","title":"Let AI Agents Search and Update Notion Pages - Buckle","navMaps":{"firstHrefInVersion":{},"firstHrefInLanguage":{}},"lastModified":"2026-11-15T13:34:02.491Z","originalFileLocation":"integrations/notion.mdx"},"headHtml":"\u003cscript data-mint-head>(function(){var d=document.documentElement,p=null;if(!p){try{p=localStorage.getItem(\"isDarkMode\")}catch(e){}if(p==='true')p='dark';else if(p==='false')p='light';if(p!=='light'\u0026\u0026p!=='dark'\u0026\u0026p!=='system')p=\"light\"}var r=p==='system'?(matchMedia(\"(prefers-color-scheme: dark)\").matches?'dark':'light'):p;d.classList.remove(r==='dark'?'light':'dark');d.classList.add(r);d.setAttribute(\"data-theme-preference\",p)})();\u003c/script>\u003cmeta data-mint-head name=\"description\" content=\"Let agents search Notion, read pages, create notes, and query databases. Connect with OAuth, pick which pages to share, and keep tokens out of the agent.\">\u003cmeta data-mint-head name=\"application-name\" content=\"Buckle\">\u003cmeta data-mint-head name=\"generator\" content=\"Mintlify\">\u003clink data-mint-head rel=\"icon\" type=\"image/png\" sizes=\"192x192\" href=\"/docs/mintlify-assets/_mintlify/favicons/onecli-17d3f772/eFiEtTXh_9JK0wwc/_generated/favicon/android-chrome-192x192.png\" media=\"(prefers-color-scheme: light)\">\u003clink data-mint-head rel=\"apple-touch-icon\" type=\"image/png\" sizes=\"180x180\" href=\"/docs/mintlify-assets/_mintlify/favicons/onecli-17d3f772/eFiEtTXh_9JK0wwc/_generated/favicon/apple-touch-icon.png\">\u003clink data-mint-head rel=\"icon\" type=\"image/png\" sizes=\"16x16\" href=\"/docs/mintlify-assets/_mintlify/favicons/onecli-17d3f772/eFiEtTXh_9JK0wwc/_generated/favicon/favicon-16x16.png\" media=\"(prefers-color-scheme: light)\">\u003clink data-mint-head rel=\"icon\" type=\"image/png\" sizes=\"32x32\" href=\"/docs/mintlify-assets/_mintlify/favicons/onecli-17d3f772/eFiEtTXh_9JK0wwc/_generated/favicon/favicon-32x32.png\" media=\"(prefers-color-scheme: light)\">\u003clink data-mint-head rel=\"shortcut icon\" type=\"image/x-icon\" href=\"/docs/mintlify-assets/_mintlify/favicons/onecli-17d3f772/eFiEtTXh_9JK0wwc/_generated/favicon/favicon.ico\" media=\"(prefers-color-scheme: light)\">\u003clink data-mint-head rel=\"icon\" type=\"image/png\" sizes=\"192x192\" href=\"/docs/mintlify-assets/_mintlify/favicons/onecli-17d3f772/eFiEtTXh_9JK0wwc/_generated/favicon-dark/android-chrome-192x192.png\" media=\"(prefers-color-scheme: dark)\">\u003clink data-mint-head rel=\"icon\" type=\"image/png\" sizes=\"16x16\" href=\"/docs/mintlify-assets/_mintlify/favicons/onecli-17d3f772/eFiEtTXh_9JK0wwc/_generated/favicon-dark/favicon-16x16.png\" media=\"(prefers-color-scheme: dark)\">\u003clink data-mint-head rel=\"icon\" type=\"image/png\" sizes=\"32x32\" href=\"/docs/mintlify-assets/_mintlify/favicons/onecli-17d3f772/eFiEtTXh_9JK0wwc/_generated/favicon-dark/favicon-32x32.png\" media=\"(prefers-color-scheme: dark)\">\u003clink data-mint-head rel=\"shortcut icon\" type=\"image/x-icon\" href=\"/docs/mintlify-assets/_mintlify/favicons/onecli-17d3f772/eFiEtTXh_9JK0wwc/_generated/favicon-dark/favicon.ico\" media=\"(prefers-color-scheme: dark)\">\u003cmeta data-mint-head property=\"og:title\" content=\"Let AI Agents Search and Update Notion Pages - Buckle\">\u003cmeta data-mint-head property=\"og:description\" content=\"Let agents search Notion, read pages, create notes, and query databases. Connect with OAuth, pick which pages to share, and keep tokens out of the agent.\">\u003cmeta data-mint-head property=\"og:site_name\" content=\"Buckle\">\u003cmeta data-mint-head property=\"og:url\" content=\"https://buckle.dev/docs/integrations/notion\">\u003cmeta data-mint-head property=\"og:type\" content=\"website\">\u003cmeta data-mint-head property=\"og:image\" content=\"https://onecli-17d3f772.mintlify.site/docs/_mintlify/api/og/v2?division=All+app+connections\u0026amp;title=Let+AI+Agents+Search+and+Update+Notion+Pages\u0026amp;description=Let+agents+search+Notion%2C+read+pages%2C+create+notes%2C+and+query+databases.+Connect+with+OAuth%2C+pick+which+pages+to+share%2C+and+keep+tokens+out+of+the+agent.\u0026amp;theme=14ca75cbbb2a0e9ba5cd5703\u0026amp;signature=82decd226b733dceb47072eb1ed021adffff4735c6e829e56e43aac93c93393f\">\u003cmeta data-mint-head property=\"og:image:width\" content=\"1200\">\u003cmeta data-mint-head property=\"og:image:height\" content=\"630\">\u003cmeta data-mint-head name=\"twitter:card\" content=\"summary_large_image\">\u003cmeta data-mint-head name=\"twitter:title\" content=\"Let AI Agents Search and Update Notion Pages - Buckle\">\u003cmeta data-mint-head name=\"twitter:description\" content=\"Let agents search Notion, read pages, create notes, and query databases. Connect with OAuth, pick which pages to share, and keep tokens out of the agent.\">\u003cmeta data-mint-head name=\"twitter:image\" content=\"https://onecli-17d3f772.mintlify.site/docs/_mintlify/api/og/v2?division=All+app+connections\u0026amp;title=Let+AI+Agents+Search+and+Update+Notion+Pages\u0026amp;description=Let+agents+search+Notion%2C+read+pages%2C+create+notes%2C+and+query+databases.+Connect+with+OAuth%2C+pick+which+pages+to+share%2C+and+keep+tokens+out+of+the+agent.\u0026amp;theme=14ca75cbbb2a0e9ba5cd5703\u0026amp;signature=82decd226b733dceb47072eb1ed021adffff4735c6e829e56e43aac93c93393f\">\u003cmeta data-mint-head name=\"twitter:image:width\" content=\"1200\">\u003cmeta data-mint-head name=\"twitter:image:height\" content=\"630\">\u003cmeta data-mint-head name=\"msapplication-config\" content=\"/docs/mintlify-assets/_mintlify/favicons/onecli-17d3f772/eFiEtTXh_9JK0wwc/_generated/favicon/browserconfig.xml\">\u003cmeta data-mint-head name=\"apple-mobile-web-app-title\" content=\"Buckle\">\u003cmeta data-mint-head name=\"msapplication-TileColor\" content=\"#ff6a13\">\u003clink data-mint-head rel=\"canonical\" href=\"https://buckle.dev/docs/integrations/notion\">\u003clink data-mint-head rel=\"alternate\" type=\"application/xml\" href=\"/docs/sitemap.xml\">\u003clink data-mint-head rel=\"alternate\" type=\"text/markdown\" href=\"/docs/integrations/notion.md\">\u003cscript data-mint-head type=\"application/ld+json\">{\"@context\":\"https://schema.org\",\"@graph\":[{\"@type\":\"Organization\",\"@id\":\"https://onecli-17d3f772.mintlify.dev/#organization\",\"name\":\"Buckle\",\"url\":\"https://onecli-17d3f772.mintlify.dev\",\"logo\":{\"@type\":\"ImageObject\",\"url\":\"https://mintcdn.com/onecli-17d3f772/5_AFCR2UNaqNo0AT/logo/logo-full-light.svg?fit=max\u0026auto=format\u0026n=5_AFCR2UNaqNo0AT\u0026q=85\u0026s=30ceea1dd3505e0e9dea50b544521ced\"}},{\"@type\":\"WebSite\",\"@id\":\"https://onecli-17d3f772.mintlify.dev/docs#website\",\"name\":\"Buckle\",\"url\":\"https://onecli-17d3f772.mintlify.dev/docs\",\"publisher\":{\"@id\":\"https://onecli-17d3f772.mintlify.dev/#organization\"}},{\"@type\":\"WebPage\",\"@id\":\"https://buckle.dev/docs/integrations/notion#webpage\",\"url\":\"https://buckle.dev/docs/integrations/notion\",\"name\":\"Let AI Agents Search and Update Notion Pages\",\"description\":\"Let agents search Notion, read pages, create notes, and query databases. Connect with OAuth, pick which pages to share, and keep tokens out of the agent.\",\"dateModified\":\"2026-11-15T13:34:02.491Z\",\"isPartOf\":{\"@id\":\"https://onecli-17d3f772.mintlify.dev/docs#website\"},\"breadcrumb\":{\"@id\":\"https://buckle.dev/docs/integrations/notion#breadcrumb\"}},{\"@type\":\"BreadcrumbList\",\"@id\":\"https://buckle.dev/docs/integrations/notion#breadcrumb\",\"itemListElement\":[{\"@type\":\"ListItem\",\"position\":1,\"name\":\"All app connections\",\"item\":\"https://onecli-17d3f772.mintlify.dev/docs/integrations/affinity\"},{\"@type\":\"ListItem\",\"position\":2,\"name\":\"Let AI Agents Search and Update Notion Pages\",\"item\":\"https://buckle.dev/docs/integrations/notion\"}]},{\"@type\":[\"Article\",\"TechArticle\"],\"@id\":\"https://buckle.dev/docs/integrations/notion#article\",\"headline\":\"Let AI Agents Search and Update Notion Pages\",\"name\":\"Let AI Agents Search and Update Notion Pages\",\"description\":\"Let agents search Notion, read pages, create notes, and query databases. Connect with OAuth, pick which pages to share, and keep tokens out of the agent.\",\"url\":\"https://buckle.dev/docs/integrations/notion\",\"mainEntityOfPage\":{\"@id\":\"https://buckle.dev/docs/integrations/notion#webpage\"},\"dateModified\":\"2026-11-15T13:34:02.491Z\",\"publisher\":{\"@id\":\"https://onecli-17d3f772.mintlify.dev/#organization\"},\"isPartOf\":{\"@id\":\"https://onecli-17d3f772.mintlify.dev/docs#website\"}}]}\u003c/script>\u003cscript data-mint-head type=\"application/ld+json\">{\"@context\":\"https://schema.org\",\"@type\":\"WebSite\",\"name\":\"Buckle\",\"publisher\":{\"@type\":\"Organization\",\"name\":\"Buckle\"},\"provider\":{\"@type\":\"Organization\",\"name\":\"Mintlify\",\"url\":\"https://mintlify.com\"}}\u003c/script>","agentPointerHref":"/docs/integrations/notion.md","siteName":"Buckle","nav":{"global":{"anchors":[{"anchor":"GitHub","icon":"https://mintlify.s3.us-west-1.amazonaws.com/onecli-17d3f772/images/github.svg","href":"https://github.com/buckle"}]},"tabs":[{"tab":"Documentation","pages":[{"title":"Documentation","href":""}]},{"tab":"Integrations","groups":[{"group":"Integrations","root":{"title":"Integrations: Connect Agents to External Services","sidebarTitle":"Overview","href":"/integrations"},"pages":[{"title":"App Connections: How OAuth \u0026 API Keys Work","sidebarTitle":"App Connections","href":"/integrations/app-connections"},{"title":"Custom Connections: Connect Any API With a Key","sidebarTitle":"Custom connections","href":"/integrations/custom-connections"},{"title":"Chat With AI Agents and Approve Actions in Slack","sidebarTitle":"Slack","href":"/integrations/slack"},{"title":"Keep LLM API Keys Out of Your AI Agents","sidebarTitle":"LLMs","href":"/integrations/llms"},{"title":"External Vaults: Connect Password Managers","sidebarTitle":"External Vaults","href":"/vaults/overview"}]},{"group":"Cloud integrations","pages":[{"title":"Prospect and Enrich Leads in Apollo.io With Agents","sidebarTitle":"Apollo.io","href":"/integrations/apollo-io"},{"title":"Use AWS From AI Agents Without Exposing Keys","sidebarTitle":"AWS","href":"/integrations/aws"},{"title":"Let AI Agents Open PRs and Issues on GitHub","sidebarTitle":"GitHub","href":"/integrations/github"},{"title":"Org-Approved GitHub Repo Access for AI Agents","sidebarTitle":"GitHub App","href":"/integrations/github-app"},{"title":"Let AI Agents Query Datadog Metrics and Monitors","sidebarTitle":"Datadog","href":"/integrations/datadog"},{"title":"Let AI Agents Update HubSpot CRM Records","sidebarTitle":"HubSpot","href":"/integrations/hubspot"},{"title":"Let AI Agents Triage Sentry Errors","sidebarTitle":"Sentry","href":"/integrations/sentry"},{"title":"Let AI Agents Read and Write OneNote Notebooks","sidebarTitle":"Microsoft OneNote","href":"/integrations/microsoft-onenote"},{"title":"Connect AI Agents to Outlook Mail in Microsoft 365","sidebarTitle":"Outlook Mail","href":"/integrations/outlook-mail"},{"title":"Let AI Agents Book Meetings in Outlook Calendar","sidebarTitle":"Outlook Calendar","href":"/integrations/outlook-calendar"}]},{"group":"All app connections","pages":[{"title":"Connect AI Agents to Affinity CRM With an API Key","sidebarTitle":"Affinity","href":"/integrations/affinity"},{"title":"Let AI Agents Manage Attio CRM Records","sidebarTitle":"Attio","href":"/integrations/attio"},{"title":"Run Clay Enrichment From AI Agents","sidebarTitle":"Clay","href":"/integrations/clay"},{"title":"Query PostHog Analytics and Flags From Agents","sidebarTitle":"PostHog","href":"/integrations/posthog"},{"title":"Connect AI Agents to Salesforce With an External App","sidebarTitle":"Salesforce","href":"/integrations/salesforce"},{"title":"Turn Timeless Meetings Into Agent Follow-Ups","sidebarTitle":"Timeless","href":"/integrations/timeless"},{"title":"Let Agents Search Circleback Meeting Notes","sidebarTitle":"Circleback","href":"/integrations/circleback"},{"title":"Run HeyReach LinkedIn Campaigns From AI Agents","sidebarTitle":"HeyReach","href":"/integrations/heyreach"},{"title":"Automate Dripify LinkedIn Outreach With Agents","sidebarTitle":"Dripify","href":"/integrations/dripify"},{"title":"Let On-Call Agents Triage PagerDuty Incidents","sidebarTitle":"PagerDuty","href":"/integrations/pagerduty"},{"title":"Query Coralogix Logs and Metrics From Agents","sidebarTitle":"Coralogix","href":"/integrations/coralogix"},{"title":"Search Company Knowledge in Onyx From Agents","sidebarTitle":"Onyx","href":"/integrations/onyx"},{"title":"Scoped Cloudflare API Tokens for AI Agents","sidebarTitle":"Cloudflare","href":"/integrations/cloudflare"},{"title":"Set Up One Google OAuth Client for All Google Apps","sidebarTitle":"Google (setup)","href":"/integrations/google"},{"title":"Let AI Agents Search, Draft, and Send Gmail","sidebarTitle":"Gmail","href":"/integrations/gmail"},{"title":"Let AI Agents Schedule Meetings in Google Calendar","sidebarTitle":"Google Calendar","href":"/integrations/google-calendar"},{"title":"Give AI Agents Access to Google Drive Files","sidebarTitle":"Google Drive","href":"/integrations/google-drive"},{"title":"Let AI Agents Draft and Edit Google Docs","sidebarTitle":"Google Docs","href":"/integrations/google-docs"},{"title":"Let AI Agents Read and Update Google Sheets","sidebarTitle":"Google Sheets","href":"/integrations/google-sheets"},{"title":"Generate Google Slides Decks With AI Agents","sidebarTitle":"Google Slides","href":"/integrations/google-slides"},{"title":"Build Google Forms and Read Responses With Agents","sidebarTitle":"Google Forms","href":"/integrations/google-forms"},{"title":"Create Google Meet Links From AI Agents","sidebarTitle":"Google Meet","href":"/integrations/google-meet"},{"title":"Search and Organize Google Photos With AI Agents","sidebarTitle":"Google Photos","href":"/integrations/google-photos"},{"title":"Track To-Dos in Google Tasks From AI Agents","sidebarTitle":"Google Tasks","href":"/integrations/google-tasks"},{"title":"Automate Google Workspace User Admin With Agents","sidebarTitle":"Google Admin","href":"/integrations/google-admin"},{"title":"Pull GA4 Reports Into AI Agents","sidebarTitle":"Google Analytics","href":"/integrations/google-analytics"},{"title":"Let AI Agents Check Indexing in Search Console","sidebarTitle":"Google Search Console","href":"/integrations/google-search-console"},{"title":"Automate Google Classroom Coursework With Agents","sidebarTitle":"Google Classroom","href":"/integrations/google-classroom"},{"title":"Manage YouTube Playlists and Analytics With Agents","sidebarTitle":"YouTube","description":"Let agents search videos, manage playlists, and read channel analytics on YouTube. Connect in one click, and the gateway keeps your OAuth token hidden.","href":"/integrations/youtube"},{"title":"Let AI Agents Search and Update Notion Pages","sidebarTitle":"Notion","href":"/integrations/notion"},{"title":"Let AI Agents Create and Triage Jira Issues","sidebarTitle":"Jira","description":"Let agents search Jira with JQL, create and update issues, comment, and move tickets through workflows. Connect in one click with Atlassian OAuth.","href":"/integrations/jira"},{"title":"Give AI Agents Search and Edit Access to Confluence","sidebarTitle":"Confluence","href":"/integrations/confluence"},{"title":"Let AI Agents Manage Your Todoist Tasks","sidebarTitle":"Todoist","href":"/integrations/todoist"},{"title":"Give AI Agents Safe Access to Your Dropbox Files","sidebarTitle":"Dropbox","href":"/integrations/dropbox"},{"title":"Deploy to Fly.io From an Agent Without Exposing Tokens","sidebarTitle":"Fly.io","href":"/integrations/flyio"},{"title":"Let AI Agents Post to LinkedIn on Your Behalf","sidebarTitle":"LinkedIn","href":"/integrations/linkedin"},{"title":"Connect AI Agents to Monday.com Boards","sidebarTitle":"Monday.com","href":"/integrations/monday"},{"title":"Administer MongoDB Atlas Clusters With Agents","sidebarTitle":"MongoDB Atlas","href":"/integrations/mongodb-atlas"},{"title":"Sync Navan Bookings and Expenses With AI Agents","sidebarTitle":"Navan","href":"/integrations/navan"},{"title":"Let AI Agents Send Email With Resend","sidebarTitle":"Resend","href":"/integrations/resend"},{"title":"Send SMS and WhatsApp From AI Agents With Twilio","sidebarTitle":"Twilio","href":"/integrations/twilio"},{"title":"Zendesk Integration: Tickets and Help Center","sidebarTitle":"Zendesk","href":"/integrations/zendesk"},{"title":"Manage Supabase Projects With AI Agents","sidebarTitle":"Supabase","href":"/integrations/supabase"},{"title":"Call Claude and Gemini on Vertex AI From Agents","sidebarTitle":"Vertex AI","href":"/integrations/vertex-ai"},{"title":"Let AI Agents Edit Webflow CMS and Publish Sites","sidebarTitle":"Webflow","href":"/integrations/webflow"},{"title":"Let AI Agents Schedule Zoom Meetings and Get Recordings","sidebarTitle":"Zoom","href":"/integrations/zoom"},{"title":"Give Agents AWS Access With an IAM Role, Not Keys","sidebarTitle":"AWS Role","href":"/integrations/aws-role"},{"title":"Bitbucket Repos, Pull Requests, and Pipelines","sidebarTitle":"Bitbucket","href":"/integrations/bitbucket"},{"title":"Manage Docker Hub Repositories From AI Agents","sidebarTitle":"Docker Hub","href":"/integrations/docker"},{"title":"Read Fathom Meeting Summaries From AI Agents","sidebarTitle":"Fathom","href":"/integrations/fathom"},{"title":"Give AI Agents Access to Fireflies Transcripts","sidebarTitle":"Fireflies","href":"/integrations/fireflies"},{"title":"Let AI Agents Work With GitLab Merge Requests","sidebarTitle":"GitLab","href":"/integrations/gitlab"},{"title":"Send Google Chat Messages From AI Agents","sidebarTitle":"Google Chat","href":"/integrations/google-chat"},{"title":"Let AI Agents Look Up and Update Google Contacts","sidebarTitle":"Google Contacts","href":"/integrations/google-contacts"},{"title":"Let AI Agents Read Your Granola Meeting Notes","sidebarTitle":"Granola","href":"/integrations/granola"},{"title":"Route Agent Package Installs Through JFrog","sidebarTitle":"JFrog Artifactory","href":"/integrations/jfrog-artifactory"},{"title":"Let AI Agents File and Update Linear Issues","sidebarTitle":"Linear","href":"/integrations/linear"},{"title":"Run Snowflake SQL From an Agent, Token Hidden","sidebarTitle":"Snowflake","href":"/integrations/snowflake"},{"title":"Use a Restricted Stripe Key With AI Agents","sidebarTitle":"Stripe","href":"/integrations/stripe"},{"title":"Let AI Agents Manage Trello Boards and Cards","sidebarTitle":"Trello","href":"/integrations/trello"},{"title":"Let AI Agents Deploy and Manage Vercel Projects","sidebarTitle":"Vercel","href":"/integrations/vercel"},{"title":"Let AI Agents Post and Read on X (Twitter)","sidebarTitle":"X","href":"/integrations/x"},{"title":"Let AI Agents Work Zoho CRM Leads and Deals","sidebarTitle":"Zoho CRM","href":"/integrations/zoho-crm"},{"title":"Let AI Agents Draft Word Docs in OneDrive","sidebarTitle":"Microsoft Word","href":"/integrations/microsoft-word"}]},{"group":"LLMs","pages":[{"title":"Connect Claude to Agents With a Token or API Key","sidebarTitle":"Anthropic","href":"/integrations/anthropic"},{"title":"Use OpenAI API Keys and Codex OAuth With AI Agents","sidebarTitle":"OpenAI","href":"/integrations/openai"}]},{"group":"External Vaults","pages":[{"title":"Bitwarden Vault: Sync Secrets to the Gateway","sidebarTitle":"Bitwarden","href":"/vaults/bitwarden"},{"title":"1Password Vault: Service Account Integration","sidebarTitle":"1Password","href":"/vaults/1password"}]}]},{"tab":"Guides","pages":[{"title":"Guides","href":"/guides"}]},{"tab":"API Reference","pages":[{"title":"API Reference","href":"/api-reference"}]},{"tab":"SDKs","pages":[{"title":"SDKs","href":"/sdks"}]}]},"basePath":"","title":"Let AI Agents Search and Update Notion Pages - Buckle","buildId":"dpl_Aw98ji4XvBsgtZwL1VrkUF9ehFqz","deploymentId":"dpl_Aw98ji4XvBsgtZwL1VrkUF9ehFqz","dynamics":["07c022d89b","a74be98ba7","a9bb46feb3"],"chunks":["Frame-0domioUa.js","DynamicMarkdown-BcGRTrw6.js","zoom-image-lightbox-DsiWwPWR.js","lightbox-handle-r17bVUz3.js","Markdown-CZqUYmMp.js","clsx-B6IZIRsp.js","lib-DuNMoZ05.js","lib-B8HbPgcC.js","html-void-elements-mCSPHezU.js","dist-B0ZV6X5T.js","katex-YMM-FMeD.js","marked.esm-CZWythHk.js","AssistantPageLink-MqLyPtsW.js"]}