Let agents manage Attio contacts, companies, deals, notes, and tasks. Connect with OAuth or a scoped API key that the gateway keeps out of the agent.
Overview
Buckle connects AI agents to Attio through OAuth or a scoped API key. Agents can read and manage CRM data such as contacts, companies, deals, lists, notes, and tasks, with credentials injected into requests to the Attio API automatically.This is useful for agents that enrich records, move deals through a pipeline, or capture notes and tasks without manual CRM data entry.
What you will set up
An Attio connection through OAuth, or a scoped API key for tighter control
Automatic credential injection and token refresh on requests to api.attio.com
Per-agent, per-tool access to CRM data
How it works
Buckle sits between your agent and Attio as a transparent proxy. When an agent calls the Attio API, the gateway matches the request, injects the stored credential, and forwards it to api.attio.com. Your agent never sees the token or API key.Because the gateway speaks the Attio REST API directly, agents use the same endpoints and request shapes as any Attio client. There is no SDK to install and no Attio-specific code in your agent. You connect Attio once, assign it to an agent, and the agent can read and write CRM data within the permissions you grant.Buckle also handles the connection lifecycle. For OAuth connections it refreshes expiring access tokens for you. For API key connections it injects your key on every request. In both cases credentials are encrypted at rest and only decrypted inside the gateway at request time.
Setup
OAuth is the default connection method and requires no setup beyond authorizing Buckle.
1
Open the app
Open the Buckle dashboard and navigate to Settings > Apps > Attio.
2
Authorize
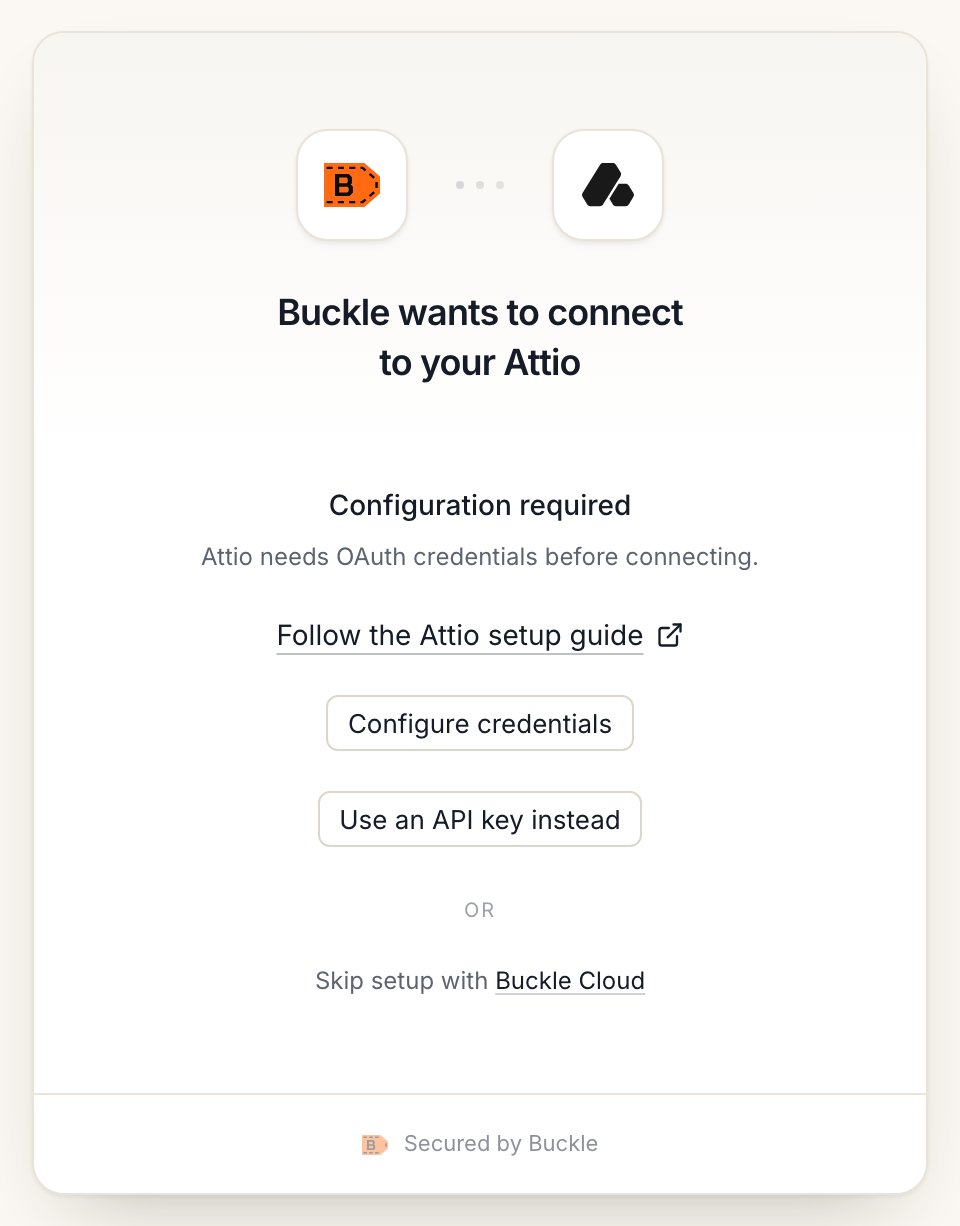
Click Connect to Attio. You’ll be redirected to Attio to sign in and authorize Buckle. Review the requested permissions and click Allow.
The Attio connect window on Buckle Cloud.
3
Verify
After authorizing, you’ll return to the dashboard. The connection shows as Connected with your Attio workspace name.
Configure
Optional: connect with a scoped API key instead
OAuth works out of the box. If you want tighter control over what an agent can reach, connect Attio with your own API key instead and grant it only the scopes you need, rather than the full OAuth scope set. For example, create a read-only key, or one limited to specific objects.
1
Create a scoped API key in Attio
In Attio, create an API key and select only the scopes your agents require. Attio’s guide walks through this: Generating an API key.
2
Connect in Buckle
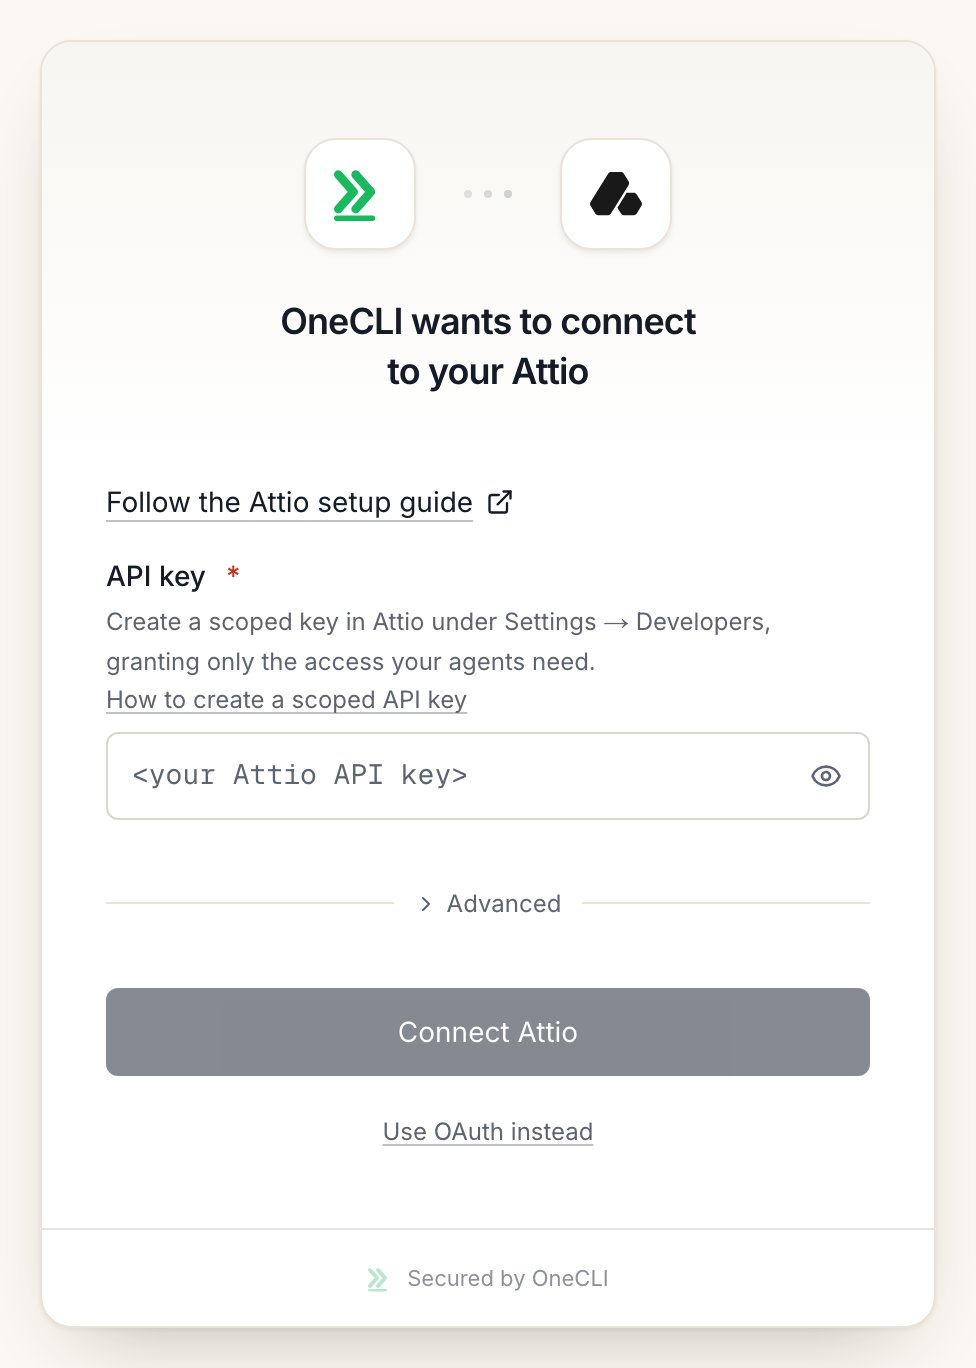
In the Buckle dashboard, open Settings > Apps > Attio, choose Use an API key instead, and paste your key. Buckle injects it into requests the same way it does an OAuth token.
Self-hosted: use your own Attio app
Skip this section on Buckle Cloud. It’s only for self-hosted Buckle without ATTIO_CLIENT_ID and ATTIO_CLIENT_SECRET set, or if you want your own company name on Attio’s consent screen. The API key option above works on self-hosted with no app at all.
Turn on the scopes your agents need. Buckle can request all of these:
Scope
Access
record_permission, object_configuration
Read-write
list_entry, list_configuration
Read-write
note, task, comment, file
Read-write
meeting, webhook
Read-write
user_management, call_recording
Read
3. Add the redirect URI
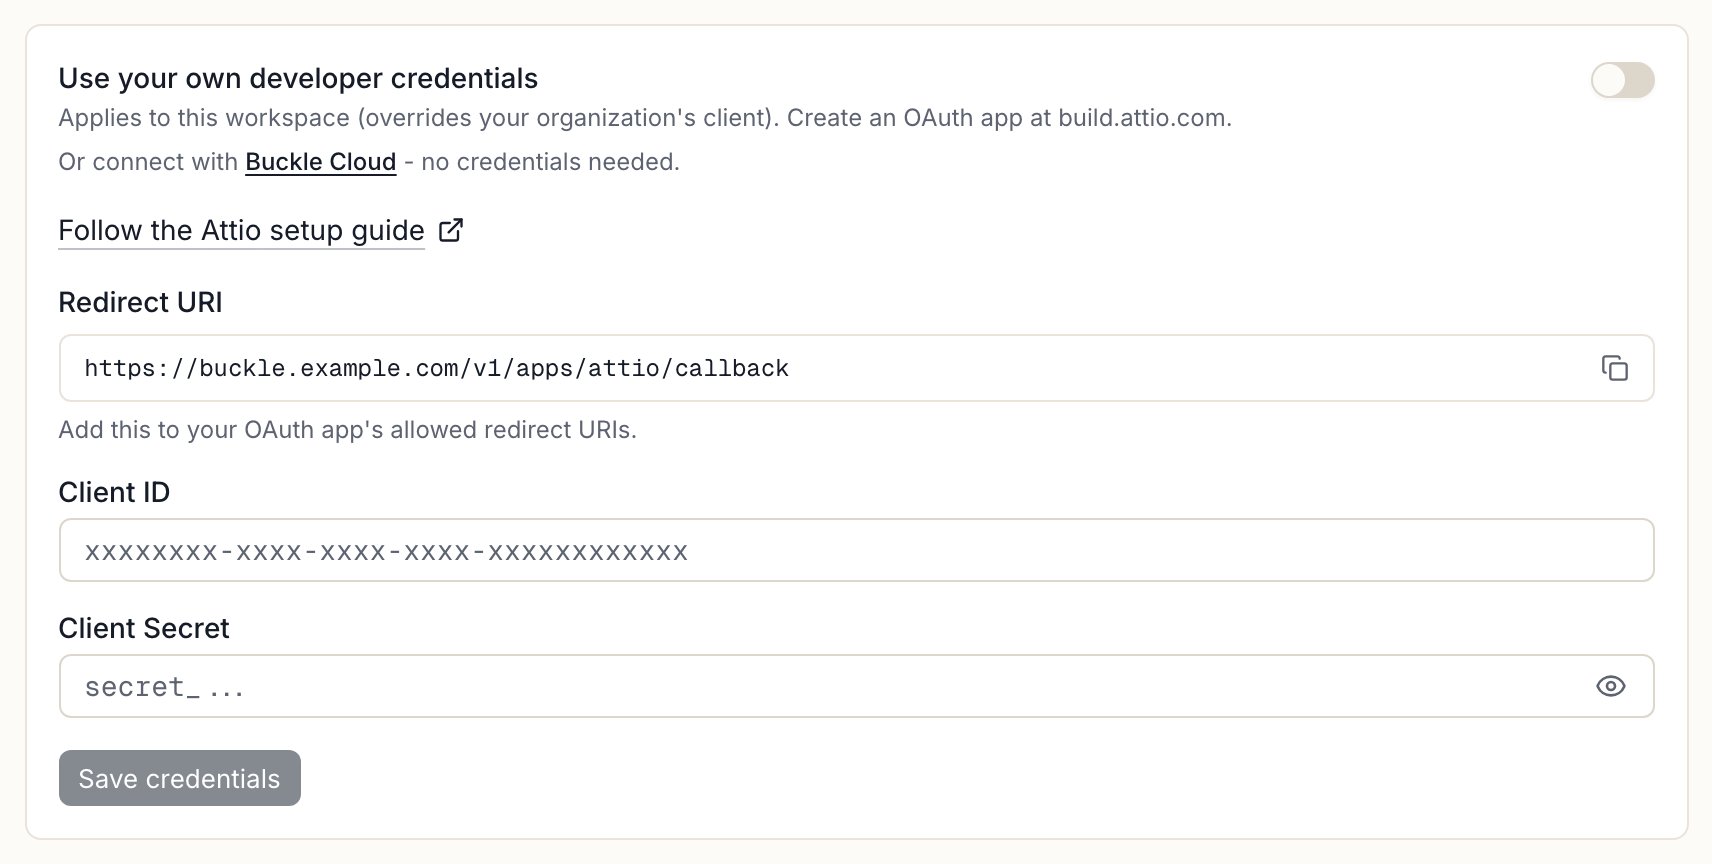
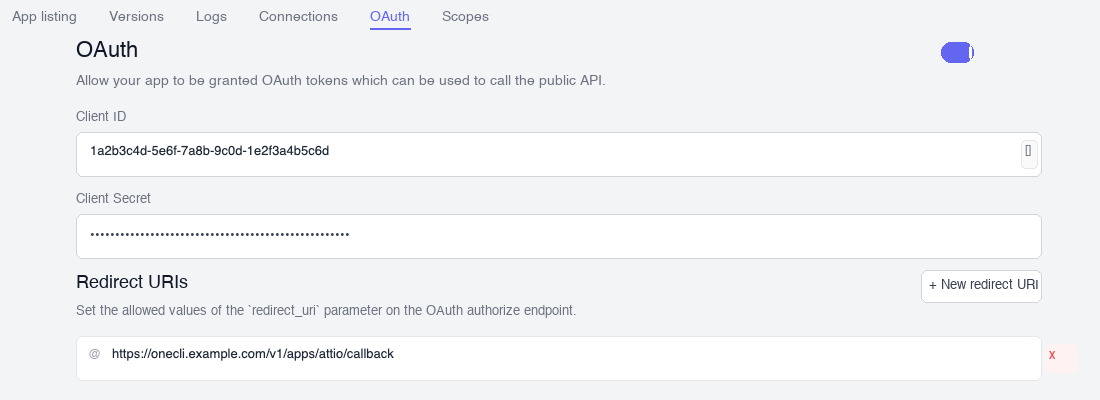
In Buckle, open Settings > Apps > Attio > Custom credentials and copy the Redirect URI. In Attio, paste it into Redirect URIs, and save.
Copy the Redirect URI from Custom credentials in Buckle.
The OAuth tab of your Attio app, with the Buckle Redirect URI.
4. Connect with your app
In Attio, copy the app’s Client ID and Client secret. Paste both into Settings > Apps > Attio > Custom credentials, select Save credentials, then Connect and allow access in Attio.
Permissions
OAuth connections request the following scopes. With an API key, you choose the scopes when you create the key in Attio.
Permission
Access
Description
Records
Read & write
Contacts, companies, and deals
Object configuration
Read & write
Custom objects and attributes
List entries
Read & write
Entries in lists
List configuration
Read & write
Lists and their columns
Notes
Read & write
Notes on records
Tasks
Read & write
Tasks and assignments
Comments
Read & write
Threads and comments
Files
Read & write
Upload and view files
Webhooks
Read & write
Manage webhooks
User management
Read
View workspace members
Meetings
Read & write
View and manage meetings
Call recordings
Read
Transcripts and speakers
What agents can do
Search and manage contacts, companies, and deals
Create and update records, custom objects, and attributes
Organize lists and list entries
Add notes, tasks, and comments to records
Upload and read files attached to records
Read meeting details and call recording transcripts
Manage webhooks for real-time updates
Disconnecting
You can disconnect Attio at any time.OAuth connections
In Buckle, open Settings > Apps > Attio and remove the connection.
In Attio, you can also revoke access by uninstalling Buckle from the installed apps section of your workspace settings.
API key connections
In Buckle, open Settings > Apps > Attio and remove the connection.
In Attio, revoke or delete the API key so it can no longer be used.
Controlling access
Access is per agent: grant the connection to each agent that needs it, choosing per tool what runs freely, what needs human approval, and what stays blocked — a read-only agent is a single grant. Organization rules add guardrails on top, like rate limits and blanket blocks. Everything is checked before credential injection, so a blocked request never reaches Attio.
FAQ
Should I use OAuth or an API key for Attio?
OAuth works out of the box. Use a scoped API key when you want the agent to reach less than the full OAuth scope set, such as a read-only key. See Configure.
How do I rotate an Attio API key?
Create a new key in Attio, then paste it into Settings > Apps > Attio in Buckle. Agents pick up the new key automatically. OAuth tokens are refreshed for you.
Does the agent see my Attio token?
No. Credentials are encrypted at rest and only decrypted inside the gateway at request time. See How it works.
{"docsConfig":{"theme":"mint","$schema":"https://mintlify.com/docs.json","name":"Buckle","colors":{"primary":"#ff6a13","light":"#ff8236","dark":"#e55e0f"},"logo":{"light":"https://mintcdn.com/onecli-17d3f772/5_AFCR2UNaqNo0AT/logo/logo-full-light.svg?fit=max\u0026auto=format\u0026n=5_AFCR2UNaqNo0AT\u0026q=85\u0026s=30ceea1dd3505e0e9dea50b544521ced","dark":"https://mintcdn.com/onecli-17d3f772/5_AFCR2UNaqNo0AT/logo/logo-full-dark.svg?fit=max\u0026auto=format\u0026n=5_AFCR2UNaqNo0AT\u0026q=85\u0026s=120ef96cf376422549781454d97dd810","href":"https://buckle.dev"},"favicon":"https://mintcdn.com/onecli-17d3f772/hJP3XqgFsBDnXHKy/favicon.svg?fit=max\u0026auto=format\u0026n=hJP3XqgFsBDnXHKy\u0026q=85\u0026s=ddda982106e5fd52c3815a54c183f4b1","appearance":{"default":"light"},"background":{"color":{"light":"#FAFAF9","dark":"#1A1918"}},"navbar":{"links":[{"href":"https://github.com/trybuckle/buckle","label":"GitHub"},{"href":"https://buckle.dev","label":"Install"}]},"footer":{"socials":{"github":"https://github.com/trybuckle"}},"fonts":{"heading":{"family":"Chakra Petch","weight":700,"source":"fonts/ChakraPetch-700.woff2","format":"woff2"}},"contextual":{"options":["copy","view","chatgpt","claude","perplexity","mcp","cursor","vscode"],"display":"header"},"styling":{"latex":false},"navigation":{"global":{"anchors":[{"anchor":"GitHub","icon":"https://mintlify.s3.us-west-1.amazonaws.com/onecli-17d3f772/images/github.svg","href":"https://github.com/buckle"}]},"pages":[]}},"deployment":{"deploymentMetadataValue":{"subdomain":"onecli-17d3f772","hasAudioNarration":false,"actualSubdomain":"onecli-17d3f772","customDomains":[],"gitSource":{"type":"github","owner":"trybuckle","repo":"buckle-docs","deployBranch":"main","contentDirectory":"","isPrivate":true,"mountPath":"","label":"","_id":"6af9ac749033d7e87e8c505a"},"entitlements":{"AI_CHAT":{"status":"DISABLED"}},"buildId":"6af9b4b9e79e0e5d703531fb","clientVersion":"0.0.4143","searchFilterCounts":[{"language":"default","tag":"API Reference","count":240},{"language":"default","tag":"Workspace","count":105},{"language":"default","tag":"Integrations","count":88},{"language":"default","tag":"All app connections","count":64},{"language":"default","tag":"Enterprise","count":57},{"language":"default","tag":"Organization","count":52},{"language":"default","tag":"Apps","count":29},{"language":"default","tag":"Channels","count":28},{"language":"default","tag":"Platform","count":21},{"language":"default","tag":"Guides","count":17}]},"assistantConfig":{"enableAskAiButton":false,"enableStarterQuestions":false,"enableContextualStarterQuestions":false,"enableAskAiSearchBar":true},"basePath":"/docs","hasChatPermissions":false,"hasWebMcpPermissions":false,"toggles":[{"name":"kill-isr","enabled":true,"variant":{"name":"disabled","enabled":false,"feature_enabled":true},"impressionData":false},{"name":"custom-rbac-roles","enabled":true,"variant":{"name":"disabled","enabled":false,"feature_enabled":true},"impressionData":false},{"name":"agent-mintlify-slack","enabled":true,"variant":{"name":"disabled","enabled":false,"feature_enabled":true},"impressionData":false},{"name":"agent-integrations-settings","enabled":true,"variant":{"name":"disabled","enabled":false,"feature_enabled":true},"impressionData":false},{"name":"rbac-expansion","enabled":true,"variant":{"name":"disabled","enabled":false,"feature_enabled":true},"impressionData":false},{"name":"automations-pr-grouping","enabled":true,"variant":{"name":"disabled","enabled":false,"feature_enabled":true},"impressionData":false},{"name":"custom-prefix","enabled":true,"variant":{"name":"disabled","enabled":false,"feature_enabled":true},"impressionData":false},{"name":"analytics-v7","enabled":true,"variant":{"name":"disabled","enabled":false,"feature_enabled":true},"impressionData":false},{"name":"user-flows-analytics","enabled":true,"variant":{"name":"disabled","enabled":false,"feature_enabled":true},"impressionData":false},{"name":"no-publish-flow","enabled":true,"variant":{"name":"disabled","enabled":false,"feature_enabled":true},"impressionData":false},{"name":"workos-onboarding","enabled":true,"variant":{"name":"disabled","enabled":false,"feature_enabled":true},"impressionData":false},{"name":"snapshot-serving-live","enabled":true,"variant":{"name":"disabled","enabled":false,"feature_enabled":true},"impressionData":false},{"name":"stripTemperatureMiddleware","enabled":true,"variant":{"name":"disabled","enabled":false,"feature_enabled":true},"impressionData":false},{"name":"support-platform-pylon-zendesk","enabled":true,"variant":{"name":"disabled","enabled":false,"feature_enabled":true},"impressionData":false},{"name":"snapshot-serving","enabled":true,"variant":{"name":"disabled","enabled":false,"feature_enabled":true},"impressionData":false},{"name":"instant-rollback","enabled":true,"variant":{"name":"disabled","enabled":false,"feature_enabled":true},"impressionData":false},{"name":"granular-notifications-server","enabled":true,"variant":{"name":"disabled","enabled":false,"feature_enabled":true},"impressionData":false},{"name":"granular-notifications","enabled":true,"variant":{"name":"disabled","enabled":false,"feature_enabled":true},"impressionData":false},{"name":"automations-fable","enabled":true,"variant":{"name":"disabled","enabled":false,"feature_enabled":true},"impressionData":false},{"name":"fixed-ai-action-pricing","enabled":true,"variant":{"name":"disabled","enabled":false,"feature_enabled":true},"impressionData":false},{"name":"automation-resolve-merge-conflict","enabled":true,"variant":{"name":"disabled","enabled":false,"feature_enabled":true},"impressionData":false},{"name":"scoped-publishing","enabled":true,"variant":{"name":"disabled","enabled":false,"feature_enabled":true},"impressionData":false},{"name":"mintql","enabled":true,"variant":{"name":"disabled","enabled":false,"feature_enabled":true},"impressionData":false},{"name":"page-level-analytics","enabled":true,"variant":{"name":"disabled","enabled":false,"feature_enabled":true},"impressionData":false},{"name":"editor-version-history-v2","enabled":true,"variant":{"name":"disabled","enabled":false,"feature_enabled":true},"impressionData":false},{"name":"billing-page-v2","enabled":true,"variant":{"name":"disabled","enabled":false,"feature_enabled":true},"impressionData":false},{"name":"full-page-search","enabled":true,"variant":{"name":"disabled","enabled":false,"feature_enabled":true},"impressionData":false},{"name":"workspace-projects","enabled":true,"variant":{"name":"disabled","enabled":false,"feature_enabled":true},"impressionData":false},{"name":"assistant-v5","enabled":true,"variant":{"name":"disabled","enabled":false,"feature_enabled":true},"impressionData":false},{"name":"fork-pr-previews","enabled":true,"variant":{"name":"disabled","enabled":false,"feature_enabled":true},"impressionData":false},{"name":"revalidation-jwt","enabled":true,"variant":{"name":"disabled","enabled":false,"feature_enabled":true},"impressionData":false},{"name":"workos-sso-scim","enabled":true,"variant":{"name":"disabled","enabled":false,"feature_enabled":true},"impressionData":false},{"name":"hobby-abuse-scan","enabled":true,"variant":{"name":"disabled","enabled":false,"feature_enabled":true},"impressionData":false},{"name":"dashboard-inbox","enabled":true,"variant":{"name":"disabled","enabled":false,"feature_enabled":true},"impressionData":false},{"name":"workos-signup","enabled":true,"variant":{"name":"disabled","enabled":false,"feature_enabled":true},"impressionData":false},{"name":"turbopuffer-dual-write","enabled":true,"variant":{"name":"disabled","enabled":false,"feature_enabled":true},"impressionData":false},{"name":"workos-enabled","enabled":true,"variant":{"name":"disabled","enabled":false,"feature_enabled":true},"impressionData":false},{"name":"approve-review-flow","enabled":true,"variant":{"name":"disabled","enabled":false,"feature_enabled":true},"impressionData":false},{"name":"editor-metadata","enabled":true,"variant":{"name":"disabled","enabled":false,"feature_enabled":true},"impressionData":false},{"name":"sso-setup-deadline-banner","enabled":true,"variant":{"name":"disabled","enabled":false,"feature_enabled":true},"impressionData":false},{"name":"turbopuffer-serve","enabled":true,"variant":{"name":"disabled","enabled":false,"feature_enabled":true},"impressionData":false},{"name":"live-agents","enabled":true,"variant":{"name":"disabled","enabled":false,"feature_enabled":true},"impressionData":false},{"name":"llms-txt-v2","enabled":true,"variant":{"name":"disabled","enabled":false,"feature_enabled":true},"impressionData":false}],"googleFontsInlined":false},"customCss":[{"filePath":"style.css","content":"a.nav-anchor div.mr-4.rounded-md{--tw-ring-color: transparent !important;--tw-ring-shadow: 0 0 0 0 transparent !important;--tw-ring-offset-shadow: 0 0 0 0 transparent !important;box-shadow:none!important;background:transparent!important;filter:none!important;transition:opacity 0.15s ease!important}a.nav-anchor:hover div.mr-4.rounded-md{--tw-ring-color: transparent !important;--tw-ring-shadow: 0 0 0 0 transparent !important;--tw-ring-offset-shadow: 0 0 0 0 transparent !important;box-shadow:none!important;background:transparent!important;filter:none!important;opacity:0.7!important}a.nav-anchor div.mr-4.rounded-md img{opacity:1!important;filter:none!important;background:transparent!important}a.nav-anchor:hover div.mr-4.rounded-md img{opacity:1!important;filter:none!important;background:transparent!important}.dark a.nav-anchor div.mr-4.rounded-md img,[data-theme=\"dark\"] a.nav-anchor div.mr-4.rounded-md img{filter:invert(1)!important}"}],"page":{"pagePath":"integrations/attio","slug":"/integrations/attio","pageMetadata":{"title":"Let AI Agents Manage Attio CRM Records","sidebarTitle":"Attio","description":"Let agents manage Attio contacts, companies, deals, notes, and tasks. Connect with OAuth or a scoped API key that the gateway keeps out of the agent.","canonical":"https://buckle.dev/docs/integrations/attio","href":"/integrations/attio"},"description":{"compiledSource":"\"use strict\";\nconst {jsx: _jsx} = arguments[0];\nconst {useMDXComponents: _provideComponents} = arguments[0];\nfunction _createMdxContent(props) {\n const _components = {\n p: \"p\",\n ..._provideComponents(),\n ...props.components\n };\n return _jsx(_components.p, {\n children: \"Let agents manage Attio contacts, companies, deals, notes, and tasks. Connect with OAuth or a scoped API key that the gateway keeps out of the agent.\"\n });\n}\nfunction MDXContent(props = {}) {\n const {wrapper: MDXLayout} = {\n ..._provideComponents(),\n ...props.components\n };\n return MDXLayout ? _jsx(MDXLayout, {\n ...props,\n children: _jsx(_createMdxContent, {\n ...props\n })\n }) : _createMdxContent(props);\n}\nreturn {\n default: MDXContent\n};\n","frontmatter":{},"scope":{}},"pageType":"default","mdx":{"mdxSource":{"compiledSource":"\"use strict\";const{Fragment:_Fragment,jsx:_jsx,jsxs:_jsxs}=arguments[0];const{useMDXComponents:_provideComponents}=arguments[0];function _createMdxContent(props){const _components={a:`a`,code:`code`,li:`li`,p:`p`,strong:`strong`,tbody:`tbody`,td:`td`,th:`th`,thead:`thead`,tr:`tr`,ul:`ul`,..._provideComponents(),...props.components},{Accordion,AccordionGroup,Frame,Heading,Info,OptimizedImage,Step,Steps,Table}=_components;if(!Accordion)_missingMdxReference(`Accordion`,true);if(!AccordionGroup)_missingMdxReference(`AccordionGroup`,true);if(!Frame)_missingMdxReference(`Frame`,true);if(!Heading)_missingMdxReference(`Heading`,true);if(!Info)_missingMdxReference(`Info`,true);if(!OptimizedImage)_missingMdxReference(`OptimizedImage`,true);if(!Step)_missingMdxReference(`Step`,true);if(!Steps)_missingMdxReference(`Steps`,true);if(!Table)_missingMdxReference(`Table`,true);return _jsxs(_Fragment,{children:[_jsx(Heading,{level:`2`,id:`overview`,children:`Overview`}),`\n`,_jsx(_components.p,{children:`Buckle connects AI agents to Attio through OAuth or a scoped API key. Agents can read and manage CRM data such as contacts, companies, deals, lists, notes, and tasks, with credentials injected into requests to the Attio API automatically.`}),`\n`,_jsx(_components.p,{children:`This is useful for agents that enrich records, move deals through a pipeline, or capture notes and tasks without manual CRM data entry.`}),`\n`,_jsx(Heading,{level:`2`,id:`what-you-will-set-up`,children:`What you will set up`}),`\n`,_jsxs(_components.ul,{children:[`\n`,_jsx(_components.li,{children:`An Attio connection through OAuth, or a scoped API key for tighter control`}),`\n`,_jsxs(_components.li,{children:[`Automatic credential injection and token refresh on requests to `,_jsx(_components.code,{children:`api.attio.com`})]}),`\n`,_jsx(_components.li,{children:`Per-agent, per-tool access to CRM data`}),`\n`]}),`\n`,_jsx(Heading,{level:`2`,id:`how-it-works`,children:`How it works`}),`\n`,_jsxs(_components.p,{children:[`Buckle sits between your agent and Attio as a transparent proxy. When an agent calls the Attio API, the gateway matches the request, injects the stored credential, and forwards it to `,_jsx(_components.code,{children:`api.attio.com`}),`. Your agent never sees the token or API key.`]}),`\n`,_jsx(_components.p,{children:`Because the gateway speaks the Attio REST API directly, agents use the same endpoints and request shapes as any Attio client. There is no SDK to install and no Attio-specific code in your agent. You connect Attio once, assign it to an agent, and the agent can read and write CRM data within the permissions you grant.`}),`\n`,_jsx(_components.p,{children:`Buckle also handles the connection lifecycle. For OAuth connections it refreshes expiring access tokens for you. For API key connections it injects your key on every request. In both cases credentials are encrypted at rest and only decrypted inside the gateway at request time.`}),`\n`,_jsx(Heading,{level:`2`,id:`setup`,children:`Setup`}),`\n`,_jsx(_components.p,{children:`OAuth is the default connection method and requires no setup beyond authorizing Buckle.`}),`\n`,_jsxs(Steps,{children:[_jsx(Step,{title:`Open the app`,children:_jsxs(_components.p,{children:[`Open the Buckle dashboard and navigate to `,_jsx(_components.strong,{children:`Settings`}),` > `,_jsx(_components.strong,{children:`Apps`}),` > `,_jsx(_components.strong,{children:`Attio`}),`.`]})}),_jsxs(Step,{title:`Authorize`,children:[_jsxs(_components.p,{children:[`Click `,_jsx(_components.strong,{children:`Connect to Attio`}),`. You’ll be redirected to Attio to sign in and authorize Buckle. Review the requested permissions and click `,_jsx(_components.strong,{children:`Allow`}),`.`]}),_jsx(Frame,{caption:`The Attio connect window on Buckle Cloud.`,children:_jsx(OptimizedImage,{src:`https://mintcdn.com/onecli-17d3f772/hJP3XqgFsBDnXHKy/images/integrations/attio/buckle-connect-attio.png?fit=max\u0026auto=format\u0026n=hJP3XqgFsBDnXHKy\u0026q=85\u0026s=6d87ae81d1061586afb601fef2e49a67`,alt:`Buckle connect window for Attio with the Access level choice (Workspace access or Personal access), the Connect to Attio button, and Use an API key instead.`,\"data-og-width\":`960`,width:`960`,\"data-og-height\":`1226`,height:`1226`,\"data-path\":`images/integrations/attio/buckle-connect-attio.png`,\"data-optimize\":`true`,\"data-opv\":`3`,srcset:`https://mintcdn.com/onecli-17d3f772/hJP3XqgFsBDnXHKy/images/integrations/attio/buckle-connect-attio.png?w=280\u0026fit=max\u0026auto=format\u0026n=hJP3XqgFsBDnXHKy\u0026q=85\u0026s=7cc52718883093f0d7ed1734ba13fe7b 280w, https://mintcdn.com/onecli-17d3f772/hJP3XqgFsBDnXHKy/images/integrations/attio/buckle-connect-attio.png?w=560\u0026fit=max\u0026auto=format\u0026n=hJP3XqgFsBDnXHKy\u0026q=85\u0026s=8afc4468aa698d952c069302046910da 560w, https://mintcdn.com/onecli-17d3f772/hJP3XqgFsBDnXHKy/images/integrations/attio/buckle-connect-attio.png?w=840\u0026fit=max\u0026auto=format\u0026n=hJP3XqgFsBDnXHKy\u0026q=85\u0026s=266c3f57988beea26055e0ed19d5b978 840w, https://mintcdn.com/onecli-17d3f772/hJP3XqgFsBDnXHKy/images/integrations/attio/buckle-connect-attio.png?w=1100\u0026fit=max\u0026auto=format\u0026n=hJP3XqgFsBDnXHKy\u0026q=85\u0026s=b164a525694c58ba16272024072187c0 1100w, https://mintcdn.com/onecli-17d3f772/hJP3XqgFsBDnXHKy/images/integrations/attio/buckle-connect-attio.png?w=1650\u0026fit=max\u0026auto=format\u0026n=hJP3XqgFsBDnXHKy\u0026q=85\u0026s=3853138f01a75eae20b83f46be5ea252 1650w, https://mintcdn.com/onecli-17d3f772/hJP3XqgFsBDnXHKy/images/integrations/attio/buckle-connect-attio.png?w=2500\u0026fit=max\u0026auto=format\u0026n=hJP3XqgFsBDnXHKy\u0026q=85\u0026s=b4e710a93e8d0c9003d23f5951878d0d 2500w`})})]}),_jsx(Step,{title:`Verify`,children:_jsxs(_components.p,{children:[`After authorizing, you’ll return to the dashboard. The connection shows as `,_jsx(_components.strong,{children:`Connected`}),` with your Attio workspace name.`]})})]}),`\n`,_jsx(Heading,{level:`2`,id:`configure`,children:`Configure`}),`\n`,_jsx(AccordionGroup,{children:_jsxs(Accordion,{title:`Optional: connect with a scoped API key instead`,id:`optional-connect-with-a-scoped-api-key-instead`,children:[_jsx(_components.p,{children:`OAuth works out of the box. If you want tighter control over what an agent can reach, connect Attio with your own API key instead and grant it only the scopes you need, rather than the full OAuth scope set. For example, create a read-only key, or one limited to specific objects.`}),_jsxs(Steps,{children:[_jsx(Step,{title:`Create a scoped API key in Attio`,children:_jsxs(_components.p,{children:[`In Attio, create an API key and select only the scopes your agents require. Attio’s guide walks through this: `,_jsx(_components.a,{href:`https://attio.com/help/apps/other-apps/generating-an-api-key`,children:`Generating an API key`}),`.`]})}),_jsxs(Step,{title:`Connect in Buckle`,children:[_jsxs(_components.p,{children:[`In the Buckle dashboard, open `,_jsx(_components.strong,{children:`Settings`}),` > `,_jsx(_components.strong,{children:`Apps`}),` > `,_jsx(_components.strong,{children:`Attio`}),`, choose `,_jsx(_components.strong,{children:`Use an API key instead`}),`, and paste your key. Buckle injects it into requests the same way it does an OAuth token.`]}),_jsx(Frame,{children:_jsx(OptimizedImage,{src:`https://mintcdn.com/onecli-17d3f772/hJP3XqgFsBDnXHKy/images/integrations/attio-api-key-v2.png?fit=max\u0026auto=format\u0026n=hJP3XqgFsBDnXHKy\u0026q=85\u0026s=4153a6b1be5179fc08de5f667934f9b2`,alt:`Buckle connect window for Attio with the Connection label and API key fields, the Connect Attio button, and a Back link to OAuth`,\"data-og-width\":`976`,width:`976`,\"data-og-height\":`1368`,height:`1368`,\"data-path\":`images/integrations/attio-api-key-v2.png`,\"data-optimize\":`true`,\"data-opv\":`3`,srcset:`https://mintcdn.com/onecli-17d3f772/hJP3XqgFsBDnXHKy/images/integrations/attio-api-key-v2.png?w=280\u0026fit=max\u0026auto=format\u0026n=hJP3XqgFsBDnXHKy\u0026q=85\u0026s=b4ba46b129ef0aadccb6279608cfe58a 280w, https://mintcdn.com/onecli-17d3f772/hJP3XqgFsBDnXHKy/images/integrations/attio-api-key-v2.png?w=560\u0026fit=max\u0026auto=format\u0026n=hJP3XqgFsBDnXHKy\u0026q=85\u0026s=d9c661e8e07265812a4bfe4b6a766ad5 560w, https://mintcdn.com/onecli-17d3f772/hJP3XqgFsBDnXHKy/images/integrations/attio-api-key-v2.png?w=840\u0026fit=max\u0026auto=format\u0026n=hJP3XqgFsBDnXHKy\u0026q=85\u0026s=4c9ab212b33f780f3c79a5d4fded6800 840w, https://mintcdn.com/onecli-17d3f772/hJP3XqgFsBDnXHKy/images/integrations/attio-api-key-v2.png?w=1100\u0026fit=max\u0026auto=format\u0026n=hJP3XqgFsBDnXHKy\u0026q=85\u0026s=f24043fe8384c83924191f8972dec49a 1100w, https://mintcdn.com/onecli-17d3f772/hJP3XqgFsBDnXHKy/images/integrations/attio-api-key-v2.png?w=1650\u0026fit=max\u0026auto=format\u0026n=hJP3XqgFsBDnXHKy\u0026q=85\u0026s=6be680c720977c23384ab7c271103cae 1650w, https://mintcdn.com/onecli-17d3f772/hJP3XqgFsBDnXHKy/images/integrations/attio-api-key-v2.png?w=2500\u0026fit=max\u0026auto=format\u0026n=hJP3XqgFsBDnXHKy\u0026q=85\u0026s=d67e26c1d57846386a3b7d7576690292 2500w`})})]})]})]})}),`\n`,_jsx(`a`,{id:`self-hosted`,style:{scrollMarginTop:`8rem`}}),`\n`,_jsx(Heading,{level:`2`,id:`self-hosted-use-your-own-attio-app`,children:`Self-hosted: use your own Attio app`}),`\n`,_jsx(Info,{children:_jsxs(_components.p,{children:[_jsx(_components.strong,{children:`Skip this section on Buckle Cloud.`}),` It’s only for self-hosted Buckle without `,_jsx(_components.code,{children:`ATTIO_CLIENT_ID`}),` and `,_jsx(_components.code,{children:`ATTIO_CLIENT_SECRET`}),` set, or if you want your own company name on Attio’s consent screen. The API key option above works on self-hosted with no app at all.`]})}),`\n`,_jsxs(AccordionGroup,{children:[_jsxs(Accordion,{title:`1. Create the Attio app`,defaultOpen:true,id:`1-create-the-attio-app`,children:[_jsxs(_components.p,{children:[`Go to the `,_jsx(_components.a,{href:`https://build.attio.com/`,children:`Attio developer dashboard`}),` and create an app named `,_jsx(_components.code,{children:`Buckle`}),`. Open its `,_jsx(_components.strong,{children:`OAuth`}),` settings.`]}),_jsx(Frame,{caption:`Create the app in Attio's developer dashboard.`,children:_jsx(OptimizedImage,{src:`https://mintcdn.com/onecli-17d3f772/hJP3XqgFsBDnXHKy/images/integrations/attio/01-provider-setup.png?fit=max\u0026auto=format\u0026n=hJP3XqgFsBDnXHKy\u0026q=85\u0026s=99a2902582b9000f64ff98936aa373d9`,alt:`Attio New app dialog with the name Buckle and the slug buckle, and the Create app button.`,\"data-og-width\":`640`,width:`640`,\"data-og-height\":`400`,height:`400`,\"data-path\":`images/integrations/attio/01-provider-setup.png`,\"data-optimize\":`true`,\"data-opv\":`3`,srcset:`https://mintcdn.com/onecli-17d3f772/hJP3XqgFsBDnXHKy/images/integrations/attio/01-provider-setup.png?w=280\u0026fit=max\u0026auto=format\u0026n=hJP3XqgFsBDnXHKy\u0026q=85\u0026s=5d959afbf483247fe14b83ea81f37300 280w, https://mintcdn.com/onecli-17d3f772/hJP3XqgFsBDnXHKy/images/integrations/attio/01-provider-setup.png?w=560\u0026fit=max\u0026auto=format\u0026n=hJP3XqgFsBDnXHKy\u0026q=85\u0026s=9d365e20973aaaed1775dff261b5810f 560w, https://mintcdn.com/onecli-17d3f772/hJP3XqgFsBDnXHKy/images/integrations/attio/01-provider-setup.png?w=840\u0026fit=max\u0026auto=format\u0026n=hJP3XqgFsBDnXHKy\u0026q=85\u0026s=ee208d271f9a010ba81dd4537e2a18bd 840w, https://mintcdn.com/onecli-17d3f772/hJP3XqgFsBDnXHKy/images/integrations/attio/01-provider-setup.png?w=1100\u0026fit=max\u0026auto=format\u0026n=hJP3XqgFsBDnXHKy\u0026q=85\u0026s=31aa75b14113daa7efba850f75245474 1100w, https://mintcdn.com/onecli-17d3f772/hJP3XqgFsBDnXHKy/images/integrations/attio/01-provider-setup.png?w=1650\u0026fit=max\u0026auto=format\u0026n=hJP3XqgFsBDnXHKy\u0026q=85\u0026s=157564a61fcff0f523dd96a90359d387 1650w, https://mintcdn.com/onecli-17d3f772/hJP3XqgFsBDnXHKy/images/integrations/attio/01-provider-setup.png?w=2500\u0026fit=max\u0026auto=format\u0026n=hJP3XqgFsBDnXHKy\u0026q=85\u0026s=7bc30091bc6bc966ab9d36fc66b3fbba 2500w`})})]}),_jsxs(Accordion,{title:`2. Add the scopes`,id:`2-add-the-scopes`,children:[_jsx(_components.p,{children:`Turn on the scopes your agents need. Buckle can request all of these:`}),_jsxs(Table,{children:[_jsx(_components.thead,{children:_jsxs(_components.tr,{children:[_jsx(_components.th,{children:`Scope`}),_jsx(_components.th,{children:`Access`})]})}),_jsxs(_components.tbody,{children:[_jsxs(_components.tr,{children:[_jsxs(_components.td,{children:[_jsx(_components.code,{children:`record_permission`}),`, `,_jsx(_components.code,{children:`object_configuration`})]}),_jsx(_components.td,{children:`Read-write`})]}),_jsxs(_components.tr,{children:[_jsxs(_components.td,{children:[_jsx(_components.code,{children:`list_entry`}),`, `,_jsx(_components.code,{children:`list_configuration`})]}),_jsx(_components.td,{children:`Read-write`})]}),_jsxs(_components.tr,{children:[_jsxs(_components.td,{children:[_jsx(_components.code,{children:`note`}),`, `,_jsx(_components.code,{children:`task`}),`, `,_jsx(_components.code,{children:`comment`}),`, `,_jsx(_components.code,{children:`file`})]}),_jsx(_components.td,{children:`Read-write`})]}),_jsxs(_components.tr,{children:[_jsxs(_components.td,{children:[_jsx(_components.code,{children:`meeting`}),`, `,_jsx(_components.code,{children:`webhook`})]}),_jsx(_components.td,{children:`Read-write`})]}),_jsxs(_components.tr,{children:[_jsxs(_components.td,{children:[_jsx(_components.code,{children:`user_management`}),`, `,_jsx(_components.code,{children:`call_recording`})]}),_jsx(_components.td,{children:`Read`})]})]})]})]}),_jsxs(Accordion,{title:`3. Add the redirect URI`,id:`3-add-the-redirect-uri`,children:[_jsxs(_components.p,{children:[`In Buckle, open `,_jsx(_components.strong,{children:`Settings`}),` > `,_jsx(_components.strong,{children:`Apps`}),` > `,_jsx(_components.strong,{children:`Attio`}),` > `,_jsx(_components.strong,{children:`Custom credentials`}),` and copy the `,_jsx(_components.strong,{children:`Redirect URI`}),`. In Attio, paste it into `,_jsx(_components.strong,{children:`Redirect URIs`}),`, and save.`]}),_jsx(Frame,{caption:`Copy the Redirect URI from Custom credentials in Buckle.`,children:_jsx(OptimizedImage,{src:`https://mintcdn.com/onecli-17d3f772/hJP3XqgFsBDnXHKy/images/integrations/attio/buckle-custom-credentials-attio.png?fit=max\u0026auto=format\u0026n=hJP3XqgFsBDnXHKy\u0026q=85\u0026s=61d67f87c0d6a573cc3eda8183b1ecea`,alt:`Buckle Custom credentials card for Attio with the setup guide link, the Redirect URI and its copy button, and the client ID and secret fields.`,\"data-og-width\":`1712`,width:`1712`,\"data-og-height\":`864`,height:`864`,\"data-path\":`images/integrations/attio/buckle-custom-credentials-attio.png`,\"data-optimize\":`true`,\"data-opv\":`3`,srcset:`https://mintcdn.com/onecli-17d3f772/hJP3XqgFsBDnXHKy/images/integrations/attio/buckle-custom-credentials-attio.png?w=280\u0026fit=max\u0026auto=format\u0026n=hJP3XqgFsBDnXHKy\u0026q=85\u0026s=76d730d3867c34cd9de780fd8b77c1de 280w, https://mintcdn.com/onecli-17d3f772/hJP3XqgFsBDnXHKy/images/integrations/attio/buckle-custom-credentials-attio.png?w=560\u0026fit=max\u0026auto=format\u0026n=hJP3XqgFsBDnXHKy\u0026q=85\u0026s=94b68c16109f7c6ce0a5325f0657b12b 560w, https://mintcdn.com/onecli-17d3f772/hJP3XqgFsBDnXHKy/images/integrations/attio/buckle-custom-credentials-attio.png?w=840\u0026fit=max\u0026auto=format\u0026n=hJP3XqgFsBDnXHKy\u0026q=85\u0026s=7c1309213a2fe4fb2e1d040f611af0cf 840w, https://mintcdn.com/onecli-17d3f772/hJP3XqgFsBDnXHKy/images/integrations/attio/buckle-custom-credentials-attio.png?w=1100\u0026fit=max\u0026auto=format\u0026n=hJP3XqgFsBDnXHKy\u0026q=85\u0026s=a8f83321f4793cf2d064ee492bcca092 1100w, https://mintcdn.com/onecli-17d3f772/hJP3XqgFsBDnXHKy/images/integrations/attio/buckle-custom-credentials-attio.png?w=1650\u0026fit=max\u0026auto=format\u0026n=hJP3XqgFsBDnXHKy\u0026q=85\u0026s=a0614d3fcc0657cb1a32068a92b06094 1650w, https://mintcdn.com/onecli-17d3f772/hJP3XqgFsBDnXHKy/images/integrations/attio/buckle-custom-credentials-attio.png?w=2500\u0026fit=max\u0026auto=format\u0026n=hJP3XqgFsBDnXHKy\u0026q=85\u0026s=0936f8caf00ef32a9a5592ac8d1f7f14 2500w`})}),_jsx(Frame,{caption:`The OAuth tab of your Attio app, with the Buckle Redirect URI.`,children:_jsx(OptimizedImage,{src:`https://mintcdn.com/onecli-17d3f772/hJP3XqgFsBDnXHKy/images/integrations/attio/02-provider-redirect.png?fit=max\u0026auto=format\u0026n=hJP3XqgFsBDnXHKy\u0026q=85\u0026s=543c743d77157b5e6bc36306b537693a`,alt:`Attio app OAuth tab with OAuth enabled, the Client ID, a hidden Client Secret, and https://buckle.example.com/v1/apps/attio/callback under Redirect URIs.`,\"data-og-width\":`1100`,width:`1100`,\"data-og-height\":`400`,height:`400`,\"data-path\":`images/integrations/attio/02-provider-redirect.png`,\"data-optimize\":`true`,\"data-opv\":`3`,srcset:`https://mintcdn.com/onecli-17d3f772/hJP3XqgFsBDnXHKy/images/integrations/attio/02-provider-redirect.png?w=280\u0026fit=max\u0026auto=format\u0026n=hJP3XqgFsBDnXHKy\u0026q=85\u0026s=3c8d330fc736207178ecff2a76eb0f34 280w, https://mintcdn.com/onecli-17d3f772/hJP3XqgFsBDnXHKy/images/integrations/attio/02-provider-redirect.png?w=560\u0026fit=max\u0026auto=format\u0026n=hJP3XqgFsBDnXHKy\u0026q=85\u0026s=5a6ad91cf71330ce337cc157906c0589 560w, https://mintcdn.com/onecli-17d3f772/hJP3XqgFsBDnXHKy/images/integrations/attio/02-provider-redirect.png?w=840\u0026fit=max\u0026auto=format\u0026n=hJP3XqgFsBDnXHKy\u0026q=85\u0026s=eb94b136a4612c20623a0f78dcf2f1e8 840w, https://mintcdn.com/onecli-17d3f772/hJP3XqgFsBDnXHKy/images/integrations/attio/02-provider-redirect.png?w=1100\u0026fit=max\u0026auto=format\u0026n=hJP3XqgFsBDnXHKy\u0026q=85\u0026s=910ad2924674a85d3caf9504e3ab5840 1100w, https://mintcdn.com/onecli-17d3f772/hJP3XqgFsBDnXHKy/images/integrations/attio/02-provider-redirect.png?w=1650\u0026fit=max\u0026auto=format\u0026n=hJP3XqgFsBDnXHKy\u0026q=85\u0026s=edcc55f65787e7bad644e3a6014f9892 1650w, https://mintcdn.com/onecli-17d3f772/hJP3XqgFsBDnXHKy/images/integrations/attio/02-provider-redirect.png?w=2500\u0026fit=max\u0026auto=format\u0026n=hJP3XqgFsBDnXHKy\u0026q=85\u0026s=8fe8c98942ac65d43b5cbed8861526f3 2500w`})})]}),_jsx(Accordion,{title:`4. Connect with your app`,id:`4-connect-with-your-app`,children:_jsxs(_components.p,{children:[`In Attio, copy the app’s `,_jsx(_components.strong,{children:`Client ID`}),` and `,_jsx(_components.strong,{children:`Client secret`}),`. Paste both into `,_jsx(_components.strong,{children:`Settings`}),` > `,_jsx(_components.strong,{children:`Apps`}),` > `,_jsx(_components.strong,{children:`Attio`}),` > `,_jsx(_components.strong,{children:`Custom credentials`}),`, select `,_jsx(_components.strong,{children:`Save credentials`}),`, then `,_jsx(_components.strong,{children:`Connect`}),` and allow access in Attio.`]})})]}),`\n`,_jsx(Heading,{level:`2`,id:`permissions`,children:`Permissions`}),`\n`,_jsx(_components.p,{children:`OAuth connections request the following scopes. With an API key, you choose the scopes when you create the key in Attio.`}),`\n`,_jsxs(Table,{children:[_jsx(_components.thead,{children:_jsxs(_components.tr,{children:[_jsx(_components.th,{children:`Permission`}),_jsx(_components.th,{children:`Access`}),_jsx(_components.th,{children:`Description`})]})}),_jsxs(_components.tbody,{children:[_jsxs(_components.tr,{children:[_jsx(_components.td,{children:`Records`}),_jsx(_components.td,{children:`Read \u0026 write`}),_jsx(_components.td,{children:`Contacts, companies, and deals`})]}),_jsxs(_components.tr,{children:[_jsx(_components.td,{children:`Object configuration`}),_jsx(_components.td,{children:`Read \u0026 write`}),_jsx(_components.td,{children:`Custom objects and attributes`})]}),_jsxs(_components.tr,{children:[_jsx(_components.td,{children:`List entries`}),_jsx(_components.td,{children:`Read \u0026 write`}),_jsx(_components.td,{children:`Entries in lists`})]}),_jsxs(_components.tr,{children:[_jsx(_components.td,{children:`List configuration`}),_jsx(_components.td,{children:`Read \u0026 write`}),_jsx(_components.td,{children:`Lists and their columns`})]}),_jsxs(_components.tr,{children:[_jsx(_components.td,{children:`Notes`}),_jsx(_components.td,{children:`Read \u0026 write`}),_jsx(_components.td,{children:`Notes on records`})]}),_jsxs(_components.tr,{children:[_jsx(_components.td,{children:`Tasks`}),_jsx(_components.td,{children:`Read \u0026 write`}),_jsx(_components.td,{children:`Tasks and assignments`})]}),_jsxs(_components.tr,{children:[_jsx(_components.td,{children:`Comments`}),_jsx(_components.td,{children:`Read \u0026 write`}),_jsx(_components.td,{children:`Threads and comments`})]}),_jsxs(_components.tr,{children:[_jsx(_components.td,{children:`Files`}),_jsx(_components.td,{children:`Read \u0026 write`}),_jsx(_components.td,{children:`Upload and view files`})]}),_jsxs(_components.tr,{children:[_jsx(_components.td,{children:`Webhooks`}),_jsx(_components.td,{children:`Read \u0026 write`}),_jsx(_components.td,{children:`Manage webhooks`})]}),_jsxs(_components.tr,{children:[_jsx(_components.td,{children:`User management`}),_jsx(_components.td,{children:`Read`}),_jsx(_components.td,{children:`View workspace members`})]}),_jsxs(_components.tr,{children:[_jsx(_components.td,{children:`Meetings`}),_jsx(_components.td,{children:`Read \u0026 write`}),_jsx(_components.td,{children:`View and manage meetings`})]}),_jsxs(_components.tr,{children:[_jsx(_components.td,{children:`Call recordings`}),_jsx(_components.td,{children:`Read`}),_jsx(_components.td,{children:`Transcripts and speakers`})]})]})]}),`\n`,_jsx(Heading,{level:`2`,id:`what-agents-can-do`,children:`What agents can do`}),`\n`,_jsxs(_components.ul,{children:[`\n`,_jsx(_components.li,{children:`Search and manage contacts, companies, and deals`}),`\n`,_jsx(_components.li,{children:`Create and update records, custom objects, and attributes`}),`\n`,_jsx(_components.li,{children:`Organize lists and list entries`}),`\n`,_jsx(_components.li,{children:`Add notes, tasks, and comments to records`}),`\n`,_jsx(_components.li,{children:`Upload and read files attached to records`}),`\n`,_jsx(_components.li,{children:`Read meeting details and call recording transcripts`}),`\n`,_jsx(_components.li,{children:`Manage webhooks for real-time updates`}),`\n`]}),`\n`,_jsx(Heading,{level:`2`,id:`disconnecting`,children:`Disconnecting`}),`\n`,_jsx(_components.p,{children:`You can disconnect Attio at any time.`}),`\n`,_jsx(_components.p,{children:_jsx(_components.strong,{children:`OAuth connections`})}),`\n`,_jsxs(_components.ul,{children:[`\n`,_jsxs(_components.li,{children:[`In Buckle, open `,_jsx(_components.strong,{children:`Settings`}),` > `,_jsx(_components.strong,{children:`Apps`}),` > `,_jsx(_components.strong,{children:`Attio`}),` and remove the connection.`]}),`\n`,_jsx(_components.li,{children:`In Attio, you can also revoke access by uninstalling Buckle from the installed apps section of your workspace settings.`}),`\n`]}),`\n`,_jsx(_components.p,{children:_jsx(_components.strong,{children:`API key connections`})}),`\n`,_jsxs(_components.ul,{children:[`\n`,_jsxs(_components.li,{children:[`In Buckle, open `,_jsx(_components.strong,{children:`Settings`}),` > `,_jsx(_components.strong,{children:`Apps`}),` > `,_jsx(_components.strong,{children:`Attio`}),` and remove the connection.`]}),`\n`,_jsx(_components.li,{children:`In Attio, revoke or delete the API key so it can no longer be used.`}),`\n`]}),`\n`,_jsx(Heading,{level:`2`,id:`controlling-access`,children:`Controlling access`}),`\n`,_jsxs(_components.p,{children:[`Access is per agent: `,_jsx(_components.a,{href:`/guides/agent-access`,children:`grant`}),` the connection to each agent that needs it, choosing per tool what runs freely, what needs human approval, and what stays blocked — a read-only agent is a single grant. Organization `,_jsx(_components.a,{href:`/guides/rules`,children:`rules`}),` add guardrails on top, like rate limits and blanket blocks. Everything is checked before credential injection, so a blocked request never reaches Attio.`]}),`\n`,_jsx(Heading,{level:`2`,id:`faq`,children:`FAQ`}),`\n`,_jsxs(AccordionGroup,{children:[_jsx(Accordion,{title:`Should I use OAuth or an API key for Attio?`,id:`should-i-use-oauth-or-an-api-key-for-attio`,children:_jsxs(_components.p,{children:[`OAuth works out of the box. Use a scoped API key when you want the agent to reach less than the full OAuth scope set, such as a read-only key. See `,_jsx(_components.a,{href:`#configure`,children:`Configure`}),`.`]})}),_jsx(Accordion,{title:`How do I rotate an Attio API key?`,id:`how-do-i-rotate-an-attio-api-key`,children:_jsxs(_components.p,{children:[`Create a new key in Attio, then paste it into `,_jsx(_components.strong,{children:`Settings`}),` > `,_jsx(_components.strong,{children:`Apps`}),` > `,_jsx(_components.strong,{children:`Attio`}),` in Buckle. Agents pick up the new key automatically. OAuth tokens are refreshed for you.`]})}),_jsx(Accordion,{title:`Does the agent see my Attio token?`,id:`does-the-agent-see-my-attio-token`,children:_jsxs(_components.p,{children:[`No. Credentials are encrypted at rest and only decrypted inside the gateway at request time. See `,_jsx(_components.a,{href:`/how-it-works`,children:`How it works`}),`.`]})})]})]})}function MDXContent(props={}){const{wrapper:MDXLayout}={..._provideComponents(),...props.components};return MDXLayout?_jsx(MDXLayout,{...props,children:_jsx(_createMdxContent,{...props})}):_createMdxContent(props)}return{default:MDXContent};function _missingMdxReference(id,component){throw new Error(`Expected `+(component?`component`:`object`)+\" `\"+id+\"` to be defined: you likely forgot to import, pass, or provide it.\")}","frontmatter":{},"scope":{"config":{},"pageMetadata":{"title":"Let AI Agents Manage Attio CRM Records","sidebarTitle":"Attio","description":"Let agents manage Attio contacts, companies, deals, notes, and tasks. Connect with OAuth or a scoped API key that the gateway keeps out of the agent.","canonical":"https://buckle.dev/docs/integrations/attio","href":"/integrations/attio"}}},"mdxSourceWithNoJs":null},"mdxExtracts":{"tableOfContents":[{"title":"Overview","slug":"overview","depth":2,"children":[]},{"title":"What you will set up","slug":"what-you-will-set-up","depth":2,"children":[]},{"title":"How it works","slug":"how-it-works","depth":2,"children":[]},{"title":"Setup","slug":"setup","depth":2,"children":[]},{"title":"Configure","slug":"configure","depth":2,"children":[]},{"title":"Self-hosted: use your own Attio app","slug":"self-hosted-use-your-own-attio-app","depth":2,"children":[]},{"title":"Permissions","slug":"permissions","depth":2,"children":[]},{"title":"What agents can do","slug":"what-agents-can-do","depth":2,"children":[]},{"title":"Disconnecting","slug":"disconnecting","depth":2,"children":[]},{"title":"Controlling access","slug":"controlling-access","depth":2,"children":[]},{"title":"FAQ","slug":"faq","depth":2,"children":[]}],"codeExamples":{}},"jsLinks":["/docs/_mintlify/custom/onecli-17d3f772/e8c5fc0faf4d8de9/infra/cloudfront/docs-response-headers.js"],"subdomain":"onecli-17d3f772","siteName":"Buckle","title":"Let AI Agents Manage Attio CRM Records - Buckle","navMaps":{"firstHrefInVersion":{},"firstHrefInLanguage":{}},"lastModified":"2026-11-15T13:34:02.491Z","originalFileLocation":"integrations/attio.mdx"},"headHtml":"\u003cscript data-mint-head>(function(){var d=document.documentElement,p=null;if(!p){try{p=localStorage.getItem(\"isDarkMode\")}catch(e){}if(p==='true')p='dark';else if(p==='false')p='light';if(p!=='light'\u0026\u0026p!=='dark'\u0026\u0026p!=='system')p=\"light\"}var r=p==='system'?(matchMedia(\"(prefers-color-scheme: dark)\").matches?'dark':'light'):p;d.classList.remove(r==='dark'?'light':'dark');d.classList.add(r);d.setAttribute(\"data-theme-preference\",p)})();\u003c/script>\u003cmeta data-mint-head name=\"description\" content=\"Let agents manage Attio contacts, companies, deals, notes, and tasks. Connect with OAuth or a scoped API key that the gateway keeps out of the agent.\">\u003cmeta data-mint-head name=\"application-name\" content=\"Buckle\">\u003cmeta data-mint-head name=\"generator\" content=\"Mintlify\">\u003clink data-mint-head rel=\"icon\" type=\"image/png\" sizes=\"192x192\" href=\"/docs/mintlify-assets/_mintlify/favicons/onecli-17d3f772/eFiEtTXh_9JK0wwc/_generated/favicon/android-chrome-192x192.png\" media=\"(prefers-color-scheme: light)\">\u003clink data-mint-head rel=\"apple-touch-icon\" type=\"image/png\" sizes=\"180x180\" href=\"/docs/mintlify-assets/_mintlify/favicons/onecli-17d3f772/eFiEtTXh_9JK0wwc/_generated/favicon/apple-touch-icon.png\">\u003clink data-mint-head rel=\"icon\" type=\"image/png\" sizes=\"16x16\" href=\"/docs/mintlify-assets/_mintlify/favicons/onecli-17d3f772/eFiEtTXh_9JK0wwc/_generated/favicon/favicon-16x16.png\" media=\"(prefers-color-scheme: light)\">\u003clink data-mint-head rel=\"icon\" type=\"image/png\" sizes=\"32x32\" href=\"/docs/mintlify-assets/_mintlify/favicons/onecli-17d3f772/eFiEtTXh_9JK0wwc/_generated/favicon/favicon-32x32.png\" media=\"(prefers-color-scheme: light)\">\u003clink data-mint-head rel=\"shortcut icon\" type=\"image/x-icon\" href=\"/docs/mintlify-assets/_mintlify/favicons/onecli-17d3f772/eFiEtTXh_9JK0wwc/_generated/favicon/favicon.ico\" media=\"(prefers-color-scheme: light)\">\u003clink data-mint-head rel=\"icon\" type=\"image/png\" sizes=\"192x192\" href=\"/docs/mintlify-assets/_mintlify/favicons/onecli-17d3f772/eFiEtTXh_9JK0wwc/_generated/favicon-dark/android-chrome-192x192.png\" media=\"(prefers-color-scheme: dark)\">\u003clink data-mint-head rel=\"icon\" type=\"image/png\" sizes=\"16x16\" href=\"/docs/mintlify-assets/_mintlify/favicons/onecli-17d3f772/eFiEtTXh_9JK0wwc/_generated/favicon-dark/favicon-16x16.png\" media=\"(prefers-color-scheme: dark)\">\u003clink data-mint-head rel=\"icon\" type=\"image/png\" sizes=\"32x32\" href=\"/docs/mintlify-assets/_mintlify/favicons/onecli-17d3f772/eFiEtTXh_9JK0wwc/_generated/favicon-dark/favicon-32x32.png\" media=\"(prefers-color-scheme: dark)\">\u003clink data-mint-head rel=\"shortcut icon\" type=\"image/x-icon\" href=\"/docs/mintlify-assets/_mintlify/favicons/onecli-17d3f772/eFiEtTXh_9JK0wwc/_generated/favicon-dark/favicon.ico\" media=\"(prefers-color-scheme: dark)\">\u003cmeta data-mint-head property=\"og:title\" content=\"Let AI Agents Manage Attio CRM Records - Buckle\">\u003cmeta data-mint-head property=\"og:description\" content=\"Let agents manage Attio contacts, companies, deals, notes, and tasks. Connect with OAuth or a scoped API key that the gateway keeps out of the agent.\">\u003cmeta data-mint-head property=\"og:site_name\" content=\"Buckle\">\u003cmeta data-mint-head property=\"og:url\" content=\"https://buckle.dev/docs/integrations/attio\">\u003cmeta data-mint-head property=\"og:type\" content=\"website\">\u003cmeta data-mint-head property=\"og:image\" content=\"https://onecli-17d3f772.mintlify.site/docs/_mintlify/api/og/v2?division=All+app+connections\u0026amp;title=Let+AI+Agents+Manage+Attio+CRM+Records\u0026amp;description=Let+agents+manage+Attio+contacts%2C+companies%2C+deals%2C+notes%2C+and+tasks.+Connect+with+OAuth+or+a+scoped+API+key+that+the+gateway+keeps+out+of+the+agent.\u0026amp;theme=14ca75cbbb2a0e9ba5cd5703\u0026amp;signature=6af718710ba15b2afdf02c0623f60762c6f4cbabae797ad290c9884e53c37218\">\u003cmeta data-mint-head property=\"og:image:width\" content=\"1200\">\u003cmeta data-mint-head property=\"og:image:height\" content=\"630\">\u003cmeta data-mint-head name=\"twitter:card\" content=\"summary_large_image\">\u003cmeta data-mint-head name=\"twitter:title\" content=\"Let AI Agents Manage Attio CRM Records - Buckle\">\u003cmeta data-mint-head name=\"twitter:description\" content=\"Let agents manage Attio contacts, companies, deals, notes, and tasks. Connect with OAuth or a scoped API key that the gateway keeps out of the agent.\">\u003cmeta data-mint-head name=\"twitter:image\" content=\"https://onecli-17d3f772.mintlify.site/docs/_mintlify/api/og/v2?division=All+app+connections\u0026amp;title=Let+AI+Agents+Manage+Attio+CRM+Records\u0026amp;description=Let+agents+manage+Attio+contacts%2C+companies%2C+deals%2C+notes%2C+and+tasks.+Connect+with+OAuth+or+a+scoped+API+key+that+the+gateway+keeps+out+of+the+agent.\u0026amp;theme=14ca75cbbb2a0e9ba5cd5703\u0026amp;signature=6af718710ba15b2afdf02c0623f60762c6f4cbabae797ad290c9884e53c37218\">\u003cmeta data-mint-head name=\"twitter:image:width\" content=\"1200\">\u003cmeta data-mint-head name=\"twitter:image:height\" content=\"630\">\u003cmeta data-mint-head name=\"msapplication-config\" content=\"/docs/mintlify-assets/_mintlify/favicons/onecli-17d3f772/eFiEtTXh_9JK0wwc/_generated/favicon/browserconfig.xml\">\u003cmeta data-mint-head name=\"apple-mobile-web-app-title\" content=\"Buckle\">\u003cmeta data-mint-head name=\"msapplication-TileColor\" content=\"#ff6a13\">\u003clink data-mint-head rel=\"canonical\" href=\"https://buckle.dev/docs/integrations/attio\">\u003clink data-mint-head rel=\"alternate\" type=\"application/xml\" href=\"/docs/sitemap.xml\">\u003clink data-mint-head rel=\"alternate\" type=\"text/markdown\" href=\"/docs/integrations/attio.md\">\u003cscript data-mint-head type=\"application/ld+json\">{\"@context\":\"https://schema.org\",\"@graph\":[{\"@type\":\"Organization\",\"@id\":\"https://onecli-17d3f772.mintlify.dev/#organization\",\"name\":\"Buckle\",\"url\":\"https://onecli-17d3f772.mintlify.dev\",\"logo\":{\"@type\":\"ImageObject\",\"url\":\"https://mintcdn.com/onecli-17d3f772/5_AFCR2UNaqNo0AT/logo/logo-full-light.svg?fit=max\u0026auto=format\u0026n=5_AFCR2UNaqNo0AT\u0026q=85\u0026s=30ceea1dd3505e0e9dea50b544521ced\"}},{\"@type\":\"WebSite\",\"@id\":\"https://onecli-17d3f772.mintlify.dev/docs#website\",\"name\":\"Buckle\",\"url\":\"https://onecli-17d3f772.mintlify.dev/docs\",\"publisher\":{\"@id\":\"https://onecli-17d3f772.mintlify.dev/#organization\"}},{\"@type\":\"WebPage\",\"@id\":\"https://buckle.dev/docs/integrations/attio#webpage\",\"url\":\"https://buckle.dev/docs/integrations/attio\",\"name\":\"Let AI Agents Manage Attio CRM Records\",\"description\":\"Let agents manage Attio contacts, companies, deals, notes, and tasks. Connect with OAuth or a scoped API key that the gateway keeps out of the agent.\",\"dateModified\":\"2026-11-15T13:34:02.491Z\",\"isPartOf\":{\"@id\":\"https://onecli-17d3f772.mintlify.dev/docs#website\"},\"breadcrumb\":{\"@id\":\"https://buckle.dev/docs/integrations/attio#breadcrumb\"}},{\"@type\":\"BreadcrumbList\",\"@id\":\"https://buckle.dev/docs/integrations/attio#breadcrumb\",\"itemListElement\":[{\"@type\":\"ListItem\",\"position\":1,\"name\":\"All app connections\",\"item\":\"https://onecli-17d3f772.mintlify.dev/docs/integrations/affinity\"},{\"@type\":\"ListItem\",\"position\":2,\"name\":\"Let AI Agents Manage Attio CRM Records\",\"item\":\"https://buckle.dev/docs/integrations/attio\"}]},{\"@type\":[\"Article\",\"TechArticle\"],\"@id\":\"https://buckle.dev/docs/integrations/attio#article\",\"headline\":\"Let AI Agents Manage Attio CRM Records\",\"name\":\"Let AI Agents Manage Attio CRM Records\",\"description\":\"Let agents manage Attio contacts, companies, deals, notes, and tasks. Connect with OAuth or a scoped API key that the gateway keeps out of the agent.\",\"url\":\"https://buckle.dev/docs/integrations/attio\",\"mainEntityOfPage\":{\"@id\":\"https://buckle.dev/docs/integrations/attio#webpage\"},\"dateModified\":\"2026-11-15T13:34:02.491Z\",\"publisher\":{\"@id\":\"https://onecli-17d3f772.mintlify.dev/#organization\"},\"isPartOf\":{\"@id\":\"https://onecli-17d3f772.mintlify.dev/docs#website\"}}]}\u003c/script>\u003cscript data-mint-head type=\"application/ld+json\">{\"@context\":\"https://schema.org\",\"@type\":\"WebSite\",\"name\":\"Buckle\",\"publisher\":{\"@type\":\"Organization\",\"name\":\"Buckle\"},\"provider\":{\"@type\":\"Organization\",\"name\":\"Mintlify\",\"url\":\"https://mintlify.com\"}}\u003c/script>","agentPointerHref":"/docs/integrations/attio.md","siteName":"Buckle","nav":{"global":{"anchors":[{"anchor":"GitHub","icon":"https://mintlify.s3.us-west-1.amazonaws.com/onecli-17d3f772/images/github.svg","href":"https://github.com/buckle"}]},"tabs":[{"tab":"Documentation","pages":[{"title":"Documentation","href":""}]},{"tab":"Integrations","groups":[{"group":"Integrations","root":{"title":"Integrations: Connect Agents to External Services","sidebarTitle":"Overview","href":"/integrations"},"pages":[{"title":"App Connections: How OAuth \u0026 API Keys Work","sidebarTitle":"App Connections","href":"/integrations/app-connections"},{"title":"Custom Connections: Connect Any API With a Key","sidebarTitle":"Custom connections","href":"/integrations/custom-connections"},{"title":"Chat With AI Agents and Approve Actions in Slack","sidebarTitle":"Slack","href":"/integrations/slack"},{"title":"Keep LLM API Keys Out of Your AI Agents","sidebarTitle":"LLMs","href":"/integrations/llms"},{"title":"External Vaults: Connect Password Managers","sidebarTitle":"External Vaults","href":"/vaults/overview"}]},{"group":"Cloud integrations","pages":[{"title":"Prospect and Enrich Leads in Apollo.io With Agents","sidebarTitle":"Apollo.io","href":"/integrations/apollo-io"},{"title":"Use AWS From AI Agents Without Exposing Keys","sidebarTitle":"AWS","href":"/integrations/aws"},{"title":"Let AI Agents Open PRs and Issues on GitHub","sidebarTitle":"GitHub","href":"/integrations/github"},{"title":"Org-Approved GitHub Repo Access for AI Agents","sidebarTitle":"GitHub App","href":"/integrations/github-app"},{"title":"Let AI Agents Query Datadog Metrics and Monitors","sidebarTitle":"Datadog","href":"/integrations/datadog"},{"title":"Let AI Agents Update HubSpot CRM Records","sidebarTitle":"HubSpot","href":"/integrations/hubspot"},{"title":"Let AI Agents Triage Sentry Errors","sidebarTitle":"Sentry","href":"/integrations/sentry"},{"title":"Let AI Agents Read and Write OneNote Notebooks","sidebarTitle":"Microsoft OneNote","href":"/integrations/microsoft-onenote"},{"title":"Connect AI Agents to Outlook Mail in Microsoft 365","sidebarTitle":"Outlook Mail","href":"/integrations/outlook-mail"},{"title":"Let AI Agents Book Meetings in Outlook Calendar","sidebarTitle":"Outlook Calendar","href":"/integrations/outlook-calendar"}]},{"group":"All app connections","pages":[{"title":"Connect AI Agents to Affinity CRM With an API Key","sidebarTitle":"Affinity","description":"Let agents look up contacts, update deal pipelines, and log interactions in Affinity. The gateway injects your API key, so agents never handle it.","href":"/integrations/affinity"},{"title":"Let AI Agents Manage Attio CRM Records","sidebarTitle":"Attio","href":"/integrations/attio"},{"title":"Run Clay Enrichment From AI Agents","sidebarTitle":"Clay","description":"Let agents search Clay's people and company data, run enrichment routines, and query tables. The gateway injects your API key so agents never see it.","href":"/integrations/clay"},{"title":"Query PostHog Analytics and Flags From Agents","sidebarTitle":"PostHog","href":"/integrations/posthog"},{"title":"Connect AI Agents to Salesforce With an External App","sidebarTitle":"Salesforce","href":"/integrations/salesforce"},{"title":"Turn Timeless Meetings Into Agent Follow-Ups","sidebarTitle":"Timeless","href":"/integrations/timeless"},{"title":"Let Agents Search Circleback Meeting Notes","sidebarTitle":"Circleback","href":"/integrations/circleback"},{"title":"Run HeyReach LinkedIn Campaigns From AI Agents","sidebarTitle":"HeyReach","href":"/integrations/heyreach"},{"title":"Automate Dripify LinkedIn Outreach With Agents","sidebarTitle":"Dripify","href":"/integrations/dripify"},{"title":"Let On-Call Agents Triage PagerDuty Incidents","sidebarTitle":"PagerDuty","href":"/integrations/pagerduty"},{"title":"Query Coralogix Logs and Metrics From Agents","sidebarTitle":"Coralogix","href":"/integrations/coralogix"},{"title":"Search Company Knowledge in Onyx From Agents","sidebarTitle":"Onyx","href":"/integrations/onyx"},{"title":"Scoped Cloudflare API Tokens for AI Agents","sidebarTitle":"Cloudflare","href":"/integrations/cloudflare"},{"title":"Set Up One Google OAuth Client for All Google Apps","sidebarTitle":"Google (setup)","href":"/integrations/google"},{"title":"Let AI Agents Search, Draft, and Send Gmail","sidebarTitle":"Gmail","href":"/integrations/gmail"},{"title":"Let AI Agents Schedule Meetings in Google Calendar","sidebarTitle":"Google Calendar","href":"/integrations/google-calendar"},{"title":"Give AI Agents Access to Google Drive Files","sidebarTitle":"Google Drive","href":"/integrations/google-drive"},{"title":"Let AI Agents Draft and Edit Google Docs","sidebarTitle":"Google Docs","href":"/integrations/google-docs"},{"title":"Let AI Agents Read and Update Google Sheets","sidebarTitle":"Google Sheets","href":"/integrations/google-sheets"},{"title":"Generate Google Slides Decks With AI Agents","sidebarTitle":"Google Slides","href":"/integrations/google-slides"},{"title":"Build Google Forms and Read Responses With Agents","sidebarTitle":"Google Forms","href":"/integrations/google-forms"},{"title":"Create Google Meet Links From AI Agents","sidebarTitle":"Google Meet","href":"/integrations/google-meet"},{"title":"Search and Organize Google Photos With AI Agents","sidebarTitle":"Google Photos","href":"/integrations/google-photos"},{"title":"Track To-Dos in Google Tasks From AI Agents","sidebarTitle":"Google Tasks","href":"/integrations/google-tasks"},{"title":"Automate Google Workspace User Admin With Agents","sidebarTitle":"Google Admin","href":"/integrations/google-admin"},{"title":"Pull GA4 Reports Into AI Agents","sidebarTitle":"Google Analytics","href":"/integrations/google-analytics"},{"title":"Let AI Agents Check Indexing in Search Console","sidebarTitle":"Google Search Console","href":"/integrations/google-search-console"},{"title":"Automate Google Classroom Coursework With Agents","sidebarTitle":"Google Classroom","href":"/integrations/google-classroom"},{"title":"Manage YouTube Playlists and Analytics With Agents","sidebarTitle":"YouTube","href":"/integrations/youtube"},{"title":"Let AI Agents Search and Update Notion Pages","sidebarTitle":"Notion","href":"/integrations/notion"},{"title":"Let AI Agents Create and Triage Jira Issues","sidebarTitle":"Jira","href":"/integrations/jira"},{"title":"Give AI Agents Search and Edit Access to Confluence","sidebarTitle":"Confluence","href":"/integrations/confluence"},{"title":"Let AI Agents Manage Your Todoist Tasks","sidebarTitle":"Todoist","href":"/integrations/todoist"},{"title":"Give AI Agents Safe Access to Your Dropbox Files","sidebarTitle":"Dropbox","href":"/integrations/dropbox"},{"title":"Deploy to Fly.io From an Agent Without Exposing Tokens","sidebarTitle":"Fly.io","href":"/integrations/flyio"},{"title":"Let AI Agents Post to LinkedIn on Your Behalf","sidebarTitle":"LinkedIn","href":"/integrations/linkedin"},{"title":"Connect AI Agents to Monday.com Boards","sidebarTitle":"Monday.com","href":"/integrations/monday"},{"title":"Administer MongoDB Atlas Clusters With Agents","sidebarTitle":"MongoDB Atlas","href":"/integrations/mongodb-atlas"},{"title":"Sync Navan Bookings and Expenses With AI Agents","sidebarTitle":"Navan","href":"/integrations/navan"},{"title":"Let AI Agents Send Email With Resend","sidebarTitle":"Resend","href":"/integrations/resend"},{"title":"Send SMS and WhatsApp From AI Agents With Twilio","sidebarTitle":"Twilio","href":"/integrations/twilio"},{"title":"Zendesk Integration: Tickets and Help Center","sidebarTitle":"Zendesk","href":"/integrations/zendesk"},{"title":"Manage Supabase Projects With AI Agents","sidebarTitle":"Supabase","href":"/integrations/supabase"},{"title":"Call Claude and Gemini on Vertex AI From Agents","sidebarTitle":"Vertex AI","href":"/integrations/vertex-ai"},{"title":"Let AI Agents Edit Webflow CMS and Publish Sites","sidebarTitle":"Webflow","href":"/integrations/webflow"},{"title":"Let AI Agents Schedule Zoom Meetings and Get Recordings","sidebarTitle":"Zoom","href":"/integrations/zoom"},{"title":"Give Agents AWS Access With an IAM Role, Not Keys","sidebarTitle":"AWS Role","href":"/integrations/aws-role"},{"title":"Bitbucket Repos, Pull Requests, and Pipelines","sidebarTitle":"Bitbucket","href":"/integrations/bitbucket"},{"title":"Manage Docker Hub Repositories From AI Agents","sidebarTitle":"Docker Hub","href":"/integrations/docker"},{"title":"Read Fathom Meeting Summaries From AI Agents","sidebarTitle":"Fathom","href":"/integrations/fathom"},{"title":"Give AI Agents Access to Fireflies Transcripts","sidebarTitle":"Fireflies","href":"/integrations/fireflies"},{"title":"Let AI Agents Work With GitLab Merge Requests","sidebarTitle":"GitLab","href":"/integrations/gitlab"},{"title":"Send Google Chat Messages From AI Agents","sidebarTitle":"Google Chat","href":"/integrations/google-chat"},{"title":"Let AI Agents Look Up and Update Google Contacts","sidebarTitle":"Google Contacts","href":"/integrations/google-contacts"},{"title":"Let AI Agents Read Your Granola Meeting Notes","sidebarTitle":"Granola","href":"/integrations/granola"},{"title":"Route Agent Package Installs Through JFrog","sidebarTitle":"JFrog Artifactory","href":"/integrations/jfrog-artifactory"},{"title":"Let AI Agents File and Update Linear Issues","sidebarTitle":"Linear","href":"/integrations/linear"},{"title":"Run Snowflake SQL From an Agent, Token Hidden","sidebarTitle":"Snowflake","href":"/integrations/snowflake"},{"title":"Use a Restricted Stripe Key With AI Agents","sidebarTitle":"Stripe","href":"/integrations/stripe"},{"title":"Let AI Agents Manage Trello Boards and Cards","sidebarTitle":"Trello","href":"/integrations/trello"},{"title":"Let AI Agents Deploy and Manage Vercel Projects","sidebarTitle":"Vercel","href":"/integrations/vercel"},{"title":"Let AI Agents Post and Read on X (Twitter)","sidebarTitle":"X","href":"/integrations/x"},{"title":"Let AI Agents Work Zoho CRM Leads and Deals","sidebarTitle":"Zoho CRM","href":"/integrations/zoho-crm"},{"title":"Let AI Agents Draft Word Docs in OneDrive","sidebarTitle":"Microsoft Word","href":"/integrations/microsoft-word"}]},{"group":"LLMs","pages":[{"title":"Connect Claude to Agents With a Token or API Key","sidebarTitle":"Anthropic","href":"/integrations/anthropic"},{"title":"Use OpenAI API Keys and Codex OAuth With AI Agents","sidebarTitle":"OpenAI","href":"/integrations/openai"}]},{"group":"External Vaults","pages":[{"title":"Bitwarden Vault: Sync Secrets to the Gateway","sidebarTitle":"Bitwarden","href":"/vaults/bitwarden"},{"title":"1Password Vault: Service Account Integration","sidebarTitle":"1Password","href":"/vaults/1password"}]}]},{"tab":"Guides","pages":[{"title":"Guides","href":"/guides"}]},{"tab":"API Reference","pages":[{"title":"API Reference","href":"/api-reference"}]},{"tab":"SDKs","pages":[{"title":"SDKs","href":"/sdks"}]}]},"basePath":"","title":"Let AI Agents Manage Attio CRM Records - Buckle","buildId":"dpl_Aw98ji4XvBsgtZwL1VrkUF9ehFqz","deploymentId":"dpl_Aw98ji4XvBsgtZwL1VrkUF9ehFqz","dynamics":["07c022d89b","a74be98ba7"],"chunks":["Frame-0domioUa.js","DynamicMarkdown-BcGRTrw6.js","zoom-image-lightbox-DsiWwPWR.js","lightbox-handle-r17bVUz3.js"]}